
Related Manuals for Euromatic DF-HT5313P


Summary of Contents for Euromatic DF-HT5313P
- Page 1 Digital Ceramic Tower Heater USER MANUAL Model Number DF-HT5313P After Sales Support (AU) 1300 886 649 (NZ) 0800 836 761 | info@tempo.org E209...
-
Page 2: Table Of Contents
Contents Important Safety Instructions Product Overview Getting Started Operating Instructions Other Useful Information After Sales Support (AU) 1300 886 649 (NZ) 0800 836 761 | info@tempo.org... -
Page 3: Important Safety Instructions
Important Safety Instructions READ CAREFULLY AND KEEP FOR FUTURE REFERENCE Read this manual thoroughly before first use, even if you are familiar with this type of product. The safety precautions enclosed herein reduce the risk of fire, electric shock and injury when correctly adhered to. Make sure you understand all instructions and warnings. - Page 4 Important Safety Instructions (Cont.) WARNING: Damaged heater: Do not pick up or operate the appliance if the • power supply cord, plug or housing is damaged, after it malfunctions, or has been dropped or damaged in any manner. • Plug: It is normal for the plug to feel warm to the touch; however, a loose fit between the AC outlet and plug may cause overheating and distortion of the plug.
- Page 5 Important Safety Instructions (Cont.) WARNING: Do not leave on unattended: Do not use this heater in small • rooms when they are occupied by persons not capable of leaving the room on their own, unless constant supervision is provided. • Usage restriction: This appliance is not intended for use by persons (including children) with reduced physical, sensory or mental capabilities, or lack of expe- rience and knowledge, unless they have been given supervision or instruction concerning use of the appliance by a person responsible for their safety.
-
Page 6: Product Overview
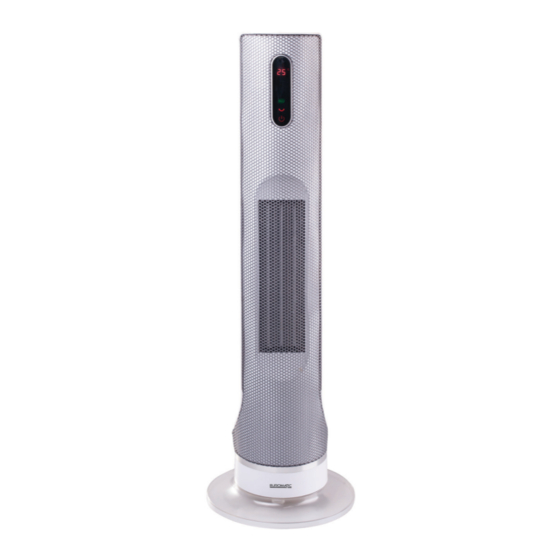
Product Overview Front view Rear view Scope of delivery (A) Heater parts Control panel Digital display panel Protective metal grille Air outlet Base of the heater Detachable stand Integrated handle and remote control storage slot Air intake with dust filter ON/OFF switch 10 Power cord and plug... - Page 7 Product Overview (Cont.) Remote control Display panel 11 Remote control and control panel buttons 12 POWER button 13 SWING button 14 PLUS button 15 MINUS button 19 Display panel indicators 16 HEAT LEVEL button 17 SET button 20 Signal receiver 18 ECO button 21 Temperature / time display 22 High heat level indicator...
-
Page 8: Getting Started
Getting Started Unpacking • Unpack: This product has been packaged to protect it against transportation damage. Unpack the appliance and keep the original packaging carton and materials in a safe place. It will help prevent any damage if the product needs to be transported in the future, and you can use it to store the appliance when it is not in use. -
Page 9: Operating Instructions
Operating Instructions When turning your heater on for the first time it is normal for the heater to emit a ‘new heater’ smell, which will quickly pass. This is no cause for concern. Ensure good ventilation. Connection • Plug the heater into an appropriate power outlet and switch on power to the outlet. - Page 10 Operating Instructions (Cont.) Heat level • In working condition, press the HEAT LEVEL [ ] button to select high or low heating power. • Operated at low (approx. 1700W) heating power, the light will illuminate on the display. • Operated at high (approx. 2400W) heating power, the light will illuminate on the display.
- Page 11 Operating Instructions (Cont.) Temperature setting • In working condition, press the SET [ ] button to enter into temperature setting mode. The temperature indicator [ °C ] will light up and the default temperature will start flashing on the display. •...
- Page 12 Operating Instructions (Cont.) Safety features Overheat protection and prevention An internal overheat protection system will shut down power to the appliance if the internal parts get too hot. All indicators will extinguish and all functions will stop. The internal temperature must have dropped to a safe level before the heater will restart.
-
Page 13: Other Useful Information
Other Useful Information CAUTION! • Always switch off and disconnect the appliance from the power supply before attempting any maintenance or cleaning the heater. • Do not attempt to open the heater and repair it yourself. Any repairs must be carried out by a qualified technician. Troubleshooting If your heater fails to operate, or you experience any other problem with the appliance, do not attempt to repair the heater yourself. - Page 14 Other Useful Information (Cont.) Battery replacement If the battery in the remote control is flat, a new CR2032 (or equivalent) battery needs to be inserted. Follow the instructions below, as illustrated. • Push the locking tab to one side and pull out the battery holder at the back side of remote control.
- Page 15 Other Useful Information (Cont.) Storage • If you are not going to use the heater for a while, please unplug it at the wall outlet. • Clean the appliance as described on page 12, then store it in its original packaging carton.
- Page 16 Warranty returns Should you for any reason need to return this product for a warranty claim, make sure to include all accessories with the product. Product does not work? If you encounter problems with this product, or if it fails to perform to your expectations, make sure to contact our After Sales Support Centre on (AU) 1300 886 649 or (NZ) 0800 836 761 for advice.
Need help?
Do you have a question about the DF-HT5313P and is the answer not in the manual?
Questions and answers