
Subscribe to Our Youtube Channel
Related Manuals for Euromatic RCH22W


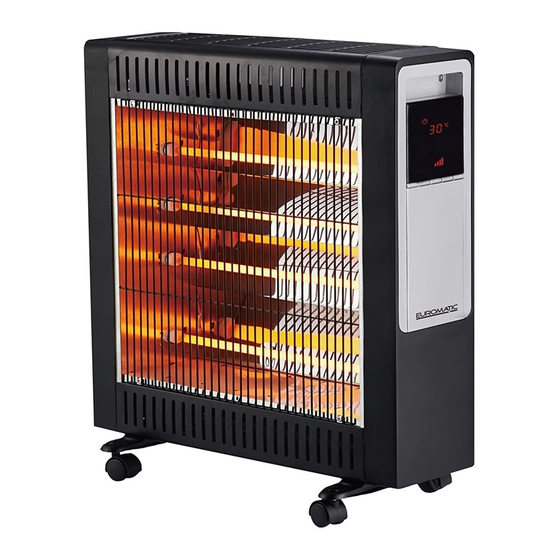
Summary of Contents for Euromatic RCH22W
- Page 1 Radiant Convection Heater INSTRUCTION MANUAL Model Number RCH22W AFTER SALES SUPPORT (AU) 1300 886 649 (NZ) 0800 836 761...
-
Page 2: Table Of Contents
Contents Important Safety Instructions Product Overview Getting Started Instructions Other Useful Information After Sales Support (AU) 1300 886 649 (NZ) 0800 836 761 | info@tempo.org... -
Page 3: Important Safety Instructions
Important Safety Instructions READ CAREFULLY AND KEEP FOR FUTURE REFERENCE Read this manual thoroughly before first use, even if you are familiar with this type of product. The safety precautions enclosed herein reduce the risk of fire, electric shock and injury when correctly adhered to. Make sure you understand all instructions and warnings. - Page 4 Important Safety Instructions (Cont.) • Plug: It is normal for the plug to feel warm to the touch; however, a loose fit between the AC outlet and plug may cause overheating and distortion of the plug. Contact a qualified electrician to replace a loose or worn outlet. •...
- Page 5 Important Safety Instructions (Cont.) • Accessories: Do not use attachments not recommended by the manufacturer, as a risk of fire, electric shock, or serious personal injury may result. • Operate upright: Always place the heater in an upright position. • Flammable materials: Do not insert or place flammable materials (such as paper, plastic or cardboard) in, on or near the product.
- Page 6 Important Safety Instructions (Cont.) CAUTION: HOT! • This heater is hot when in use. To avoid burns and personal injury, do not allow bare skin to touch hot surfaces. • Attachments, when furnished, may become hot during use. Allow any attachments to cool before handling them.
-
Page 7: Product Overview
Product Overview Scope of delivery Heater parts Protective metal grille LCD display panel Quartz heating elements (4) Castor wheel assemblies (2, with 4 wheels) Remote control NOTE: Due to continued product improvement, images and illustrations in this manual may vary slightly from the product purchased. All images in this manual are for reference purposes only. - Page 8 Product Overview (Cont.) Display panel Power Auto mode Sleep mode Eco mode (n/a) Temperature display Weekly timing display (n/a) Time display Clock Heating Open window indicator n/a: not available on this model FIRST USE When switching on the heater for the first time, it may produce fumes or odour when first heating up.
-
Page 9: Getting Started
Getting Started Unpacking • Packaging: This product has been packaged to protect it against transportation damage. Unpack the appliance and keep the original packaging carton and materials in a safe place. It will help prevent any damage if the product needs to be transported in the future, and you can use it to store the appliance when it is not in use. -
Page 10: Instructions
Instructions Introduction This heater has 4 quartz heating elements, which can be operated on 2 heat settings and in 3 modes: normal, auto and sleep. It is also equipped with a thermostat for automatic mode and comes with a remote control for easy operation. Positioning the heater The heater is for floor-standing use only. - Page 11 Instructions (Cont.) Operation modes Press the MODE button to select one of the 3 operation modes. Weekly Mode Power Temperature Timing Timing Full (4 tubes) Cannot be set: Normal 1 – 15 hours or half (2 tubes) max. 38°C Thermostat controlled: Can be set: Auto half or full power...
- Page 12 Instructions (Cont.) Auto mode To enter auto mode, press the MODE [ M ] button until the auto indicator illuminates on the display. The heater starts working with full power (4 tubes = 2200W) and all heating indicators are illuminated on the display. In auto mode you can set the desired temperature within the 15°C–32°C range using the [ + ] and [ - ] buttons.
-
Page 13: Other Useful Information
Other Useful Information Tip-over safety switch This mechanism turns off power to the appliance as soon as it tips over. Should this happen, place the heater upright again, but take care as it may still be hot. Once the heater is in an upright position it will start working again. Error messages and troubleshooting guide Error Message Problem... - Page 14 Other Useful Information (Cont.) Storage When the heater is not in use, make sure it is unplugged from the wall socket. Take off the castor wheel assemblies and store the heater in the original carton in a cool and dry place, out of children's reach. Alternatively, store it covered with a piece of material to protect it from dust.
- Page 15 Other Useful Information (Cont.) Other battery precautions • Do not open the batteries or short-circuit them. • Do not mix different types of batteries. Due to increased risk of leakage, empty batteries should be removed. The batteries should also be removed from the remote control if it is not being used for long periods.
- Page 16 Warranty returns Should you for any reason need to return this product for a warranty claim, make sure to include all accessories with the product. Product does not work? If you encounter problems with this product, or if it fails to perform to your expectations, make sure to contact our After Sales Support Centre on (AU) 1300 886 649 or (NZ) 0800 836 761 for advice.
Need help?
Do you have a question about the RCH22W and is the answer not in the manual?
Questions and answers