Table of Contents

Related Manuals for Efitment T012


Summary of Contents for Efitment T012
- Page 1 AUTO INCLINE TREADMILL WITH BLUETOOTH MODEL NO: T012 IMPORTANT! Read all instructions carefully before using this product. Save this manual for future reference. EXERCISE EQUIPMENT QUESTIONS: Contact customer service at service@zoovaa.com USER MANUAL...
-
Page 2: Important Safety Instructions
IMPORTANT SAFETY INSTRUCTIONS At Efitment your safety is our top priority and to make sure both you and the unit remain in perfect working order, we encourage you to read all the instructions before assembling and using your new Efitment machine. -
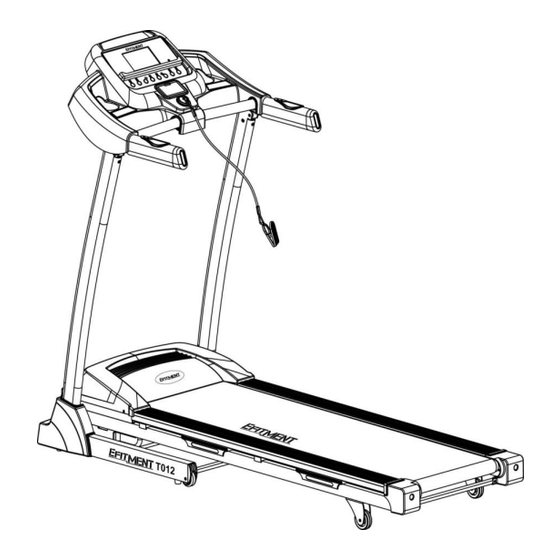
Page 3: Exploded Drawing
EXPLODED DRAWING... -
Page 4: Parts List
PARTS LIST Description Qty. Description Qty. Base Frame Safety Key Socket Main Frame Safety Key Computer Bracket Holder Left Upright End cap Right Upright Console Incline Bracket Control Board Motor Bracket Upper Signal Wire Front Roller Middle Signal Wire Rear Roller Lower Signal Wire Spanner w/ Screw Driver Hand Pulse with Incline... - Page 5 Description Qty. Description Qty. Bolt M6*35 Flat Washer 10*2.0 Φ Bolt M5*8 Screw ST2.6*8 Bolt M5*12 Filter Screw ST4.2*55 AC Single Line Brown Screw ST4.2*20 AC Single Line Blue Screw ST4.2*12 Grounding Wire Screw ST4.2*12 Audio Connecting Line Screw ST3.5*8 Amplifier Board Screw ST2.9*4 Power Amplifier Line...
-
Page 6: Hardware Package
HARDWARE PACKAGE... - Page 7 ASSEMBLY INSTRUCTIONS STEP 1: Open carton remove contents. Place the Main Frame (No. A02) on level ground, ensure that you have a work area that is clean and has adequate space. Do not cut the Packing Belt (No. F) until the assembly is complete! STEP 2: Loosen the preassembled Bolt (No.
- Page 8 ASSEMBLY INSTRUCTIONS STEP 4: Support the Left & Right Upright Tubes (No. A04 & No. A05) with your hands to prevent them from falling down. Fix the Left & Right Upright Tubes (No. A04 & No. A05) to the Base Frame (No.
- Page 9 ASSEMBLY INSTRUCTIONS STEP 6: Attach the Left & Right Upright Tube Covers (No. C20 & No. C21) to the Base Frame (No. A01). STEP 7: You may now cut the Packing Belt (No. F). Insert the Safety Key (No. C26) into the magnetic area of the Console (No.
-
Page 10: Maintenance And Care
MAINTENANCE & CARE General cleaning will help prolong the life and performance of your treadmill. Keep the unit clean and maintained by dusting the components on a regular basis. Clean both sides of the Running Belt (No. C23) to prevent dust from accumulating underneath the Running Belt (No. C23). Keep your running shoes clean so that dirt from your shoes does not wear out the Running Board (No. -
Page 11: Lubricating The Treadmill
LUBRICATING THE TREADMILL IMPORTANT NOTE: You will need to lubricate your treadmill before the first use. RUNNING BELTS & TREADMILL LUBRICANT: Lubricating the Running Board (No. D20) and Running Belt (No. C23) is essential as the friction between the two affects the life span and function of the treadmill, therefore it is recommended that the Running Board (No. -
Page 12: Folding Instructions
FOLDING INSTRUCTIONS FOLDING: Place your hand at position “P” and lift up on the Main Frame (No. A02) until the Air Pressure Cylinder (No. B05) “K” locks into the tube. You will hear a clicking sound when the Pressure Cylinder (No. -
Page 13: How To Move The Machine
HOW TO MOVE THE MACHINE Before attempting move treadmill, make sure that it has been properly folded. Unplug the Power Wire (No. D16). To tilt, start by placing one hand at position “P” to support the top end of the treadmill. Next, place one foot at position “M”... -
Page 14: Important Electrical Information
IMPORTANT ELECTRICAL INFORMATION WARNING: This treadmill requires a power source of 10 amps (100-120V) in order to properly operate. For your safety, as well as the safety of others, please verify that the power source is correct before plugging the equipment. Any power source above or below this level could cause significant damage to the equipment and or user. -
Page 15: The Display Console
THE DISPLAY CONSOLE QUICK START: 1. Insert the magnet end of the Safety Key into the console. Turn on the power switch. 2. Press the START button, and the console will automatically display a 3 second countdown. Once the countdown reaches zero, the running belt will start at the initial default speed of 0.5 MPH. 3. -
Page 16: Window Display
THE DISPLAY CONSOLE WINDOW DISPLAY 1. SPEED/PULSE: The speed range is 0.5 - 9.0 MPH. 0.5 MPH is the default running speed. When the runner holds both hands on the pulse sensors (located on the handles), the console will calculate the runner’s heartbeats and display it in this window. -
Page 17: Function Keys
THE DISPLAY CONSOLE FUNCTION KEYS: 1. PROGRAM: Press the PROGRAM button to set your desired interval setting. Programs are displayed as P1-P9 and FAT. Various intervals are shown on the face of the treadmill. P1-P9 are preset programs. 2. MODE: When stopped, press this button to select a Countdown Mode. 10:00 MINS is the set Countdown for TIME 1.0 MILE is the set Countdown for DISTANCE 50 KCAL is the set Countdown for CALORIES... - Page 18 THE DISPLAY CONSOLE LUBRICATION REMINDER Your treadmill needs lubrication maintenance every 188 miles. The console will release a beeping sound every 10 seconds and display an “OIL” icon on your LCD display to remind you when it’s time. Please read the LUBRICATING THE TREADMILL on Page 11 to learn the proper steps to lubricating your machine.
- Page 19 THE DISPLAY CONSOLE BODY MASS CALCULATION: Press the PROGRAM button until the window displays FAT to access Body Mass Calculation. Press MODE to enter F-1, F-2, F-3, F-4, F-5 F-1 SEX, F-2 AGE, F-3 HEIGHT, F-4 WEIGHT, F-5 is Body Mass Index Press SPEED +/- buttons to set F1-F4 (refer to the chart below).
- Page 20 TREADMILL FUNCTIONS SAFETY LOCK FUNCTION: Removing the Safety Key (No. C26) from the Console (No. D01) while the treadmill is running will cause it to stop immediately. Once the treadmill reaches a full stop, the console will display “- - -“ and the buzzer will beep 3 times.
-
Page 21: Exercise Instructions
EXERCISE INSTRUCTIONS GETTING STARTED: Before starting any exercise program, you should consult your physician to determine if you have any medical or physical conditions that could put your health and safety at risk or prevent you from using the equipment properly. Be aware of your body’s signals. -
Page 22: Troubleshooting
TROUBLESHOOTING PROBLEM POSSIBLE CAUSE SUGGESTED ACTION Not plugged in Plug cord into outlet Treadmill will not start Safety Key not inserted Insert Safety Key Running belt tension not Tighten the adjustment bolts on Running belt not centered correct on the left or right sides of the left and right side of the rear the running board roller... - Page 23 Check motor wires to see if the motor is connected. If the wire has The motor wire is not connected or been punctured or damaged, you E06: Motor Abnormality the motor is damaged. will need to replace it. If the problem is not rectified, you may need to replace the motor Check the upper and middle wires...
Need help?
Do you have a question about the T012 and is the answer not in the manual?
Questions and answers