Table of Contents
Advertisement
Quick Links
Advertisement
Table of Contents

Related Manuals for Fantec QB-35U31R


Summary of Contents for Fantec QB-35U31R
- Page 1 Model QB-35U31R 4-Bay HDD-Enclosure with RAID-Functionality Manual English...
-
Page 2: Table Of Contents
Inhalt Contact Introduction Technical Data Delivery Features Connections System Requirements Working Environment Security Instructions Overview Front View Controls Rear View Side View Assembly Hard Drive Installation Opening the Front Panel Changing the Fan Setup RAID-Modes Single Mode RAID 0 Spanning RAID 0 Striping RAID 1 Mirroring Operation Manual... -
Page 3: Contact
Secure Removing of the Hard Drive Initialising, Partitioning and Formatting Windows Mac OS Contact Contact our technical support at: service@fantec.de +49 (0)40 730 92 83 56 We are online at: www.fantec.de Declaration of Conformity: http://www.fantec.de/unternehmen/ce Adress for RMA Sending from Germany... -
Page 4: Introduction
Introduction fantec Save your Data with the QB-35U31R with room for up to four SATA hard drives in one enclosure. With diverse RAID-Levels (Single, 0 , 1) the QB-35U31R offers different settings for data security or increased performance. All hard drives can also be displayed, controlled, changed and replaced individually as well as expanded independently of producer or capacity. With the USB 3.1 interface you can transfer your data lightning-fast with up to 10 Gbit/s and the UASP-transport-protocol allows even more increased performance. The built-in temperature-sensor controls the fan automatically in 3 steps for optimal ventila- tion of your hard drives and the integrated USB-Hub prevents the loss of interfaces on your system. Technical Data Delivery • 1× USB 3.1 Cable • 4× Hard drive Handles •... -
Page 5: System Requirements
• 1× Power connection (side) System Requirements • Microsoft Windows 7 / 10 • Mac OS X 10.13 or higher Working Environment • Temperature: 0 ~ 40 °C • Humidity: 5 % ~ 90 % RH Security Instructions • Protect the product against moisture and direct sunlight • Do not place this device near water. •... -
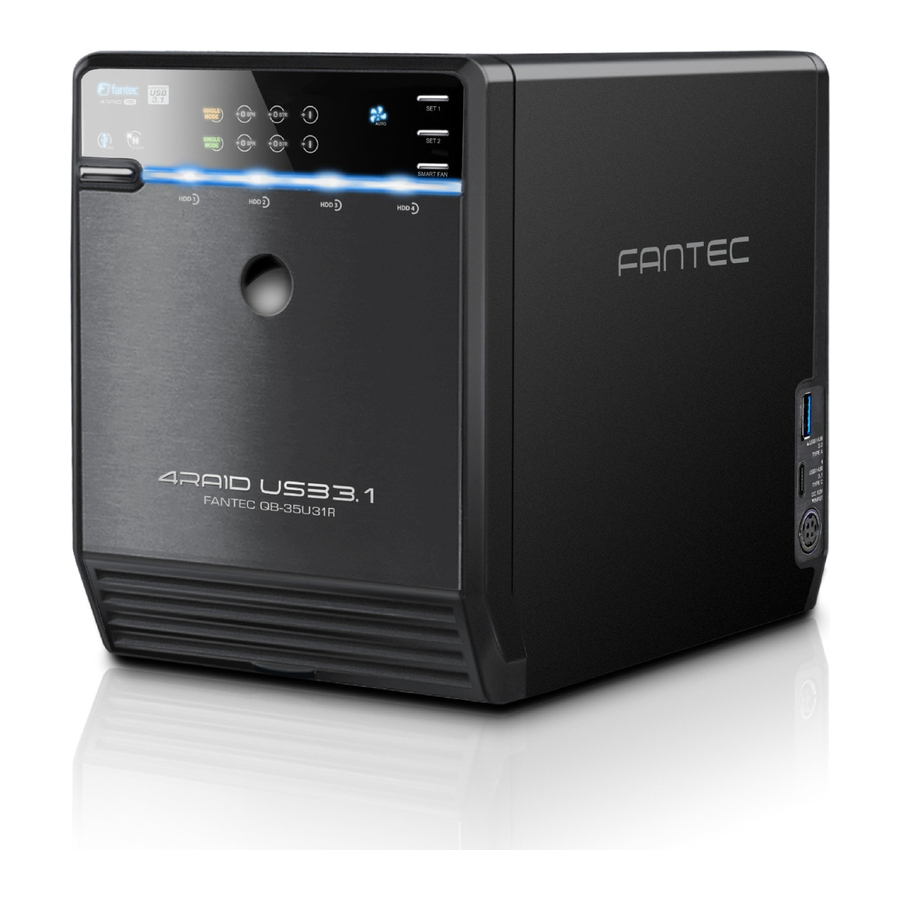
Page 6: Overview
Overview Front View... -
Page 7: Controls
Controls 1. Main Switch press switch hold switch ca. 3 sec. 2. Mode for Set 11 RAID-mode-change: hold ca.3 sec. 3. Mode for Set 21 RAID-mode-change: hold ca.3 sec. 4. Smart Fan automatic fan control on / off 5. Status LED blue Device is switched on orange... -
Page 8: Rear View
Rear View 1. Fan 2. RAID-Mode-Confirmation 3. USB 3.1 Typ-C port Side View 1. USB Hub Typ-A port 2. USB Hub Typ-C port 3. Current input 4. Power plug HDD Handle Front Cover Metal Cladding... -
Page 9: Assembly
Assembly Hard Drive Installation 1. Please attach the included handles to the hard drives with screws. 2. Push the circular indentation, to open the enclosure. 3. Push both handles, to remove the metal cladding. - Page 10 4. Please remove the transport safety board. 5. Push the hard drives into the enclosure and check if they are installed in the correct order from top to bottom. To remove the hard drives, push the attached handle slightly downwards and then pull the hard drive out. 6. Put the metal cladding which was removed in step 3 back in and be careful that it locks in as well. After that the front panel can be closed again. 7. Connect the device with the power adapter and switch it on. Attention: When the USB-cable is removed the enclosure switches to stand- by-mode automatically.
-
Page 11: Opening The Front Panel
Opening the Front Panel If you forgot to put the metal cladding back in place before closing the front panel, simply push – as shown in the image – the lower lever. This makes the front panel open slowly. Please do not try to open the front panel with a sharp object. Changing the Fan Negative Positive red Cable black Cable If the fan becomes noisy shut down the enclosure and open the paneling on the back side. Now you can remove the fan and clean it carefully. Should the noise not stop despite the cleaning, you can replace the fan with an identical one (80 × 80 × 20mm). In case of complete failure of the fan please contact our service. -
Page 12: Setup
RAID-Modes The QB-35U31R offers the following RAID-modes: Single, RAID 0 Spanning (Big), RAID 0 Striping and RAID 1. These modes can be created in two independent sets of two hard drives. The QB-35U31R has no standard mode. To install a RAID you need hard drives which do not contain important data. Usu- ally no already saved data can be transferred into a RAID-system. Only in Single Mode you can use hard drives which already contain data. Please read Hints for the Installation of Hard Drives with Data (P.17). -
Page 13: Raid 0 Striping
= 4 TB RAID 0 Striping Striping connects several drives to one large virtual drive as a logical unit. The data is written parallel onto all hard drives, which results in an increased data- transfer-rate. When one drive fails or gets damaged all data will be lost and can only be reconstructed with professional help. The usable memory corresponds to the memory of the smallest drive times two. For this mode we recommend to use two identical hard drives (same capacity, brand and model-number). -
Page 14: Operation Manual
Attention: After several seconds the enclosure shuts down automatically, if hard drives are installed without choosing a RAID-mode. Both red LEDs (Nr. 12 on P. 6) permanently being on signals an erroneous RAID. This means the controller is not finding the hard drives in the state neccessary for the chosen RAID-mode. The QB-35U31R is set to Single mode on delivery! In this state you can install the hard drives which will not be used as a RAID and save your data after initialising the drives. If you want to use a RAID, set up the device accordingly. After setting up the chosen RAID the LEDs (Nr.12) will turn off if everything is working. Save your data before changing the RAID-mode of the device to avoid negative consequences of maloperations or other faults. -
Page 15: Particularities In Single Mode
(P.20). Particularities in Single Mode In Single Mode it is not neccessary to initialise the hard drives in any case. This depends on whether they have already been initialised and if this initialisation can be processed by the QB-35U31R. In most cases the operating system will present a note about a new partition. In Windows this is mostly a new drive letter. If not, please see chapter Initialisation, Partitioning and Formatting (P.20). After Installation of a Set The first reboot of the device after being shut down with the RAID-Mode-Con- firmation-Key takes a few seconds longer than a regular reboot;... -
Page 16: Raid 0
RAID 0 • When a hard drive fails in a RAID 0, the RAID fails completely. • A RAID 0 Spanning offers the possibility to use hard drives with different charac- teristics. This is only a good solution if the saved data is actually redundant. As an archive of “old hard drives” it is not a good solution. Old disks will eventually fail and your archive will be lost. RAID 1 • A RAID 1 continues to work even if one hard drive fails. The failed disk should be replaced as soon as possible as another disk failure would mean a complete loss of all data. We recommend to perform a data backup before installing the new hard drive. The exchange of a hard drive and the following rebuild of the data use both drives heavily – there is a risk for the other hard drive to fail too. - Page 17 QB-35U31R. • Please note: Do no format hard drives which contain important data and which do not have a backup – even if your operating system suggests it! • Please note that hard drives which contain important data but can not be used in the QB-35U31R (and therefore have to be given up) have to be formatted to be incorporated into your file system. Windows only assigns drive letters when it...
- Page 18 With RAID-systems the reading of SMART-information of the individual hard drives is not readily possible. For the QB-35U31R the SMART-information of the first hard drive of both sets can be read. Secure Removing of the Hard Drive The QB-35U31R is a USB hard drive enclosure and fromt the vantage point of many operating systems a removable disk. Please execute “Safe Hardware Removal” or “unmount” before turning off the enclosure or pulling of the data cable. Nor- mally this “unmounting” is done automatically by shutting down your PC, Notebook, NAS, Router, Mediaplayer or Mac-Device. In a Standby-Mode, Energy-Saving-Mode,...
- Page 20 Initialising, Partitioning and Formatting Windows 1. Right-Click on “This PC” icon and select the “Manage” column. 2. Select “Disk Management” and you will see your drive show “Not initialised” and “Unallocated”. 3. Right-Click on the red Symbol and select “Initialise Disk”. 4. Select “GPT” mode. Then press OK button fi nish the initialising procedure.
- Page 21 5. Right-Click on the “Unallocated” block and select “New Simple Volume”. Then follow up the dialogue box with pressing the “Next” button until the “Finish” button will start the formatting procedure. 6. When formatting is completed, the external SSD will be recognized as a “New Volume”. Mac OS 1. Open Disk Utility. 2. Initialise hard drive. 3. Choose the drive and delete it.
- Page 22 4. Formatting Please Note • When initialising takes too long please check if the hard drive has a tight fit in the enclosure. • If you can not activate “GPT” during initialisation, change the current RAID mode to another mode first, then back to the desired mode. Use the RAID-Mode-Con- firmation-Key. This will ensure the drive will be rebuild and can be initialised correctly.
Need help?
Do you have a question about the QB-35U31R and is the answer not in the manual?
Questions and answers