Table of Contents
Advertisement
Quick Links
Advertisement
Table of Contents

Related Manuals for Everest & Jennings Traveler L3 Plus 3F012


Summary of Contents for Everest & Jennings Traveler L3 Plus 3F012
- Page 1 ® Manual Wheelchair Models 3F012 / 3F013 / 3F014 User Manual EJ_3F012-3F013-3F014-INS-LAB-RevD20 Read this manual before operating your wheelchair. Save this manual for future use. The most current version of this manual can be found online at www.grahamfield.com.
-
Page 2: Table Of Contents
CONTENTS INTRODUCTION ..................................3 IMPORTANT SAFETY PRECAUTIONS ........................... 4 WARNINGS ....................................4 GETTING STARTED — GENERAL OPERATION GUIDELINES ..................... 6 TRAVELER L3 PLUS COMPONENT IDENTIFICATION ......................6 OPERATING THE WHEEL LOCKS ............................6 UNFOLDING AND FOLDING THE WHEELCHAIR ........................6 UNFOLDING THE WHEELCHAIR ............................. -
Page 3: Introduction
1 INTRODUCTION Important safety, operating, and maintenance instructions that warrant your attention are included in this user manual. Read the entire manual carefully before operating your new wheelchair, and refer to it as often as necessary to help maintain good performance standards. Consult your healthcare professional and GF authorized distributor for assistance in developing and learning safe and effective techniques for performing your daily activities according to your individual physical abilities and needs, and to make certain that your wheelchair is properly prescribed and... -
Page 4: Important Safety Precautions
2 IMPORTANT SAFETY PRECAUTIONS IMPORTANT SAFETY PRECAUTIONS: ALWAYS FOLLOW THESE SAFETY PRECAUTIONS WHEN USING YOUR WHEELCHAIR. FAILURE TO DO SO COULD RESULT IN PERSONAL INJURY TO YOU OR OTHERS OR DAMAGE TO YOUR WHEELCHAIR. Safety requires the constant attention of the wheelchair user and the attendant. It is extremely important to learn and always use safe methods of performing basic daily activities. - Page 5 WARNING: Operate only with anti-tippers in place when leaning or tipping. When wheelchair is in use, anti-tippers must be installed in the downward position. WARNING: Do not lean over the top of the wheelchair back. This could cause the wheelchair to tip over. WARNING: To reduce the risk of tipping before leaning or reaching forward, sit back in the seat and rotate casters fully toward front of wheelchair.
-
Page 6: Getting Started - General Operation Guidelines
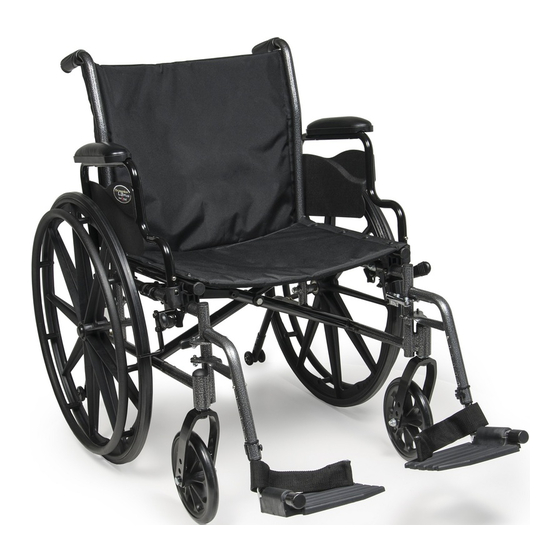
3 GETTING STARTED — GENERAL OPERATION GUIDELINES TRAVELER L3 PLUS COMPONENT IDENTIFICATION Familiarize yourself with main components, identified in Traveler L3 Plus illustration below. back upholstery handgrip arm pad frame/ backpost rear wheel seat upholstery seat extension footrest handrim anti-tipper wheel lock crossbrace footplate... -
Page 7: Unfolding The Wheelchair
UNFOLDING THE WHEELCHAIR 1. Engage wheel locks on both sides. 2. Use both hands to push down with even pressure on seat tubes and seat upholstery on insides of wheelchair, as shown at above left, until the seat rails are fully seated, as shown at above right. - Page 8 5. To fold wheelchair completely, tip it sideways so wheel won’t drag and press sides together as shown at above right. EJ_3F012-3F013-3F014-INS-LAB-RevD20 • Traveler L3 Plus User Manual...
-
Page 9: Handling Tips
4 HANDLING TIPS The Everest & Jennings Traveler L3 Plus has been designed and engineered to perform as a stable and well balanced unit when used for its intended purpose. However, it is possible to tip the Traveler L3 Plus over if it is used improperly or if you move beyond the center of gravity. You may want to consider the use of a positioning belt, available from your distributor or www.grahamfield.com, to maintain proper weight distribution. -
Page 10: Reaching / Bending
REACHING / BENDING WARNING: Always turn the casters frontward to provide stability while reaching. If in doubt, ask for assistance or use a device that will extend your reach without requiring you to shift your weight. Although it is not recommended, you may find it occasionally necessary to lean or reach from your wheelchair. -
Page 11: Ramps And Inclines
RAMPS AND INCLINES WARNING: During descent, the footplates’ lowest point should be no closer to the ground than 2 inches to permit proper clearance. WARNING: Do not attempt inclines without anti-tippers installed. Do not attempt any incline or decline of more than 6 degrees (10% grade, or one foot of rise or fall per ten feet of ramp length). -
Page 12: Curbs - With Attendant
CURBS — WITH ATTENDANT Going up (Method 1) Going Up (Method 2) (Going Down) WARNING: When approaching a curb, ensure the hand grips are securely fastened and do not turn or slip off. Curbs should only be negotiated with the assistance of an attendant. The following are suggestions only for curb negotiation. -
Page 13: Adjustments
5 ADJUSTMENTS The Traveler L3 Plus offers several adjustments to make it easier and more comfortable to drive. Section 7, MAINTENANCE, offers preventive maintenance suggestions for keeping your wheelchair in excellent condition; ensure that all components are in excellent condition before adjusting. The following are recommended methods;... -
Page 14: Arms
ARMS ARM—FIXED-HEIGHT, REMOVABLE, FLIP-BACK Remove arm The fixed-height flip-back arm is removable. 1. Depress both front and rear lower arm release pins until they unlock. 2. Hold arm by center of armpad. Lift straight up and off. Install arm release Hold arm by center of armpad. -
Page 15: Front Rigging
FRONT RIGGING swingaway FOOTREST—DETACHABLE, SWINGAWAY release lever hinge plate WARNING: The footplates' lowest point should be no closer to the ground than 2 inches, to permit proper clearance. WARNING: Do not stand on the footplates; this could cause the wheelchair to tip. REMOVE FOOTREST 1. -
Page 16: Elevating Legrest-Detachable, Swingaway
ELEVATING LEGREST—DETACHABLE, SWINGAWAY WARNING: The footplates' lowest point should be no closer to the ground than 2 inches, to permit proper clearance. WARNING: Do not stand on the footplates; this could cause the wheelchair to tip. REMOVE ELEVATING LEGREST swingaway 1. -
Page 17: Adjust Elevating Legrest Panel Position
ADJUST ELEVATING LEGREST PANEL POSITION The legrest panel can be rotated up and out of the way. Refer to picture on previous page. 1. To adjust panel, hold the panel and rotate it upward. 2. To return panel to position, hold the panel and rotate legrest downward. -
Page 18: Wheel Locks
WHEEL LOCKS ADJUST WHEEL LOCKS M11 wrench 1. Use an M11 wrench to loosen the adjustment bolt until the right rear wheel wheel lock slides on the frame. wheel lock adjustment bolt 2. Place the wheel lock in the locked position and slide it into right front frame contact with the tire. -
Page 19: Transporting Or Storing The Traveler L3 Plus
6 TRANSPORTING OR STORING THE TRAVELER L3 PLUS WARNING: This wheelchair does not offer seating or occupant restraint equivalent to the seat provided in a motor vehicle! To increase your safety while traveling in a motor vehicle, always transfer to the vehicle seat and use the restraint provided by the vehicle manufacturer. - Page 20 Lifting Wheelchair into Rear Seat or Trunk Rear Seat: Move the front seat as far forward as possible. Fold the wheelchair as described on previous page and face it toward the open car door. Tilt the wheelchair backwards as shown above and roll it forward on the rear wheels.
-
Page 21: Maintenance
7 MAINTENANCE Protect your E&J Traveler L3 Plus by having it serviced regularly. Proper care and maintenance are essential to keep your wheelchair in safe working condition. Periodic inspection, adjustment, and replacement of worn parts will provide many years of superb performance. When you believe that a component or part of your Traveler L3 Plus is not functioning properly, contact your GF authorized distributor immediately, as a potentially hazardous condition could result. -
Page 22: List Of Tools
LIST OF TOOLS The tools and cleaning supplies listed will assist in the procedures outlined in Section 7. 30 weight oil (available at most auto parts stores) Phillips screwdriver soft cloth mild soap and water solution GENERAL CARE Always evaluate the overall operation of your wheelchair. It should function with ease and should travel straight without excessive drag or pull to one side. -
Page 23: Check Upholstery
CHECK UPHOLSTERY Check upholstery at least once a month. Inspect for rips, tears and worn spots. Ensure that all upholstery-attaching screws are present, properly aligned, and well-secured. Use a Phillips screwdriver to tighten upholstery mounting screws. Check attaching screws for sharp edges or stripped screws, and replace if found. -
Page 24: Check Casters
CHECK CASTERS Check the caster stems for proper rotation at least every three months. The caster fork must swivel freely to facilitate steering and handling. Adjusting the stem nut varies the amount of force required to turn the caster. If the nut is too loose, the caster will flutter or shimmy; if the nut is too tight, the wheelchair will be difficult to steer. -
Page 25: Troubleshooting
8 TROUBLESHOOTING Continual use of your Traveler L3 Plus necessitates maintenance, especially if the factory-set adjustments have been altered. The following troubleshooting guide lists several common problems that may occur, and offers corrective actions for each. If you are unsure of the solution or unable to diagnose the problem, do not hesitate to ask your GF authorized distributor for assistance. -
Page 26: Limited Warranty
9 LIMITED WARRANTY SCOPE OF WARRANTY GF Health Products, Inc. (“GF”) warrants to the original purchaser only that it will replace or repair components, at GF’s sole discretion, that are defective in material or workmanship under normal use and service. All warranties are conditioned upon the proper use of the products strictly in accordance with good commercial practice and applicable GF instructions and manuals, including proper use and maintenance. -
Page 27: Index
10 INDEX Adjustments 13 Maintenance 21 Anti-tippers, check 22 Arm, adjustable-height, adjust height 14 NOTICE statement, significance 3 Arm, adjustable-height, flip back 14 Arm, adjustable-height, lock 14 Ramps and Inclines 11 Arm, fixed-height, flip back 14 Reaching / bending 10 Arm, fixed-height, install 14 Rear wheel adjustment, check 23 Arm, fixed-height, lock 14... - Page 28 1.770.368.4700 Information contained herein is subject to change. The most current and complete product information can be found on our website. www.grahamfield.com © 2016, GF Health Products, Inc. All Rights Reserved. Everest & Jennings, and Traveler are trademarks of GF Health Products, Inc., One Graham-Field Way, Atlanta GA 30340-3140 GF Health Products, Inc.
Need help?
Do you have a question about the Traveler L3 Plus 3F012 and is the answer not in the manual?
Questions and answers