
Subscribe to Our Youtube Channel
Related Manuals for Radio Shack Racing Scanner


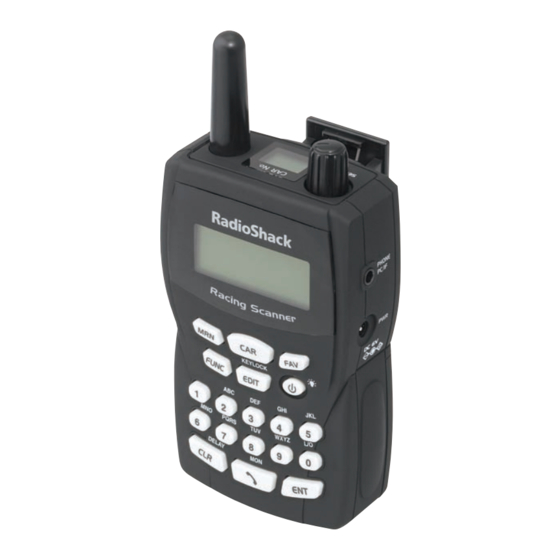
Summary of Contents for Radio Shack Racing Scanner
- Page 1 2000444/PRO-444 User’s Guide Racing Scanner Thank you for purchasing your Racing Scanner from RadioShack. Please read this user’s guide before installing, setting up, and using your new scanner.
-
Page 2: Table Of Contents
Contents Introduction ................. 4 Package Contents ................4 Features ....................4 Top View .....................4 Front View ..................4 Left View .....................5 Right View ..................5 Button Functions ................6 Setup ................... 7 Powering Your Scanner ..............7 Installing Batteries ................7 Charging Ni-MH Batteries .............7 Using AC/DC Power ..............8 Connecting Headset/Earphones ............9 Attaching the Belt Clip ...............9 Basic Operation .............. - Page 3 Text Input Method ................18 Keylock .....................18 Additional Information ............19 Scanning Legally ................19 Troubleshooting ................20 Care Instructions................20 Service and Repair ................20 Specifications..................21 FCC Notice ..................21 Limited Warranty ................22...
-
Page 4: Introduction
Introduction Package Contents • Scanner • Belt Clip • Earphones • User’s Guide • Quick Start Features • Comes with 6 preloaded major race series categories: ARCA RE/ MAX, Grand Am, Indy Racing League (IRL), Truck, NationWide Series, and Sprint Cup. • Program a list of favorite cars for easy access. • Get cell phone calls through your scanner during noisy races. Top View CAR No. Antenna Shows the current car number • Display turns off when listening to • MRN channels SEL/VOL Select race category, car number, • favorite number, or MRN number Select options in the EDIT menu • Increase/decrease the volume • (with FUNC) Front View Race category... -
Page 5: Left View
Left View Right View PHONE / PC/IF Connect a in (3.5mm) cable (not supplied) to clone scanners, receive cell phone calls, or update data from your computer MIC / s Insert earphones or a microphone headset to listen to races and receive cell phone calls Insert an AC or DC adapter to charge or power your scanner (see page 8) -
Page 6: Button Functions
Button Functions Press briefly to • Press briefly to input • input favorite car a car number. number. Press and hold for • Press and hold for • one second to scan one second to scan car numbers. the favorite bank. G / î Press and hold to turn Press to access MRN • • the scanner on or off. radio. Press to turn on the • Press and hold to • backlight briefly. scan MRN channels (control tower radio, safety radio, etc.). FUNC Use secondary scanner functions or change the volume. EDIT/KEYLOCK Change the car/MRN •... -
Page 7: Setup
Setup Powering Your Scanner You can power your scanner with three AA batteries, or with an AC or DC adapter (none included). For longest operation and best performance, use alkaline batteries, or use nickel-metal hydride (Ni-MH) rechargeable batteries. Installing Batteries 1. Turn off the scanner. Ni-MH/ALK 2. Remove the battery compartment Switch cover. 3. Set the battery type selector switch inside the battery compartment to ALK for non-rechargeable alkaline batteries or Ni-MH for rechargeable batteries. 4. Insert three AA batteries, matching the polarity symbols (+ and –) marked inside. 5. Replace the battery compartment cover. Charging Ni-MH Batteries 1. Press and hold POWER to power off the scanner. 2. Make sure Ni-MH batteries are installed and the battery type selector switch is set to Ni-MH. 3. Plug an AC or DC power adapter (not supplied; see page 8) into the PWR jack. -
Page 8: Using Ac/Dc Power
WARNING: Never install alkaline batteries with the battery type selector switch set to Ni-MH. Alkaline batteries can get hot or explode if you try to recharge them. Battery Notes: • You can use scanner while charging batteries, but it is not recommended. The charging current decreases and charging takes longer. • Do not over-charge rechargeable batteries. Overcharging shortens battery life. -
Page 9: Connecting Headset/Earphones
Caution: • You must use an adapter that supplies 6 volts and delivers at least 300mA. Its center tip must be set to negative, and its barrel plug must correctly fit the scanner’s PWR jack. Using an adapter that does not meet these specifications could damage the scanner or the adapter. Connecting Headset/Earphones Your scanner does not have an internal speaker, so to listen to your scanner or to receive cell phone calls (see page 17 for more information) you must use a microphone headset or earphones. You can also add a second microphone headset or earphones to talk to a friend more easily during noisy races. Option 1: Connect the included earphones or any others with a in. (3.5mm) jack to either set of s jacks on the left side of the scanner. Option 2: Connect a microphone headset to the A set of s / MIC jacks to use with a cell phone, and to the A or B jacks to talk to another person. Attaching the Belt Clip 1. Align the clip with the slot on the back of the scanner. -
Page 10: Basic Operation
Basic Operation Turning on the Scanner Press and hold G / î. The scanner turns on and a welcome message appears for about 2 seconds. Press and hold again to turn off. Selecting a Race Series 1. Turn the SEL/VOL dial on top of the scanner to select one of the following preset race types: • (Sprint Cup) NASCAR SprintCu • (NationWide Series) NASCARnationwid • NASCAR Truck • (ARCA RE/MAX Series) ARCA • Grand Am • (Indy Racing League) IRL (Indy) 2. Press ENT. appears briefly to remind you that your LOAD DATA!! car number/channel data may not be up to date. -
Page 11: Manually Inputting Car Numbers
Manually Inputting Car Numbers 1. Press CAR once and use the number keys to input a car number you want. If your inputted number is found, the scanner shows that number on the display. 2. If no car by that number is found, “ ” Car#XX Not Stored appears on the display. Press CLR to go back to browse mode and try again. Scanning for Car Numbers 1. Press and hold CAR until appears in the upper left corner SCAN of the display. 2. Scanning stops if a transmission is found, so you can listen. When the transmission stops, scanning continues. Note: You can program a two second delay into the scanner. See page 16 for details. 3. Press and hold CAR to return to regular listening mode. The selected race type appears in the upper left corner of the display. Listening to the Motor Racing Network 1. Press MRN. and the pre-programmed station name appears on the middle line of the display. -
Page 12: Adjusting The Volume
Adjusting the Volume 1. Press FUNC. appears in the upper left corner of the display. FUNC 2. Turn the SEL/VOL dial on top of the scanner clockwise to increase and counterclockwise to decrease the volume. and the volume number appear in the upper right corner of the display. Advanced Operation Favorites List Follow these steps to program up to 10 favorite car numbers or MRN channels to listen to. 1. Navigate to the car number or MRN channel you want to save as a favorite by following the steps on pages 10 and 11. 2. Press the FAV button. _ appears in the upper left INPUT FAV# corner of the display. 3. Press the number key (1-0) where you want to place the car or channel, then press ENT to save. 4. While listening to your scanner, press a number key at any time to listen to that favorite. Using the EDIT Menu 1. Press EDIT. 2. Use the SEL/VOL dial to scroll through options and press ENT to select: •... -
Page 13: Frequency
Frequency 1. Follow steps 1 and 2 under “Using the EDIT Menu” and select FREQUENCY 2. Use the SEL/VOL dial to select or , then press ENT. 1:CAR# 2:MRN To edit existing entries: 1. Follow steps 1 and 2 under “Frequency” to select number (or driver), then press ENT. appears on the top line of the display. Edit? 1:YES 2:NO 2. Press 1 to edit or press 2 to cancel and go back to car number/ MRN channel selection. 3. If the displayed car number is correct, press ENT. If not, enter the correct car number and press ENT. 4. If there is already a car number by the number you inputted, the car number and will appear on the Duplicate? YES:1 NO:2 display. You can store more than 1 frequency (max 26) on one car number. Press 1 to duplicate the number or 2 to go back and enter a new car number. 5. The car number, , and the current frequency number FREQUENCY... -
Page 14: Fav (Favorites)
Note: When editing MRN, if the number you enter is already stored, appears on the display. Press CLR ERROR INVALID INPUT and input the number again. Page Tag 1. Follow steps 1 and 2 under “Using the EDIT Menu” and select PAGE TAG 2. Change the race series tag. Enter new tag using the number and FUNC keys. See “Text Input Method” on page 18. 3. Press ENT to store new entry. - Page 15 Key Tone 1. Follow steps 1 and 2 under “Settings” and select Key Tone 2. Use SEL/VOL to select or , then Key Tone ON Key Tone OFF press ENT. Note: Turning key tones off does not turn off the error beep. Power Save Your scanner features a power save circuit that is automatically activated when you monitor a single car number frequency. This allows the receiver to “Sleep” briefly while waiting for a call on the selected channel. Power save is off by default. 1. Follow steps 1 and 2 under “Settings” and select Power Save 2. Rotate SEL/VOL to choose or Power Save ON...
-
Page 16: Cloning Your Scanner
Cloning Your Scanner You can transfer your scanner’s data to and from another PRO-444 scanner using a connecting cable with -inch (3.5mm) stereo plugs on both ends (not supplied). 1. Turn on both scanners. 2. Connect the cable to each scanner’s PC/IF/PHONE jack. 3. Press EDIT on both scanners. 4. Use the SEL/VOL dial to select , then press ENT. CLONE 5. Choose on the scanner you are transferring to, then RECEIVE press ENT twice. 6. Choose on the scanner you are transferring from. SEND 7. Press ENT twice on the scanner you CLONE RECEIVE are transferring from to send the data. START!! appears on the display. START!! 8. When replaces , remove FINISH!! START!! CLONE RECEIVE the cable and press EDIT to go back to FINISH!! -
Page 17: Locking Out Channels
that channel for two seconds after the transmission stops before resuming scanning. 3. To turn off the delay, press FUNC then DELAY while monitoring a car number/channel. disappears. Delay is ON by default. Locking Out Channels You can scan existing channels faster by locking out car numbers that have continuous transmissions. While scanning: • Press FUNC then 0 (L/O) when the scanner stops on the number you want to lock out. appears on the display. Manually: • Select the car number you want to lock out, then press FUNC and 0 (L/O). appears on the display. • To remove the lock out, manually select the car number, then press FUNC and 0 L/O. disappears. Note: You cannot lock out M1 channel. Cell Phone Operation To answer your cell phone and talk using the scanner, you will need a microphone headset and a cable with ” (3.5mm) plugs on either end (neither included). 1. Connect the microphone headset to the A set of s / MIC jacks on the left side of the scanner. The B set of jacks does not work with the cell phone feature. -
Page 18: Text Input Method
Text Input Method Follow the chart below to input text and numbers for the menu functions starting on page 12. • For example, to enter the name “Rob,” press 7, 3, 6 FUNC 3, 2 FUNC 2. Button(s) Pressed Output Characters 1 2 3 4 5 6 7 8 9 0 A B C 2 FUNC a b c D E F 3 FUNC d e f G H I 4 FUNC g h i J K L 5 FUNC j k l M N O 6 FUNC m n o P Q R S 7 FUNC p q r s T U V 8 FUNC t u v W X Y Z 9 FUNC w x y z ! . _ - # : ? “ (space) 0 FUNC... -
Page 19: Additional Information
Additional Information Scanning Legally Your scanner covers frequencies used by many different groups including police and fire departments, ambulance services, government agencies, private companies, amateur radio, military operations, pager services, and wireline (telephone and telegraph) service providers. It is legal to listen to almost every transmission your scanner can receive. However, there are some transmissions you should never intentionally listen to. These include: • Telephone conversations (cellular, cordless, or other private means of telephone signal transmission) • Pager transmissions • Any scrambled or encrypted transmissions According to the Electronic Communications Privacy Act (ECPA), you are subject to fines and possible imprisonment for intentionally listening to, using or divulging the contents of such a transmission unless you have the consent of a party to the communication (unless such activity is otherwise illegal). This scanner has been designed to prevent reception of illegal transmissions. This is done to comply with the legal requirement that scanners be manufactured so as to not be easily modifiable to pick up those transmissions. Do not open your scanner’s case to make any modifications that could allow it to pick up transmissions that are illegal to monitor. Doing so could subject you to legal penalties. We encourage responsible, legal scanner use. In some areas, mobile use of this scanner is unlawful or requires a permit. Check the laws in your area. It is also illegal in many areas to interfere with the duties of public safety officials by traveling to the scene of an incident without authorization. -
Page 20: Troubleshooting
Troubleshooting Problem Solution The scanner does not work • The AC or DC adapter might not be connected. Be sure the adapter’s barrel plug is fully inserted into the PWR jack. The center tip on the adapter’s barrel plug must be set to positive. • The batteries might be dead or need to be recharged. Recharge the rechargeable batteries or replace the alkaline batteries. The scanner is turned on, Try adjusting the squelch setting. but will not scan See page 14 for more information. The keypad doesn’t work Keylock might be turned on. See page 18 to turn it off. Care Instructions • Keep the scanner dry; if it gets wet, wipe it dry immediately. • Use and store the scanner only in normal temperature environments. • Handle the scanner carefully; do not drop it. • Keep the scanner away from dust and dirt • Wipe it with a damp cloth occasionally to keep it looking new. Service and Repair If your scanner is not performing as it should, take it to your local RadioShack store for assistance. To locate your nearest RadioShack, use the store locator feature on RadioShack’s website (www.radioshack.com), or call 1-800-THE-SHACK (800-843-7422) and... -
Page 21: Specifications
Specifications Memory Channels..................1000 channel Max Race Series ...................... 20-series Max Frequency Coverage ..................450-470 MHz Frequency Step ......................6.25 kHz Sensitivity (12 dB SINAD) .................... 0.3 uV Selectivity .....................-6 dB +/-10 kHz ........................-50 dB +/-18 kHz Scan Speed ....................40 channels/sec. Delay Time ......................2 seconds IF Frequencies: 1st ..........................21.4 MHz 2nd ..........................450 kHz Squelch Sensitivity: Threshold (SQ1) ......................0.3 uV Tight (SQ) ...................... (S+N)/N-30 dB Audio Output Power (10% THD) ...............24 mW Nominal ......................(32 ohm at earphone) Operating Temperature ..................14 to 140˚ F ......................... (-10 to +60˚ C) Power Requirements ..............4.5 volts DC, 3AA Batteries AC Adapter ......................6 V 300 mA Current Drain (Squelched) ..................40mA Dimensions (HWD) ........ -
Page 22: Limited Warranty
to radio or television reception, which can be determined by turning the equipment off and on, the user is encouraged to try to correct the interference by one or more of the following measures: • Reorient or relocate the receiving antenna. • Increase the separation between the equipment and receiver. • Connect the equipment into an outlet on a circuit different from that to which the receiver is connected. This device complies with Part 15 of the FCC Rules. Operation is subject to the following two conditions: (1) This device may not cause harmful interference, and (2) this device must accept any interference received, including interference that may cause undesired operation. Limited Warranty RadioShack warrants this product against defects in materials and workmanship under normal use by the original purchaser for one (1) year after the date of purchase from a RadioShack-owned store or an authorized RadioShack franchisee or dealer. RADIOSHACK MAKES NO OTHER EXPRESS WARRANTIES. This warranty does not cover: (a) damage or failure caused by or attributable to abuse, misuse, failure to follow instructions, improper installation or maintenance, alteration, accident, Acts of God (such as floods or lightning), or excess voltage or current; (b) improper or incorrectly performed repairs by persons who are not a RadioShack Authorized Service Facility; (c) consumables such as fuses or batteries; (d) ordinary wear and tear or cosmetic damage; (e) transportation, shipping or insurance costs; (f) costs of product removal, installation, set-up service, adjustment or reinstallation; and (g) claims by persons other than the original purchaser. Should a problem occur that is covered by this warranty, take the product and the RadioShack sales receipt as proof of purchase date to any RadioShack store in the U.S. RadioShack will, at its option, unless otherwise provided by law: (a) repair the product without charge for parts and labor; (b) replace the product with the same or a comparable product; or (c) refund the purchase price. All replaced parts and products, and products on which a refund is made, become the property of RadioShack. New or reconditioned parts and products may be used in the performance of warranty service. Repaired or replaced parts and products are warranted for the remainder of the original warranty period. You will be charged for repair or replacement of the product made after the expiration of the warranty period. RADIOSHACK EXPRESSLY DISCLAIMS ALL WARRANTIES AND CONDITIONS NOT STATED IN THIS LIMITED WARRANTY. ANY IMPLIED WARRANTIES THAT MAY BE IMPOSED BY LAW, INCLUDING THE IMPLIED WARRANTY OF MERCHANTABILITY AND, IF APPLICABLE, THE IMPLIED WARRANTY OF FITNESS FOR A PARTICULAR PURPOSE, SHALL EXPIRE ON THE EXPIRATION OF THE STATED WARRANTY PERIOD. - Page 23 EXCEPT AS DESCRIBED ABOVE, RADIOSHACK SHALL HAVE NO LIABILITY OR RESPONSIBILITY TO THE PURCHASER OF THE PRODUCT OR ANY OTHER PERSON OR ENTITY WITH RESPECT TO ANY LIABILITY, LOSS OR DAMAGE CAUSED DIRECTLY OR INDIRECTLY BY USE OR PERFORMANCE OF THE PRODUCT OR ARISING OUT OF ANY BREACH OF THIS WARRANTY, INCLUDING, BUT NOT LIMITED TO, ANY DAMAGES RESULTING FROM INCONVENIENCE AND ANY LOSS OF TIME, DATA, PROPERTY, REVENUE, OR PROFIT AND ANY INDIRECT, SPECIAL, INCIDENTAL, OR CONSEQUENTIAL DAMAGES, EVEN IF RADIOSHACK HAS BEEN ADVISED OF THE POSSIBILITY OF SUCH DAMAGES. Some States do not allow limitations on how long an implied warranty lasts or the exclusion or limitation of incidental or consequential damages, so the above limitations or exclusions may not apply to you. This warranty gives you specific legal rights, and you may also have other rights which vary from State to State. You may contact RadioShack at: RadioShack Customer Relations 300 RadioShack Circle, Fort Worth, TX 76102 04/08 www.RadioShack.com...
- Page 24 Protect the environment by recycling your used electronics. Go to E-CyclingCentral.com to find an electronic recycling center near you. ©2010. RadioShack Corporation. All rights reserved. Printed 05A10 RadioShack and RadioShack.com are trademarks used by in China 2000444 RadioShack Corporation. GR-10D-0700...
Need help?
Do you have a question about the Racing Scanner and is the answer not in the manual?
Questions and answers