
Related Manuals for Miniature Scenery PEREGRINE Y2K


Summary of Contents for Miniature Scenery PEREGRINE Y2K
- Page 3 INSTRUCTIONS PEREGRINE Y2K Light Freighter DELUXE Preparation Getting Started Construction Once you clear some table space you will need a I. Parts should remove easily from the board by Slot the parts together as shown by the pic- pressing through and popping them out. It’s a...
- Page 5 c19a G117 G120 G119...
- Page 6 D67 D66 Additional Extra Wiring and pipes to be added where ever you feel like. G101 G100 E23 E21 E27 E26 G83 G82...
- Page 7 G124 G133 G127 G121 G126 G132 G130 G123 G129 G121 G128 G125 G116 G129 G128 G125 G118 G122 G113 G106 G112 G115 G103 G102 G111 G110 G114 G114 G105 G107 G109 G104 G102 G108 G114 G114...
- Page 10 Underside of floor. Note that the instructions show the de- tailed floor for the deluxe version. The easy-build version does not have the grating holes. Top-side of Floor. Deluxe Version Only...
- Page 14 This about the best time to add the cockpit detail. See the interior instructions for your version for clear expla- nation.
- Page 17 Note the direction of the un- dercarriage well plates and be careful not to obscure the UC mounting holes!!!!
- Page 19 It’s easiest to attach parts 48 first.
- Page 20 note that If you have the De- luxe Version, You will need to add the toilet parts now. Now is a good time to begin adding and painting the inte- rior parts. Refer to the interior instructions for your version.
- Page 21 57 (x5)
- Page 23 Allow this part to dry flat on the table. Actually, it’s best to leave all of the following 4 or 5 steps to dry between stages. Skip ahead to the undercar- riage, if you like, while you are waiting. Note: The entire roof frame assembly It quite fragile and prone to breakage until you attach the outer skins.
- Page 25 There will be a small gap here.
- Page 27 Test fit the roof to the hull. It should be an easy fit, so that the roof can be removed easily. It much easier to make Trim or sand any problem any adjustments now than areas until the roof drops later after the skin is attached.
- Page 28 Part 76 will be a tight fit, but should drop in behind part with a bit of light pressure.
- Page 29 c19a...
- Page 30 Be SUPER careful not to glue the roof in by mistake.
- Page 31 The forward roof should fit in place without glue.
- Page 32 Small notch on part 83 goes toward the central door.
- Page 33 Notch Towards Front...
- Page 34 Circle Towards Back 2mm rod, approx 22mm long for barrels. (see page 2)
- Page 35 Part 104 is rather tiny. We’ve given you a few spares.
- Page 36 See Page 84 for extra details!!!
- Page 37 See Page 81 for extra details!!!
- Page 38 If you assemble the front ramp carefully, the lower section should slide in and out and the whole thing will be able to be raised and lowered.
- Page 39 2mm rod. 6mm long.
- Page 40 Detail parts. Deluxe Peregrine Interior. The following pages contain the instructions for the Deluxe interior for your Y2k Peregrine Light Freighter. There are MANY very small parts, so be careful and take your time. Use a good quality PVA/ white-glue/ Elmers type glue. NOT A dollar store cheap one.
- Page 41 Detail parts. Deluxe Peregrine Interior. Cockpit. The previously assembled cockpit frame is shown in the following steps without the rest of the hull for clarity.
- Page 42 Detail parts. Deluxe Peregrine Interior. Cockpit. Make sure the parts don't protrude past the top edge of the cockpit frame...
- Page 43 Detail parts. Deluxe Peregrine Interior. Cockpit.
- Page 44 Detail parts. Deluxe Peregrine Interior. Cockpit.
- Page 45 Detail parts. Deluxe Peregrine Interior. Cockpit. Remove...
- Page 46 Detail parts. Deluxe Peregrine Interior. Cockpit. Parts should line up here. D48 (x2) Don’t cover up the foot pedal holes!! Be Careful. These parts are easy to damage.
- Page 47 Detail parts. Deluxe Peregrine Interior. Cockpit. D63 (x4)
- Page 48 Detail parts. Deluxe Peregrine Interior. Cockpit. D65 (x2) D65 (x2)
- Page 49 Detail parts. Deluxe Peregrine Interior. Cockpit. D72 (Both sides)
- Page 50 Detail parts. Deluxe Peregrine Interior. Cockpit. D78 (both sides)
- Page 51 Detail parts. Deluxe Peregrine Interior. Cockpit.
- Page 52 Detail parts. Deluxe Peregrine Interior. Cockpit.
- Page 53 Detail parts. Deluxe Peregrine Interior. Cockpit.
- Page 54 Detail parts. Deluxe Peregrine Interior. Cockpit.
- Page 55 Detail parts. Deluxe Peregrine Interior. Engines. There are two engines. The following steps show both left and right handed ver- sions. Errata!!! Remove E1 + E2 Bi-axial Plasma Splitter plates.
- Page 56 Detail parts. Deluxe Peregrine Interior. Engines. Deptronic infuser tanks...
- Page 57 Detail parts. Deluxe Peregrine Interior. Engines. Molecular Particle Assembly.
- Page 58 Detail parts. Deluxe Peregrine Interior. Engines. Phased Nutrino containment...
- Page 59 Detail parts. Deluxe Peregrine Interior. Engines. Assymetrical Warp Stream Manifold Nanowave flux conduits...
- Page 60 Detail parts. Deluxe Peregrine Interior. Engines. Wavefront Matrix manipulators. Muti-spacial alignment grid Modulated Warp Converters...
- Page 61 Detail parts. Deluxe Peregrine Interior. General Interior. Previous assembly...
- Page 62 Detail parts. Deluxe Peregrine Interior. General Interior.
- Page 63 Detail parts. Deluxe Peregrine Interior. General Interior. G22 + G23. ( Both sides )
- Page 64 Detail parts. Deluxe Peregrine Interior. General Interior.
- Page 65 Detail parts. Deluxe Peregrine Interior. General Interior.
- Page 66 Detail parts. Deluxe Peregrine Interior. General Interior.
- Page 67 Detail parts. Deluxe Peregrine Interior. General Interior. There are enough parts for Five of these assem- blies.
- Page 68 Detail parts. Deluxe Peregrine Interior. General Interior.
- Page 69 Detail parts. Deluxe Peregrine Interior. General Interior. G101 G100...
- Page 70 Detail parts. Deluxe Peregrine Interior. General Interior. G102 G103 G102 G103 G113 G106 G112 G105 G112 G104 G111 G110 G109 G107 G108...
- Page 71 Detail parts. Deluxe Peregrine Interior. General Interior. G115 G114...
- Page 72 Detail parts. Deluxe Peregrine Interior. General Interior. 2mm rod. 16mm + 20mm long 20mm G119 G121 G117 G118 G120 G116 G117 G122 G119 G118 G123...
- Page 73 Detail parts. Deluxe Peregrine Interior. General Interior. All of the items from the previous steps, as shown above, can be added to your Peregrine model as creatively as you wish.
- Page 74 Detail parts. Deluxe Peregrine Interior. Rear Stairs. G125 G124 G125 G126 G127 G128 G128...
- Page 75 Detail parts. Deluxe Peregrine Interior. Rear Stairs. G129 G129 G133 G132 G130 G131...
- Page 76 Detail parts. Deluxe Peregrine Interior. Rear Stairs.
- Page 77 Exterior Panelling.
- Page 78 Exterior Panelling. Much of the Panelling that makes up the outside plating of the hull is attaced at this point. Take your time and use the following top and bottom plan views as a guide. The panels are spaced 2mm apart , so we have included a handy tool to assist.
- Page 79 Exterior Panelling.
- Page 80 Exterior Panelling.
- Page 81 Exterior Panelling.
- Page 82 Exterior Panelling.
- Page 83 Exterior Panelling.
- Page 84 Exterior Panelling.
- Page 85 Exterior Panelling.
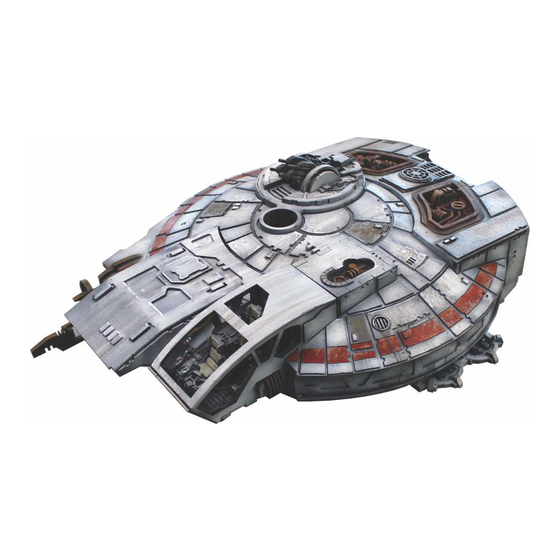
- Page 86 Wow. You’re Finished! Congratulations!
Need help?
Do you have a question about the PEREGRINE Y2K and is the answer not in the manual?
Questions and answers