
Subscribe to Our Youtube Channel
Related Manuals for Kikusui KJM6710


Summary of Contents for Kikusui KJM6710
- Page 1 Part No. Z1-003-052, IA003141 Jan. 2004 OPERATION MANUAL Time Interval Jitter Meter KJM6710...
- Page 2 If you find any incorrectly arranged or missing pages in this manual, they will be replaced. If the manual it gets lost or soiled, a new copy can be provided for a fee. In either case, please contact Kikusui distributor/agent, and provide the “Kikusui Part No.” given on cover.
-
Page 3: Safety Symbols
Is placed before the sign “DANGER,” “WARNING,” or “CAUTION” to emphasize these. When this symbol is marked on the product, see the relevant sections in this manual. Indicates a protective conductor terminal. Indicates a chassis (frame) terminal. KJM6710 Safety Symbols I... -
Page 4: Safety Precautions
• • Cover • There are parts inside the product which may cause physical hazards. Do not remove the external cover. Installation • When installing products be sure to observe "1.2 Installation" described in this manual. II Safety Precautions KJM6710... - Page 5 Service • Internal service is to be done by Kikusui ser- vice engineers. If the product must be adjusted or repaired, contact Kikusui agent/ distributor.
-
Page 6: Overvoltage Category
fixed installation. Overvoltage category IV • Equipment of overvoltage IV is for use at the origin of the installation. Example of such equipment are electricity meters and primary overcurrent protection equipment. IV Overvoltage category KJM6710... - Page 7 Overvoltage category Overvoltage category Switchboard Drop wire Indoor wiring Equipment AC line Transformer Receptacle Overvoltage category Overvoltage category KJM6710 Overvoltage category V...
- Page 8 VI Overvoltage category KJM6710...
-
Page 9: Table Of Contents
1.2 Installation - - - - - - - - - - - - - - - - - - - - - - - - - - - - - - - - - - - 1-2 1.3 Precautions When Moving the KJM6710 - - - - - - - - - - - - - - - 1-4 1.4 Connecting the DC Power Supply- - - - - - - - - - - - - - - - - - - - 1-4... - Page 10 6.2 General Specifications - - - - - - - - - - - - - - - - - - - - - - - - - - - 6-3 6.3 External Dimensions - - - - - - - - - - - - - - - - - - - - - - - - - - - - 6-4 VIII Contents KJM6710...
-
Page 11: Preface
It is a compact unit for embedded applications that is designed to maximize the work efficiency on the production line. To provide the KJM6710 at low cost, the item to be measured has been limited to DVDs, and meters and panel switches have been removed. - Page 12 P-2 Preface KJM6710...
-
Page 13: Chapter 1 Setup
Chapter 1 Setup This chapter describes the procedures of unpacking and preparation of the KJM6710 before use. Checking the Package Contents When you receive the product, check that all accessories are included and that the product and accessories have not been damaged during transportation. -
Page 14: Installation
Avoid locations where the KJM6710 is exposed to high temperature or direct sunlight. Do not place the KJM6710 near a heater or in areas subject to drastic temperature changes. Operating temperature range: 0 °C to 40 °C Spec guaranteed temperature range: 15 °C to 35 °C... - Page 15 Storage humidity range: 0 to 90 % RH (no condensation) Condensation may occur even within the operating humidity range. In such cases, do not use the KJM6710 until the condensation dries up completely. Do not place the KJM6710 in a corrosive atmosphere.
-
Page 16: Precautions When Moving The Kjm6710
When moving the KJM6710 to the installation location or when transporting the unit, note the following points. Always turn off the POWER switch. Moving the KJM6710 with the power on may result in electric shock or damage. When moving the KJM6710, remove all wires that are connected. -
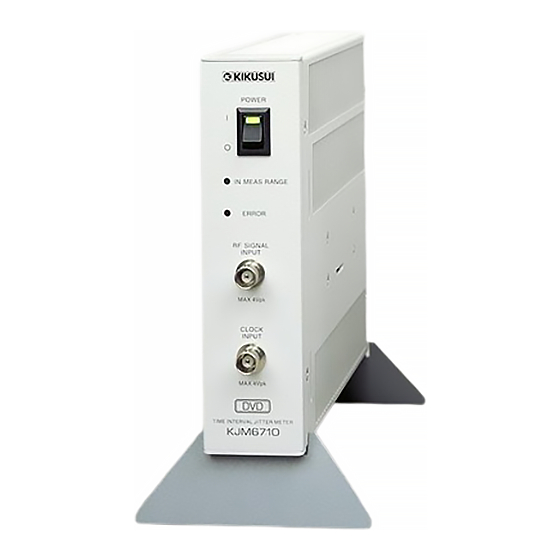
Page 17: Chapter 2 Names And Functions Of Parts
If an error is detected during the self-test, the LED changes to blinking. In addition, the LED illuminates for a certain period when a communication error occurs on the RS-232C interface. KJM6710 Names and Functions of Parts 2-1... -
Page 18: Rear Panel
The output impedance is approximately 600 Ω. approximately 600 Ω. Function setup switches These switches are used to set DC INPUT connector the functions of the KJM6710. DC INPUT connector Used to connect the input power cable. RS-232C connector Compatible plug... -
Page 19: Chapter 3 Operation
To measure time intervals using two signals, connect the clock signal to the CLOCK INPUT connector. Refer to the figures to connect the DUT to the KJM6710 and set the functions according to the input signal. 1. Time interval jitter measurement using sliced RF signal and regen-... - Page 20 Function setup switches SYMMETRY AUTO (or AUTO+OFST) CLOCK EDGE Any RF EDGE positive either negative Use RS-232C control Do not turn both RF EDGE switches to (ON). KJM6710 DVD player, etc. Clock Pickup Equalizer Slicer regeneration circuit Equalized RF signal Clock signal Fig.3-2...
- Page 21 Function setup switches SYMMETRY AUTO (or AUTO+OFST) CLOCK EDGE Any RF EDGE positive either negative Use RS-232C control Do not turn both RF EDGE switches to (ON). KJM6710 DVD player, etc. Clock Pickup Equalizer Slicer regeneration circuit Pickup output signal Clock signal Fig.3-3...
- Page 22 4. Time interval jitter measurement using only sliced RF signal Function setup switches SYMMETRY MANUAL CLOCK EDGE Any RF EDGE positive either negative Do not turn both RF EDGE switches to (ON). KJM6710 DVD player, etc. Clock Pickup Equalizer Slicer regeneration circuit Sliced RF signal Fig.3-4 3-4 Operation...
- Page 23 Function setup switches SYMMETRY AUTO (or AUTO+OFST) CLOCK EDGE Any RF EDGE positive either negative Use RS-232C control Do not turn both RF EDGE switches to (ON). KJM6710 DVD player, etc. Clock Pickup Equalizer Slicer regeneration circuit Equalized RF signal Fig.3-5 KJM6710...
- Page 24 SYMMETRY AUTO (or AUTO+OFST) CLOCK EDGE Any RF EDGE positive either negative Use RS-232C control Do not turn both RF EDGE switches to (ON). KJM6710 DVD player, etc. Clock Pickup Equalizer Slicer regeneration circuit Pickup output signal Fig.3-6 3-6 Operation...
-
Page 25: Function Setup
MANUAL) is set to 0 V. The BPS (baud rate) switch setting takes effect the next time the KJM6710 is powered up. Other switch settings take effect immediately. All settings except the BPS (baud rate) setting can be configured using RS-232C command messages. The settings that actually take effect are those specified last. -
Page 26: Trigger Edge Selection
Trigger Edge Selection The KJM6710 measures the time difference between the RF signal and clock signal and expresses the error as standard deviation. When measuring the time difference between the RF signal and clock sig- nal, the interval (from one edge to another edge of each signal) over which the time difference is measured is specified using the function... - Page 27 • If the RF signal to be measured is already converted to one edge, be sure to set the trigger edge of the RF signal of the KJM6710 to rising or falling to match the signal. Measure- ment is not possible if both edges are selected.
-
Page 28: Symmetry And Slice Level
DC component when the RF signal is sliced. Operation when SYMMETRY mode is set to AUTO The KJM6710 is equipped with a function that automatically controls the slice level to follow the symmetry level of the RF signal to correct the RF signal asymmetry. - Page 29 100 %. However, as shown in Fig. 3-10, the slicer input is AC coupled, and a difference appears between the preset slice level and the actual slice level depending on the duty cycle of the input signal. KJM6710 Operation 3-11...
- Page 30 In addition, the frequency bandwidth of the RF input is approxi- mately 60 MHz. Therefore, operation will fail on narrow pulses of which the pulse width falls below 15 ns, because of amplitude drop- outs. 3-12 Operation KJM6710...
-
Page 31: Delay Adjustment
180°. The delay circuit is used to make this adjustment. The delay circuit places an appropriate delay on the clock signal, and the average phase difference between the two signals can be made 180°. KJM6710 Operation 3-13... - Page 32 2. Send a DELAY CONTROL message through the RS-232C interface. 3. Vary the value of the command so that the DC voltmeter reading is as close to 0 as possible. The phase difference is at the optimum value when the voltmeter reading is 0 V. 3-14 Operation KJM6710...
-
Page 33: Chapter 4 Rs-232C Control
PC. Use a RS-232C cross cable to make the con- nection. The baud rate of the KJM6710 can be set to 9 600 bps or 19 200 bps using the switches on the rear panel. (The setting is read during power up.) -
Page 34: Messages And Terminators
KJM6710. To notify that the processing of a message is complete, the KJM6710 sends a response message to the computer (referred to as an acknowl- edge message) in response to each program message sent to the KJM6710. -
Page 35: Device Messages
Device Messages Device messages refer to program messages and response messages that the KJM6710 supports. This section describes the device messages one by one. Program messages are not case-sensitive. Response messages are returned in upper-case. Abbreviated form Abbreviations are provided for program messages and some of the character program data. - Page 36 Queries the model name and ROM version of the KJM6710. Program message • Syntax Query message: *IDN? Response message In response to *IDN?, the model name of the KJM6710 is returned as shown in the following example: (Manufacturer: KIKUSUI, model: KJM6710, and version: 1.00) Comma separator KIKUSUI ELECTRONICS CORP.,KJM6710,0,1.00...
- Page 37 Integer Values: –128 to +127 Resolution: (Example) Set the level to 64 when the delay is set to MANUAL DEL:CON 64 Response message Returns the current setting in response to DEL:CON? in integers (–128 to +127). KJM6710 RS-232C Control 4-5...
- Page 38 • Program data Data format: Characters Values: Equalizer circuit on OFF: Equalizer circuit off (Example) Turn on the equalizer circuit. EQ ON Response message Returns the current setting in response to EQ? in characters (ON or OFF). 4-6 RS-232C Control KJM6710...
- Page 39 Queries the measured value. Program message • Syntax Query message: IMR? Response message Returns the measured value (0 or 1) in response to IMR?. Message Code Description Above 20 % Less than or equal to 20 % KJM6710 RS-232C Control 4-7...
- Page 40 100.0 is returned. Program message • Syntax Query message: JITTER:TIME? JIT:TIM? Response message Returns the jitter value being measured in ns in response to JIT:TIM?. (Example) When the jitter value is 11.1 ns Returns 11.1. 4-8 RS-232C Control KJM6710...
- Page 41 Returns the PLL circuit status (LOCK or UNLOCK) in response to PLL:STAT?. Message Code Description LOCK The PLL circuit is locked to the input signal. UNLOCK The PLL circuit is not locked to the input signal. KJM6710 RS-232C Control 4-9...
- Page 42 Sets the symmetry mode. Or, queries the current setting. Program message • Syntax Command message: SYMMETRY:MODE<{AUTO|OFFSET |MANUAL}> SYM:MOD_<{AUT|OFFS|MAN}> Query message: SYMMETRY :MODE? SYM:MOD? • Program data Data format: Characters Values: AUT: Set to AUTO OFFS: Set to OFFSET MAN: Set to MANUAL 4-10 RS-232C Control KJM6710...
- Page 43 (–128 to +127). SYMMETRY:SLICE:LEVEL (SYM:SLIC:LEV) Queries the symmetry slice level. The amplitude of the input signal (100 %) corresponds to a slice level value of approximately 600. Thus, the returned value is between –300 and +300. KJM6710 RS-232C Control 4-11...
- Page 44 (0.01, 0.1, or 1). UIS? Queries whether measurements cannot be made. Program message • Syntax Query message: UIS? Response message Returns the current setting in response to UIS? in real numbers (0 (yes) or 1 (no)). 4-12 RS-232C Control KJM6710...
-
Page 45: Sample Program
Sample Program '================================================================ ' KJM6710 Sample Program ' A sample program using Microsoft Visual Basic 6.0. After setting the parameters, the jitter measurement value (%) is displayed once. ' The VISA library (VISA COM software) is used for RS-232C control. - Page 46 Call SendMessage(m_session, "PLL ON") ' PLL clock regen. ' circuit = ON strAck = ReceiveMessage(m_session) Call SendMessage(m_session, "EQ ON") ' EQ circuit = ON strAck = ReceiveMessage(m_session) Call SendMessage(m_session, "SYM:MOD AUT")' SYMMETRY mode = AUTO strAck = ReceiveMessage(m_session) 4-14 RS-232C Control KJM6710...
- Page 47 Private Sub CloseVisaResource() ' Close the VISA I/O resource If Not m_session Is Nothing Then ' Closes the VISA session m_session.Close Set m_session = Nothing End If End Sub '------------------------------------------------------------ Function SendMessage(session As IMessage, strDat As String) KJM6710 RS-232C Control 4-15...
- Page 48 = session.ReadString(256) ' CR+LF Removed strRd = Left(strRd, InStr(1, strRd, vbLf) - 2) ReceiveMessage = strRd Exit Function ERROR_HANDLER: Dim strVisaCode As String strVisaCode = "VISA Error: 0x" & Hex(Err.Number) MsgBox Err.Description, vbExclamation, strVisaCode End Function 4-16 RS-232C Control KJM6710...
-
Page 49: Chapter 5 Maintenance
If a break is found, stop using it immediately. To purchase accessories, contact your Kikusui agent or distributor. Calibration The KJM6710 is calibrated at the factory before shipment. However, periodic calibration is necessary due to changes that occur after extended use. -
Page 50: Troubleshooting
The symptoms listed below may not necessarily mean a malfunction. Check the KJM6710 before requesting repairs. If the remedy does not solve the problem or if your case does not match any of the items, contact your Kikusui agent. Table 5-1 Symptom... - Page 51 Check the edge settings. See “ Rec- ommended setup”, on page 3-9. After power Is the RF signal discon- Internal data error has occurred. on, the ERROR nected? Request for repairs. LED blinks at 1-s intervals. KJM6710 Maintenance 5-3...
- Page 52 5-4 Maintenance KJM6710...
-
Page 53: Chapter 6 Specifications
Chapter 6 Specifications This chapter describes the electrical and mechanical specifications of the KJM6710. The specifications apply to the following conditions. • Warm-up time: 30 minutes • Temperature: 15 °C to 35 °C • Humidity: 20 % RH to 85 % RH (no condensation) Electrical Specifications... - Page 54 7 kHz: 1.0 ± 1.7 dB teristics) 15 kHz: –4.0 ± 1.7 dB Lockup time Within 700 ms Synchronizable jitter range 5 % to 17 % Residual jitter 2 % or less Complies with DVD Specifications for Read-Only Disc Ver.1.0 Aug 1996. 6-2 Specifications KJM6710...
-
Page 55: Output Section
Approx. 45 W × 175 H × 240 D) Weight Approx. 1 kg Accessories Operation manual 1 pc. Stand 1 set (2 pcs.) Attachment screws 4 pcs. (M3 × 8 mm) DC plug 1 pc. (1.5 m) KJM6710 Specifications 6-3... -
Page 56: External Dimensions
External Dimensions MAX15 210.5 MAX240 4-M3 14.5 29.2 4-M3 [Unit: mm] 6-4 Specifications KJM6710...
Need help?
Do you have a question about the KJM6710 and is the answer not in the manual?
Questions and answers