Advertisement
L BRACKET
FOR TARGET MODULE
USER'S MANUAL
Before operating your edelkrone,
please watch the user's manual video.
TABLE OF CONTENTS
1.
WHAT'S IN THE BOX & THE BASICS
2.
3.
4.
5.
MOUNTING YOUR L BRACKET TO YOUR TARGET MODULE HEAD
R
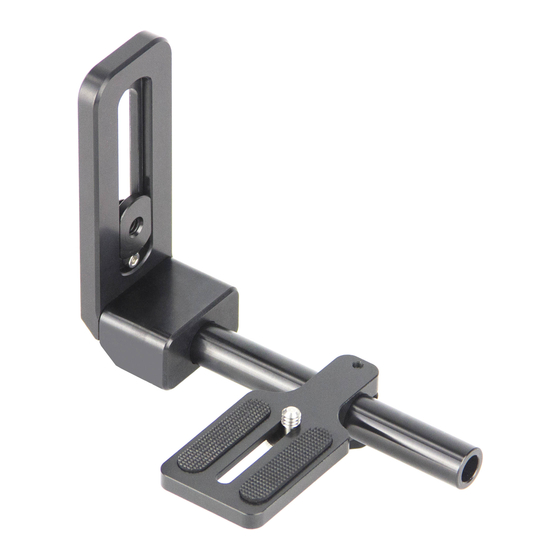
1. WHAT'S IN THE BOX & THE BASICS
1
2
1.
1/4" - 20 Mounting port
2.
1/4" - 20 Mounting screw
Advertisement
Table of Contents

Related Manuals for edelkrone L BRACKET


Summary of Contents for edelkrone L BRACKET
- Page 1 WHAT’S IN THE BOX & THE BASICS MOUNTING YOUR L BRACKET TO YOUR CAMERA ADJUSTING FRONT/BACK CENTER OF GRAVITY ADJUSTING UP/DOWN CENTER OF GRAVITY MOUNTING YOUR L BRACKET TO YOUR TARGET MODULE HEAD 1/4” - 20 Mounting port 1/4” - 20 Mounting screw...
- Page 2 Remove the camera plate. Turn the plate’s thumb screw side towards the lens. When the camera is parallel to the ground, L Bracket is in the center of the gravity. Mount the camera plate underneath your camera. Tighten the thumb screw to proceed to the front/back center of gravity set up.
- Page 3 By holding the mounting port, adjust the center of gravity of the up/down axis by, sliding the screw hole back and forth until the camera is balanced. The L Bracket does not need to be positioned perfectly. A detailed video explaining mounting process can be found at: A detailed video explaining how to adjust the center of gravity can be found at: manuals.edelkrone.com...
- Page 4 DISCLAIMER edelkrone cannot be held responsible for damage caused by improper use or modification of the product. For more infromation and tips about your L Bracket, please watch the users manual videos at the link, manuals.edelkrone.com © 2016, edelkrone www.edelkrone.com...
Need help?
Do you have a question about the L BRACKET and is the answer not in the manual?
Questions and answers