Advertisement
MOTION MODULE
USER'S MANUAL
Before operating your edelkrone,
please watch the user's manual video.
TABLE OF CONTENTS
1.
WHAT'S IN THE BOX & THE BASICS
2.
PREPARE YOUR SLIDERONE
3.
4.
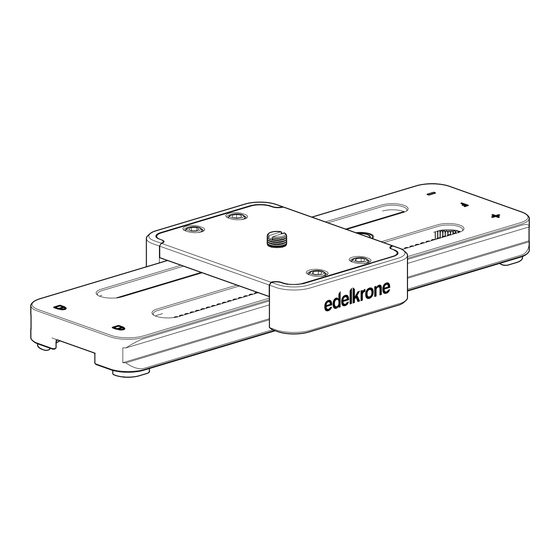
1. WHAT'S IN THE BOX & THE BASICS
R
1
2
3
4
5
1.
2.
3.
4.
Mounting screw to attach SliderONE
1/4"-20 accessory mounting port
Battery bracket
Slicon feet
6
7
8
5.
3/8"-16 mounting port
6.
Coreless DC motor
7.
Mounting wheel
8.
2.5mm shutter tiriger cable port
Advertisement
Table of Contents

Related Manuals for edelkrone MOTION MODULE


Summary of Contents for edelkrone MOTION MODULE
- Page 1 WHAT’S IN THE BOX & THE BASICS 3/8”-16 mounting port Mounting screw to attach SliderONE Coreless DC motor 1/4”-20 accessory mounting port PREPARE YOUR SLIDERONE Mounting wheel Battery bracket MOUNTING YOUR SLIDERONE ON MOTION MODULE 2.5mm shutter tiriger cable port Slicon feet START USING...
- Page 2 2. PREPAIR YOUR SLIDERONE FOR MOUNTING 3. MOUNTING YOUR SLIDERONE ON MOTION MODULE Remove the screws under the lock knob with a cross point screwdriver. Remove the lock knob. Align SliderONE with Motion Module. Make sure the friction adjustment is loosened all the way down and there is Make sure the rubber ring is aligned with the lock knob slot.
- Page 3 QR codes below. manual videos at: manuals.edelkrone.com There are no on/off buttons on Motion Module. Attach the battery to the Motion Module to switch on. SliderONE will start calibrating and find the end of the slide.
- Page 4 Place the rubber ring back to its slot. *Repeat these steps by adding more height adjustment stickers until your Motion Module is in full contact with the SliderONE and there is motion on your SliderONE. Only to be used when the Motion...
Need help?
Do you have a question about the MOTION MODULE and is the answer not in the manual?
Questions and answers