BIG ASS FANS Yellow Jacket Installation Manual
Oscillator
Hide thumbs
Also See for Yellow Jacket:
- Installation manual (52 pages) ,
- Installation manual (28 pages)

Related Manuals for BIG ASS FANS Yellow Jacket


Summary of Contents for BIG ASS FANS Yellow Jacket
- Page 1 INSTALLATION GUIDE Yellow Jacket Oscillator ® For help, call 1-877-BIG-FANS or visit www.bigassfans.com...
- Page 2 All trademarks used herein are the properties of their respective owners. No part of this document may be reproduced or translated into a different language without the prior written consent of Big Ass Fans. The information contained in this document is subject to change without notice.
- Page 3 Do not attempt to resolve electrical malfunctions or failures on your own. Contact Big Ass Fans if you have any questions regarding the use of this fan. CAUTION: When service or replacement of a component in the fan requires the removal or disconnection of a safety device, the safety device is to be reinstalled or remounted as previously installed.
-
Page 4: Table Of Contents
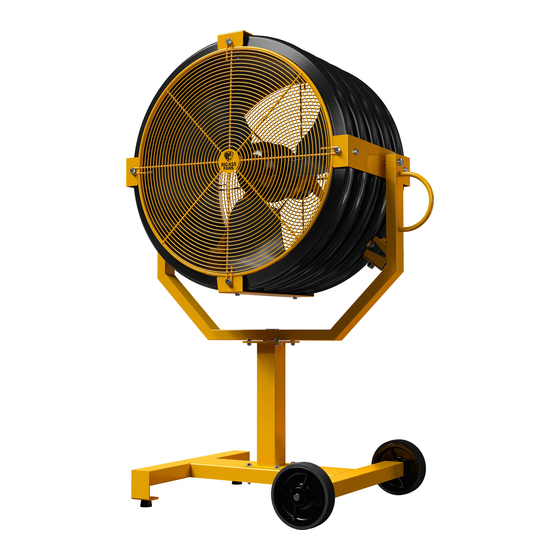
CONTENTS Introduction Safety Instructions Portable Base Parts and Hardware Installing the Oscillator 1. Assemble Portable Base 2. Attach Handle and Second Pedestal 3a. Install Handle and Oscillator Assembly (one pedestal) 3b. Install Oscillator Assembly (two pedestals) 4. Install Fan Yoke 5. -
Page 5: Parts And Hardware
Parts and hardware The parts and hardware listed below are intended for the oscillator option on a Yellow Jacket with a portable base mount. For a complete list of fan components, see the Yellow Jacket Installation Guide. If you are missing any parts or hardware required for installation, contact Customer Service. -
Page 6: Attach Handle And Second Pedestal
2. Attach handle and second pedestal ATTENTION Up to two pedestals can be installed. If you are not installing a second pedestal, skip this step and proceed to step 3a. After securing the wheels and first pedestal to the portable base, attach the handle and second pedestal with the Pedestal Hardware. -
Page 7: 3B. Install Oscillator Assembly (Two Pedestals)
3b. Install oscillator assembly (two pedestals) ATTENTION If you are not installing two pedestals, skip this step and proceed to step 4. After securing the handle and second pedestal to the first pedestal, attach the oscillator assembly to the top of the second pedestal. -
Page 8: Adjust Angle Of Oscillation (Optional)
5. Adjust angle of oscillation (optional) The oscillator arm is preset to oscillate a full 60 degrees; however, the angle of oscillation can be adjusted and set to 45°, 60°, or 90°. The innermost hole is 90°, the middle hole is 60°, and the outermost hole is 45°. To adjust the angle of oscillation, remove the oscillator enclosure cover by unscrewing the (8) screws. - Page 9 Wiring the oscillator CAUTION: The installation of a Big Ass Fan must be in accordance with the requirements specified in this installation manual and with any additional requirements set forth by the National Electric Code (NEC), ANSI/NFPA 70-2011, and all local codes. Code compliance is ultimately YOUR responsibility! BLACK RED 2 GREEN W/ YELLOW TRACER...
- Page 10 ® column, or I-beam. Consult the complete Yellow Jacket Installation Guide for all other aspects of fan installation, operation, and safety information. WARNING: Do not prevent the oscillator from rotating when in operation! WARNING: The safety cable is an important part of the fan installation and must be installed correctly! (4) 3/8-16 x 1”...
-
Page 11: Install Wall/Column Supports Or Yokes
If you are installing the oscillator on a previously assembled fan, remove the (4) bolts, (8) washers, (4) nuts, and fan yoke assembly from the wall/column supports or yoke mount. 1. Install wall/column supports or yokes In the complete Yellow Jacket Installation Guide, follow the steps to install the wall supports, column supports, or ®... -
Page 12: Install Fan Yoke
4. Install fan yoke Secure the fan yoke to the oscillator bracket. Refer to the appropriate illustration for the mounting method used. Lower Oscillator Hardware: a. (4) 3/8-16 x 1” Hex Head Cap Screw b. (4) 3/8” Washer Yoke Mount Column Mount WWW.BIGASSFANS.COM ©... -
Page 13: Install Junction Box
5. Install junction box ATTENTION Big Ass Fans does not supply the cable needed to install the oscillator On/Off switch. 1. Remove the cover from the junction box, and then secure the junction box to the fan brace with the Junction Box Hardware. -
Page 14: Adjust Angle Of Oscillation (Optional)
6. Adjust angle of oscillation (optional) The oscillator arm is preset to oscillate a full 60 degrees; however, the angle of oscillation can be adjusted and set to 45°, 60°, or 90°. The innermost hole is 90°, the middle hole is 60°, and the outermost hole is 45°. To adjust the angle of oscillation, remove the oscillator enclosure cover by unscrewing the (8) screws. -
Page 15: Install Safety Cable
8. Install safety cable WARNING: The safety cable is a crucial part of the fan and must be installed correctly. If you have any questions, call Customer Service. CAUTION: Ensure there is enough slack in the safety cable to accommodate for the oscillating motion! Column Mount Yoke Mount Route one end of the safety cable through a Gripple... - Page 16 Wiring the oscillator CAUTION: The installation of a Big Ass Fan must be in accordance with the requirements specified in this installation manual and with any additional requirements set forth by the National Electric Code (NEC), ANSI/NFPA 70-2011, and all local codes. Code compliance is ultimately YOUR responsibility! WWW.BIGASSFANS.COM ©...
- Page 20 002582 Rev. M 01/21/2020 2251 Innovation Drive, Lexington, KY 40511 1 (877) BIG-FANS | WWW.BIGASSFANS.COM...
Need help?
Do you have a question about the Yellow Jacket and is the answer not in the manual?
Questions and answers