Table of Contents
Advertisement
Quick Links
Advertisement
Table of Contents
Troubleshooting

Subscribe to Our Youtube Channel
Related Manuals for Kuppersbusch EMWK 1060.0


Summary of Contents for Kuppersbusch EMWK 1060.0
- Page 1 e{Š‡yŽ} gŽ}† ]eoc IHNHFH...
- Page 2 Service Manual: H4-070-52-01 Responsible: D. Rutz KÜPPERSBUSCH HAUSGERÄTE AG Email: dieter.rutz@kueppersbusch.de Tel.: (0209) 401-733 Kundendienst Fax: (0209) 401-743 Postfach 100 132 Date: 06.09.2002 45801 Gelsenkirchen...
-
Page 3: Table Of Contents
Service Manual EMWK 1060.0 List of Contents General ..........................4 Installation and electric connection ............... 4 Notes on safety....................... 6 Technical data......................... 7 Accessories supplied..................... 8 What cookware may be used in your appliance? ..........9 Power levels and their applications ..............10 Control elements and modes of operation .............. -
Page 4: General
Service Manual EMWK 1060.0 General Installation and electric connection 1. After you have taken the appliance out of the packing, remove the protective sleeve which holds the turntable, its holder and all the accessories. 2. There is a plastic bag with assembly material in the oven cavity. Please take this bag out of the oven. - Page 5 Service Manual EMWK 1060.0 1. Mount the attachment section B in the right position in the niche. 2. Make sure that there is still a gap on both sides of the attachment section. Screw the section tight with the screws H.
-
Page 6: Notes On Safety
The purpose of this service manual is to provide the customer service technicians who already have the technical knowledge necessary to repair microwave ovens with specific information on the mode of operation of the EMWK 1060.0. Caution! Risks and damage may arise for the user as a result of improper repairs! It is imperative to observe the following notes in order to prevent electric shocks: •... -
Page 7: Technical Data
Service Manual EMWK 1060.0 Technical data Voltage 230V - 50Hz Max. power consumption 3000 W Microwave output power 1000 W Magnetron Goldstar LG 2M246 - 050GF Safety thermostat Plaset 23 W Cooking compartment fan Winding 120 W (at 20 °C) -
Page 8: Accessories Supplied
Service Manual EMWK 1060.0 Accessories supplied Turntable holder The turntable holder and the turntable must always remain in the oven and are used for all functions. Never place objects other than the turntable directly on the holder. We recommend you to use a mild cleaning agent, luke-warm water and a soft cloth to clean the turntable holder. -
Page 9: What Cookware May Be Used In Your Appliance
Service Manual EMWK 1060.0 Rectangular grid Mode - only hot air oven: Suitable for all traditional methods of cooking in rectangular and round dishes for baking cakes. What cookware may be used in your appliance? Mode Only microwaves Combination mode... -
Page 10: Power Levels And Their Applications
Service Manual EMWK 1060.0 Power levels and their applications In order to ensure maximum possible flexibility during the cooking process, the microwave oven was equipped with different power levels: 1000 W Very rapid heating of liquids and (fresh or deep-frozen) food and for cooking vegetables... -
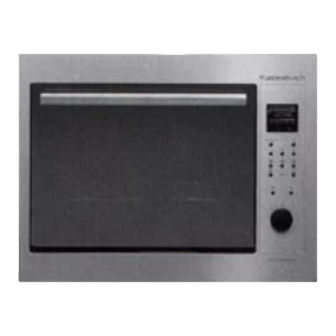
Page 11: Control Elements And Modes Of Operation
Service Manual EMWK 1060.0 Control elements and modes of operation Control panel Display of the time Oven temperature display and modes Mode selection button Clock button Button for Turntable stop button microwave power Temperature selector AUTO buttons for quick cooking processes already stored... -
Page 12: Setting The Clock
Service Manual EMWK 1060.0 Setting the clock After the appliance has been connected to the house mains or after a power failure, four dashes (--:--) appear in the display. In order to enter the time, proceed as described below: 1. Press the button “Set time”. -
Page 13: Memotime" Function
Service Manual EMWK 1060.0 “Memotime” function In this mode the time setting can be used for up to 60 minutes with the oven not in operation. Press the button “Mode selection” until 3 dashes appear in the display “Oven temperature”. - Page 14 Service Manual EMWK 1060.0 Set the cooking time in minutes by turning the knob. With the functions: Only microwave Combination mode microwave + hot air in the oven Combination mode microwave + grill Select the power level of the microwaves by repeatedly pressing the button “Microwave power level” until the level you want is shown in the display in numbers (Watt) above the LOWER display and flashes.
-
Page 15: Automatic, Consecutive Defrosting And Cooking Processes
Service Manual EMWK 1060.0 At the end of the cooking time an acoustic signal is emitted (3 times) and “ ” appears in the display. Open the door and take out the food (the time appears). If the appliance is hot, the word “... -
Page 16: Retrieving Recipes Already Stored ("Auto" Buttons)
Service Manual EMWK 1060.0 Enter the subsequent cooking process by selecting the mode you want with the mode selection button and the corresponding display appears (e.g. combination mode microwave + hot air oven). Set the cooking time and, if programmed in the... -
Page 17: Rapid Heating
Service Manual EMWK 1060.0 Rapid heating This mode is very useful for heating small amounts of food or drinks or to prolong the cooking process already ended by several minutes. Press the START button: The appliance starts at the highest power level for a period of 30 sec. -
Page 18: Cleaning
Service Manual EMWK 1060.0 Cleaning Prior to all maintenance or cleaning work always pull out the mains plug and wait until the appliance has cooled down. The cavity is made of stainless steel and therefore cleaning is extremely easy. Always keep the cover panel of the microwave outlet opening free of oil and grease splashes. -
Page 19: Safety Precautions During Troubleshooting
Service Manual EMWK 1060.0 Safety precautions during troubleshooting Before it leaves the factory, every appliance is carefully checked but it must be correctly installed and operated. In spite of all safety measures, safety depends on correct installation and correct operation and maintenance by the customer. -
Page 20: Component Check
Service Manual EMWK 1060.0 Component check Maintenance of the turntable motor To gain access to the motor, it is necessary to cut through the metal reeds holding the motor cover (see Underside Fig. A). After the maintenance work, install the cover again with the two screws 4.2 x 9 again. -
Page 21: Magnetron Check - Resistance Measurement
Service Manual EMWK 1060.0 Magnetron check - Resistance measurement Measuring resistance: Target value: > 1 Ω With ohmmeter (scale Rx1) between the connections of the heating filaments of the magnetron. With ohmmeter at maximum measuring range infinite between each heating filament connections and the earthed frame. -
Page 22: Diode
Service Manual EMWK 1060.0 Diode Checking the diode: Normal result: Create a circuit with 12 V DC and a 2.5 V lamp between The lamp is either on or off, depending on the connections. the direction of current Abnormal result:... -
Page 23: Measuring The Output Power Of The Magnetron
Service Manual EMWK 1060.0 Measuring the output power of the magnetron The following procedure provides information on the working conditions of the magnetron but it does not reproduce an accurate measurement of the microwave output power. The test load is one litre (1000 ml) of water with a starting temperature of 15 - 24 °C in a container with a capacity of 1000 ml. -
Page 24: Troubleshooting
Service Manual EMWK 1060.0 Troubleshooting Cause / Remedy Fault The appliance does not work. • The door is not properly closed. • The plug is not properly inserted into the socket outlet. • There is no electricity in the socket outlet. -
Page 25: Wiring Diagram And Legend
Service Manual EMWK 1060.0 Wiring diagram and legend Break contact for ventilation duct Turntable motor Electronic check F1..F13 PC board terminals Magnetron fan High-voltage capacitor High-voltage diode High-voltage transformer Membrane switch contact Encoder contact NTC sensor contact Microswitch Magnetron Monitor microswitches...
Need help?
Do you have a question about the EMWK 1060.0 and is the answer not in the manual?
Questions and answers