GE IM-6 Owner's Manual And Installation Instructions
Icemaker accessory kit
Hide thumbs
Also See for IM-6:
- Installation instructions manual (8 pages) ,
- Owner's manual and installation instructions (74 pages)
Advertisement
Available languages
Available languages
Quick Links
Safety Information
. . . . . . . . . 1
Operating Instructions
Normal Sounds You May Hear . . . .2
Preparing for Vacation . . . . . . . . . .2
When You Should Set the
Icemaker Power Switch
to OFF . . . . . . . . . . . . . . . . . . . . . . . . . .2
Installation Instructions
Cold Water Line . . . . . . . . . . . .66-69
Fill Tube Templates . . . . . . . . . . . . .70
Fill Tube Extension
Templates . . . . . . . . . . . . . . . . . . . . .71
C
Icemaker
. . . . . . . . . . . . . . .10-13
F
Icemaker
. . . . . . . . . . . . . . .14-17
G
Icemaker
. . . . . . . . . . . . . . .18-21
H
Icemaker
. . . . . . . . . . . . . . .22-25
J
Icemaker
. . . . . . . . . . . . . . .26-29
K
Icemaker
. . . . . . . . . . . . . . .30-33
L
Icemaker
. . . . . . . . . . . . . . .34-37
M
Icemaker
. . . . . . . . . . . . . . .38-41
N
Icemaker
. . . . . . . . . . . . . . .42-45
P
Icemaker
. . . . . . . . . . . . . . .46-49
Q
Icemaker
. . . . . . . . . . . . . . .50-53
R
Icemaker
. . . . . . . . . . . . . . .54-57
S
Icemaker
. . . . . . . . . . . . . . .58-61
T
Icemaker
. . . . . . . . . . . . . . .62-65
Parts List . . . . . . . . . . . . . . . . . . . . .6, 7
Removing Existing
Ice Cube Tray Holder . . . . . . . . . . . .8
Repositioning or Removing
the Freezer Shelf . . . . . . . . . . . . . . . .9
Consumer Support
Consumer Support . . . . Back Cover
Warranty . . . . . . . . . . . . . . . . . . . . . 72
Which instructions should
you follow?
Look for a label on the back of the
refrigerator that will tell you which
instructions to use:
C
F
G
H
J
K
L
N
P
Q
R
S
T
or
ge.com
. . . . .2
Machine à glaçons
La section française commence à la page 73
Máquina de Hielos
La sección en español empieza en la página 159
M
197D6260P003
Owner's Manual and
Installation Instructions
Kit IM-6
This kit fits most models calling
for UK-KIT-1, UK-KIT-2, UK-KIT-4,
and all models calling for Kit IM-1,
IM-2, IM-3, IM-4 or IM5SS. If you
are replacing an icemaker with
Kit IM-1 or IM-2, see page 5.
Trousse
Manuel d'utilisation
et d'installation
Equipo de Accesorios
Manual del propietario
e instalación
★
49-60554 12-07 JR
Advertisement

Subscribe to Our Youtube Channel
Related Manuals for GE IM-6


Summary of Contents for GE IM-6
-
Page 1: Safety Information
Operating Instructions ..2 Before You Call For Service ..3, 4 Kit IM-6 Normal Sounds You May Hear ..2 This kit fits most models calling Preparing for Vacation ..2... -
Page 2: Important Safety Information
IMPORTANT SAFETY INFORMATION. READ ALL INSTRUCTIONS BEFORE USING. SAFETY PRECAUTIONS FOR YOUR SAFETY: Do not place fingers or hands in the automatic It will also prevent interference with moving parts icemaking mechanism while the refrigerator is of the ejector mechanism and the heating element plugged in. - Page 3 About the automatic icemaker. A newly-installed refrigerator may take 12 to 24 hours to begin making ice. Automatic Icemaker Icemaker The icemaker will produce seven cubes When the bin fills to the level of the feeler per cycle—approximately 100–130 cubes arm, the icemaker will stop producing ice.
-
Page 4: Before You Call For Service
Before you call for service… ge.com Troubleshooting Tips Save time and money! Review the charts on the following pages first and you may not need to call for service. Problem Possible Causes What To Do Automatic icemaker Freezer compartment too warm. - Page 5 Before you call for service… Troubleshooting Tips Problem Possible Causes What To Do Leaking water around Foam in the fill cup from • If the fill tube was installed by sliding it through the back the fill cup installing the fill tube. of the refrigerator, it may have picked up pieces of foam as it was pushed through.
- Page 6 Installation IM-6 Icemaker Kit Instructions Questions? Call 800.GE.CARES (800.432.2737) ge.com Visit our Website at: In Canada, call 1.800.561.3344 geappliances.ca Visit our Website at: BEFORE YOU BEGIN ARE YOU REPLACING AN ICEMAKER WITH THIS KIT? Read these instructions completely and carefully.
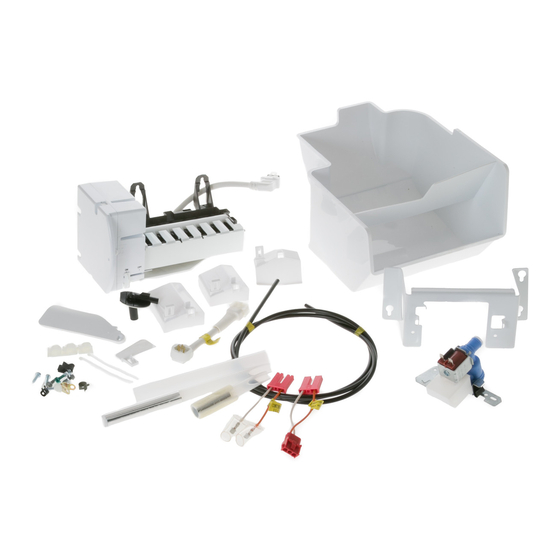
- Page 7 Installation Instructions CONTENTS OF KIT IM-6 15 Water Tube Inlet Icemaker Fill Cup (center-mounted) Icemaker (Appearance may vary) Icemaker Insert Water Line Clamp Fill Tube with Foil (strain relief) (5/8″ O.D.) Owner’s Manual & ICEMAKER Installation Instructions WARRANTY VERIFICATION Date Installed...
- Page 8 (end-mounted – 2-3/4″ long) *Always change the water valve when replacing an icemaker that makes round cubes. This new icemaker uses a different voltage which may cause the old valve to fail. For dispenser models, order GE Part Number WR57X96.
- Page 9 Installation Instructions REMOVE EXISTING ICE TRAY HOLDER Follow the instructions below for the ice tray holder that looks like yours. Type 1 Type 4 •Unhook the ice tray holder side and bottom from •Remove the 2 screws and save them for installation the retaining hooks.
- Page 10 Installation Instructions REPOSITION OR REMOVE FREEZER SHELVES On some models, you may need to remove or reposition the freezer shelf so the icemaker and bucket sit properly. Follow the instructions below for the ice tray holder that looks like yours. Type 1 •To reposition the two-piece shelf supports, slide the shelf up off the base mount.
- Page 11 Installation Instructions ICEMAKER INSTALLATION INSTRUCTIONS C Are these the right instructions for your model? Follow the Installation Instructions indicated by the label on the back of the refrigerator— or T INSTALL FILL TUBE EXTENSION BEFORE YOU BEGIN Cut the fill tube extension Read each step thoroughly before proceeding.
- Page 12 Installation Instructions INSTALL THE ICE BUCKET INSTALL THE ICEMAKER FILL CUP Put the ice bucket (11) directly under the icemaker Install the icemaker fill cup (side-mounted) (17) into the (to the left and all the way to the rear of the shelf icemaker as shown.
- Page 13 Installation Instructions WATER VALVE ASSEMBLY INSTALLATION INSTRUCTIONS C Are these the right instructions for your model? Follow the Installation Instructions indicated by the label on the back of the refrigerator— or T ATTACH THE WATER VALVE BEFORE YOU BEGIN • Locate the female connector plug (A) which is Read each step thoroughly before proceeding.
- Page 14 Installation Instructions INSTALL WATER LINE CLAMP ATTACH THE PLASTIC WATER LINE Fasten the plastic water line to the back of the • Push the metal water line clamp (strain relief) (12) cabinet with adhesive-backed fasteners (5), spacing onto the lower flange of the cabinet back, directly the fasteners as shown to take up the slack in the line.
- Page 15 Installation Instructions ICEMAKER INSTALLATION INSTRUCTIONS F Are these the right instructions for your model? Follow the Installation Instructions indicated by the label on the back of the refrigerator— or T INSTALL FILL TUBE EXTENSION BEFORE YOU BEGIN • Remove and discard the white Read each step thoroughly before proceeding.
- Page 16 Installation Instructions MOUNT THE ICEMAKER INSTALL THE ICEMAKER FILL CUP Install the icemaker fill cup (side-mounted) (17) into • Lift the icemaker so the fill tube extension (10) fits the icemaker as shown. in the fill cup opening (C). Hang the icemaker on the two mounting screws (A).
- Page 17 Installation Instructions WATER VALVE ASSEMBLY INSTALLATION INSTRUCTIONS F Are these the right instructions for your model? Follow the Installation Instructions indicated by the label on the back of the refrigerator— or T ATTACH THE WATER VALVE BEFORE YOU BEGIN • Locate the female connector plug (C) which is Read each step thoroughly before proceeding.
- Page 18 Installation Instructions INSTALL WATER LINE CLAMP ATTACH THE PLASTIC WATER LINE Attach the metal water line clamp (strain relief) Fasten the plastic water line to the back of the • (8) to the refrigerator. Drive one of the screws, cabinet with adhesive-backed fasteners (5), removed in Step 1, into the cabinet edge through spacing the fasteners as shown to take up the the clamp and hole in compressor cover.
- Page 19 Installation Instructions ICEMAKER INSTALLATION INSTRUCTIONS G Are these the right instructions for your model? Follow the Installation Instructions indicated by the label on the back of the refrigerator— or T LOOSEN MOUNTING SCREWS BEFORE YOU BEGIN Loosen the two mounting screws (B) but do not Read each step thoroughly before proceeding.
- Page 20 Installation Instructions MOUNT ICEMAKER POWER CORD ADAPTER (on some models) • Lift the icemaker so the fill tube extension (10) fits in the fill cup opening (C). Hang the icemaker There is a power cord adapter (18) included with on the two mounting screws (A). the kit.
- Page 21 Installation Instructions WATER VALVE ASSEMBLY INSTALLATION INSTRUCTIONS G Are these the right instructions for your model? Follow the Installation Instructions indicated by the label on the back of the refrigerator— or T ATTACH THE WATER VALVE BEFORE YOU BEGIN • Locate the female connector plug (B). Read each step thoroughly before proceeding.
- Page 22 Installation Instructions ATTACH THE PLASTIC WATER LINE INSTALL WATER LINE CLAMP Fasten the plastic water line to the back of the • Attach the metal water line clamp (strain relief) cabinet with adhesive-backed fasteners (5), (8) to the refrigerator. Drive the screw (7) from the spacing the fasteners as shown to take up the kit through the clamp (8) at the indent into the slack in the line.
- Page 23 Installation Instructions ICEMAKER INSTALLATION INSTRUCTIONS H Are these the right instructions for your model? Follow the Installation Instructions indicated by the label on the back of the refrigerator— or T NOTE: If you have refrigerator model TNS22 or TNX22, please refer to the installation instructions , instead of using the instructions.
- Page 24 Installation Instructions MOUNT ICEMAKER POWER CORD ADAPTER (on some models) • Lift the icemaker so the fill tube (16) fits in the fill cup opening (C). Hang the icemaker on the two There is a power cord adapter (18) included with mounting screws (A).
- Page 25 Installation Instructions WATER VALVE ASSEMBLY INSTALLATION INSTRUCTIONS H Are these the right instructions for your model? Follow the Installation Instructions indicated by the label on the back of the refrigerator— or T • Plug the female connector (B) onto the male BEFORE YOU BEGIN terminals on the water valve (4).
- Page 26 Installation Instructions CONNECT THE WATER LINE WATER VALVE INSTALLED Refer to the Water Line Installation Instructions for • Squeeze the ends of the hose clamp (3) from connection to the home water supply. After water the kit with pliers and slide the clamp over the line installation is completed, set the icemaker water tube inlet.
- Page 27 Installation Instructions ICEMAKER INSTALLATION INSTRUCTIONS J Are these the right instructions for your model? Follow the Installation Instructions indicated by the label on the back of the refrigerator— or T PREPARE THE REFRIGERATOR BEFORE YOU BEGIN Find the sticker located Read each step thoroughly before proceeding.
- Page 28 Installation Instructions PLUG IN THE ICEMAKER INSTALL THE ICEMAKER FILL CUP Place the icemaker on its Install the icemaker fill cup (side-mounted) (17) into side as shown. Insert the the icemaker as shown. icemaker power cord plug (A) into the socket on the side wall, making sure the prongs and holes are matched.
- Page 29 Installation Instructions WATER VALVE ASSEMBLY INSTALLATION INSTRUCTIONS J Are these the right instructions for your model? Follow the Installation Instructions indicated by the label on the back of the refrigerator— or T ATTACH THE WATER VALVE BEFORE YOU BEGIN • Locate the female connector plug (A). Read each step thoroughly before proceeding.
- Page 30 Installation Instructions INSTALL WATER LINE CLAMP ATTACH THE PLASTIC WATER LINE Route the plastic water line along the back of the • Push the metal water line clamp (strain relief) (12) refrigerator to the icemaker hole in the case back. onto the lower flange of the cabinet back, directly in Use three of the adhesive-backed fasteners (5) to line with the water valve.
- Page 31 Installation Instructions ICEMAKER INSTALLATION INSTRUCTIONS K Are these the right instructions for your model? Follow the Installation Instructions indicated by the label on the back of the refrigerator— or T INSTALL FILL TUBE BEFORE YOU BEGIN • Slide the insulated fill tube (21) Read each step thoroughly before proceeding.
- Page 32 Installation Instructions INSTALL THE ICEMAKER FILL CUP MOUNT THE ICEMAKER • Lift the icemaker up and hang it on the icemaker AND INSERT bracket (26). Make sure the insulated fill tube (21) Install the icemaker fill cup (center-mounted) (23) and goes into the fill cup (23) opening.
- Page 33 Installation Instructions WATER VALVE ASSEMBLY INSTALLATION INSTRUCTIONS K Are these the right instructions for your model? Follow the Installation Instructions indicated by the label on the back of the refrigerator— or T ATTACH THE WATER VALVE BEFORE YOU BEGIN 3-pin models •...
- Page 34 Installation Instructions ROUTE AND ATTACH THE PLASTIC CONNECT THE WATER LINE WATER LINE • Make sure there is enough plastic water line to Route the plastic water line along the back of the • extend from the water valve to well into the water refrigerator to the water tube inlet.
- Page 35 Installation Instructions ICEMAKER INSTALLATION INSTRUCTIONS L Are these the right instructions for your model? Follow the Installation Instructions indicated by the label on the back of the refrigerator— or T PREPARE FOR INSTALLATION BEFORE YOU BEGIN • Remove and discard the large white plug from Read each step thoroughly before proceeding.
- Page 36 Installation Instructions MOUNT THE ICEMAKER INSTALL THE ICEMAKER FILL CUP • Lift the icemaker so the fill tube extension (10) Install the icemaker fill cup (side-mounted) (17) into the fits in the fill cup opening (C). Hang the icemaker icemaker as shown. on the two mounting screws (A).
- Page 37 Installation Instructions WATER VALVE ASSEMBLY INSTALLATION INSTRUCTIONS L Are these the right instructions for your model? Follow the Installation Instructions indicated by the label on the back of the refrigerator— or T ATTACH THE WATER VALVE BEFORE YOU BEGIN • Locate the female connector plug (C) which is Read each step thoroughly before proceeding.
- Page 38 Installation Instructions INSTALL WATER LINE CLAMP ROUTE AND ATTACH THE PLASTIC Attach the metal water line clamp (strain relief) • WATER LINE (8) to the refrigerator. Drive one of the screws, Route the plastic water line along the back of the •...
- Page 39 Installation Instructions ICEMAKER INSTALLATION INSTRUCTIONS M Are these the right instructions for your model? Follow the Installation Instructions indicated by the label on the back of the refrigerator— or T PREPARE FOR INSTALLATION BEFORE YOU BEGIN Inside the freezer, loosen the two mounting screws Read each step thoroughly before proceeding.
- Page 40 Installation Instructions MOUNT THE ICEMAKER INSTALL THE ICEMAKER FILL CUP • Lift the icemaker so the fill tube extension (10) fits Install the icemaker fill cup (side-mounted) (17) into in the fill cup opening (D). Hang the icemaker on the icemaker as shown. the two screws.
- Page 41 Installation Instructions WATER VALVE ASSEMBLY INSTALLATION INSTRUCTIONS M Are these the right instructions for your model? Follow the Installation Instructions indicated by the label on the back of the refrigerator— or T ATTACH THE WATER VALVE BEFORE YOU BEGIN • Locate the female connector plug. Plug the Read each step thoroughly before proceeding.
- Page 42 Installation Instructions ROUTE AND ATTACH THE PLASTIC INSTALL WATER LINE CLAMP • Attach the metal water line clamp (strain relief) WATER LINE (8) to the refrigerator. Drive the screw (7) from the Fasten the plastic water line to the back of the •...
- Page 43 Installation Instructions ICEMAKER INSTALLATION INSTRUCTIONS N Are these the right instructions for your model? Follow the Installation Instructions indicated by the label on the back of the refrigerator— or T PREPARE FOR INSTALLATION BEFORE YOU BEGIN • Remove and discard the large white plug from the Read each step thoroughly before proceeding.
- Page 44 Installation Instructions INSTALL THE ICEMAKER MOUNT THE ICEMAKER FILL CUP • Lift the icemaker so the fill tube (16) goes into the fill cup opening (17). Hang the icemaker on the Install the icemaker fill cup (side-mounted) (17) into the two screws (14).
- Page 45 Installation Instructions WATER VALVE ASSEMBLY INSTALLATION INSTRUCTIONS N Are these the right instructions for your model? Follow the Installation Instructions indicated by the label on the back of the refrigerator— or T ATTACH THE WATER VALVE BEFORE YOU BEGIN • Locate the female connector plug. Plug the Read each step thoroughly before proceeding.
- Page 46 Installation Instructions CONNECT THE WATER LINE WATER VALVE INSTALLED Refer to the Water Line Installation Instructions for • Make sure there is enough plastic water line to connection to the home water supply. After water extend from the water valve to well into the line installation is completed, set the icemaker water tube inlet (15).
- Page 47 Installation Instructions ICEMAKER INSTALLATION INSTRUCTIONS P Are these the right instructions for your model? Follow the Installation Instructions indicated by the label on the back of the refrigerator— or T INSTALL FILL TUBE BEFORE YOU BEGIN • Cut the fill tube (16) to the Read each step thoroughly before proceeding.
- Page 48 Installation Instructions POWER CORD ADAPTER MOUNT THE ICEMAKER • Lift the icemaker so the fill tube (16) fits in the fill (on some models) cup opening (E). Hang the icemaker on the two There is a power cord adapter (18) included with mounting screws (C).
- Page 49 Installation Instructions WATER VALVE ASSEMBLY INSTALLATION INSTRUCTIONS P Are these the right instructions for your model? Follow the Installation Instructions indicated by the label on the back of the refrigerator— or T ATTACH THE WATER VALVE BEFORE YOU BEGIN • Locate the female connector plug (B). If there Read each step thoroughly before proceeding.
- Page 50 Installation Instructions CONNECT THE WATER LINE WATER VALVE INSTALLED Refer to the Water Line Installation Instructions for • Make sure there is enough plastic water line to connection to the home water supply. After water extend from the water valve to well into the water line installation is completed, set the icemaker tube inlet (15).
- Page 51 Installation Instructions ICEMAKER INSTALLATION INSTRUCTIONS Q Are these the right instructions for your model? Follow the Installation Instructions indicated by the label on the back of the refrigerator— or T INSTALL FILL TUBE BEFORE YOU BEGIN • Cut the fill tube (16) to the Read each step thoroughly before proceeding.
- Page 52 Installation Instructions MOUNT THE ICEMAKER INSTALL THE ICEMAKER FILL CUP • Lift the icemaker so the fill tube (16) fits in the fill Install the icemaker fill cup (side-mounted) (17) into the cup opening (E). Hang the icemaker on the two icemaker as shown.
- Page 53 Installation Instructions WATER VALVE ASSEMBLY INSTALLATION INSTRUCTIONS Q Are these the right instructions for your model? Follow the Installation Instructions indicated by the label on the back of the refrigerator— or T • Fasten the water valve to the cabinet edge hole BEFORE YOU BEGIN with the hex-head screw (13) from the kit.
- Page 54 Installation Instructions CONNECT THE WATER LINE WATER VALVE INSTALLED Refer to the Water Line Installation Instructions for • It may be necessary to remove the screw from connection to the home water supply. After water the top right condenser mounting clip for better line installation is completed, set the icemaker access to the water tube inlet.
- Page 55 Installation Instructions ICEMAKER INSTALLATION INSTRUCTIONS R Are these the right instructions for your model? Follow the Installation Instructions indicated by the label on the back of the refrigerator— or T INSTALL FILL TUBE BEFORE YOU BEGIN • Cut the fill tube (16) to the Read each step thoroughly before proceeding.
- Page 56 Installation Instructions MOUNT THE ICEMAKER INSTALL THE ICEMAKER FILL CUP • Lift the icemaker so the fill tube (16) fits in the fill Install the icemaker fill cup (side-mounted) (17) into the cup opening (E). Hang the icemaker on the two icemaker as shown.
- Page 57 Installation Instructions WATER VALVE ASSEMBLY INSTALLATION INSTRUCTIONS R Are these the right instructions for your model? Follow the Installation Instructions indicated by the label on the back of the refrigerator— or T ATTACH THE WATER VALVE BEFORE YOU BEGIN • Locate the female connector plug (C). Read each step thoroughly before proceeding.
- Page 58 Installation Instructions INSTALL WATER LINE CLAMP ROUTE AND ATTACH THE PLASTIC Attach the water line clamp (strain relief) (8) from WATER LINE • the kit to the refrigerator. With the clamp directly Route the plastic water line along the back of •...
- Page 59 Installation Instructions ICEMAKER INSTALLATION INSTRUCTIONS S Are these the right instructions for your model? Follow the Installation Instructions indicated by the label on the back of the refrigerator— or T PREPARE FOR INSTALLATION (cont.) BEFORE YOU BEGIN • Inside the freezer, remove the two small white Read each step thoroughly before proceeding.
- Page 60 Installation Instructions INSTALL THE MOUNTING SCREWS MOUNT THE ICEMAKER • Lift the icemaker so the fill tube shipped with the • Skip to Step 5 if screws are already in place in refrigerator fits in the fill cup opening (E). Hang the the freezer side wall.
- Page 61 Installation Instructions WATER VALVE ASSEMBLY INSTALLATION INSTRUCTIONS S Are these the right instructions for your model? Follow the Installation Instructions indicated by the label on the back of the refrigerator— or T ATTACH THE WATER VALVE BEFORE YOU BEGIN • Locate the female connector plug (C). Read each step thoroughly before proceeding.
- Page 62 Installation Instructions ATTACH THE WATER VALVE ROUTE AND ATTACH THE WATER (cont.) TUBE • Clip the end of the ground wire to the refrigerator cabinet. • Fasten the plastic water tube to the back of the refrigerator with three of the adhesive-backed fasteners (5), spacing the fasteners as shown.
- Page 63 Installation Instructions ICEMAKER INSTALLATION INSTRUCTIONS T Are these the right instructions for your model? Follow the Installation Instructions indicated by the label on the back of the refrigerator— or T REMOVE THE OUTLET COVER BEFORE YOU BEGIN • Remove the outlet cover Read each step thoroughly before proceeding.
- Page 64 Installation Instructions INSTALL THE MOUNTING SCREWS MOUNT THE ICEMAKER • Lift the icemaker so the fill tube shipped with the • Skip to Step 6 if screws are already in place in refrigerator fits in the fill cup opening (E). Hang the the freezer side wall.
- Page 65 Installation Instructions WATER VALVE ASSEMBLY INSTALLATION INSTRUCTIONS T Are these the right instructions for your model? Follow the Installation Instructions indicated by the label on the back of the refrigerator— or T ATTACH THE WATER VALVE BEFORE YOU BEGIN • Locate the female connector plug. Plug the Read each step thoroughly before proceeding.
- Page 66 Installation Instructions REMOVE THE TUBE COVER ROUTE AND ATTACH THE PLASTIC WATER LINE • At the bottom right rear of the refrigerator, remove the screws holding the tube cover (A) to the case back. Fasten the plastic water line to the back of the •...
- Page 67 1/4″ outer diameter to connect the refrigerator Osmosis Water System, the only approved installation to the water supply. If using copper, be sure both is with a GE RVKit. For other reverse osmosis water ends of the tubing are cut square. systems, follow the manufacturer’s To determine how much tubing you need: measure recommendations.
- Page 68 • Two 1/4 ″ outer diameter compression nuts and the water pipe. 2 ferrules (sleeves)–to connect the copper tubing to the shutoff valve and the refrigerator water valve. • If you are using a GE SmartConnect ™ Refrigerator Tubing kit, the necessary fittings are preassembled to the tubing.
- Page 69 (WX08X10002) to Tighten the compression nut securely. connect the filter. Do not cut plastic tube to install filter. For plastic tubing from a GE SmartConnect ™ Refrigerator Tubing kit, insert the molded end Remove the plastic flexible cap from the water of the tubing into the shutoff valve and tighten valve (refrigerator connection).
- Page 70 Arrange the coil of tubing so that it does not vibrate against the back of the refrigerator or Place the compression nut and ferrule (sleeve) against the wall. Push the refrigerator back to onto the end of the tubing as shown. On GE the wall. SmartConnect ™...
- Page 71 FILL TUBE TEMPLATES Refer to the appropriate fill tube template indicated by the label on the back of the refrigerator— or S...
- Page 72 FILL TUBE EXTENSION TEMPLATES Refer to the appropriate fill tube extension template indicated by the label on the back of the refrigerator— or M ″ Cut the fill tube extension (10) to this length for (11.1 cm) Cut the fill tube extension (10) to this length for 6″...
- Page 73 This warranty is extended to the original purchaser and any succeeding owner for products purchased for home use within the USA. If the product is located in an area where service by a GE Authorized Servicer is not available, you may be responsible for a trip charge or you may be required to bring the product to an Authorized GE Service location for service.
- Page 74 Soutien des consommateurs ..158 Changement de place ou enlèvement de la clayette du Trousse IM-6 compartiment congélation ..81 Cette trousse convient à la Conduite d’eau froide ..150–153 plupart des modèles qui ont...
- Page 75 La machine à glaçons automatique. Un réfrigérateur nouvellement installé peut prendre de 12 à 24 heures pour commencer à produire des glaçons. Machine à glaçons automatique Machine à glaçons La machine à glaçons produit sept glaçons Jetez les premiers lots de glaçons pour par cycle, soit environ 100 à...
- Page 76 Avant d’appeler un réparateur… electromenagersge.ca Liste de vérifications préventives Économisez votre temps et votre argent! Consultez les tableaux des pages suivantes, vous éviterez peut-être d’appeler un réparateur. Problème Causes possibles Que faire La machine à glaçons Le compartiment congélateur • Après avoir installé la trousse, laissez le réfrigérateur refroidir automatique ne est trop chaud.
- Page 77 Avant d’appeler un réparateur… Liste de vérifications préventives Votre problème Causes possibles Solutions Fuite d’eau autour du Mousse dans le récipient de • Si vous avez installé la conduite d’alimentation en le faisant récipient de remplissage remplissage en provenance glisser à travers l’arrière du réfrigérateur, il peut avoir amassée de l’installation de la conduite des morceaux de mousse pendant que vous la poussiez.
- Page 78 Instructions IM-6 Trousse de d’installation machine à glaçons Vous avez des questions? Au Canada, appelez au numéro 1.800.561.3344 ou visitez electromenagersge.ca notre site Web à l’adresse AVANT DE COMMENCER REMPLACEZ-VOUS UNE MACHINE À GLAÇONS EXISTANTE PAR CETTE Lisez ces instructions complètement et TROUSSE? attentivement.
- Page 79 Instructions d’installation CONTENU DE LA TROUSSE IM-6 Vis à tête hexagonale 15 Raccord d’arrivée de conduite d’eau Machine à glaçons (L’aspect peut varier) Collier de serrage de Récipient de remplissage conduite d’eau (collier de la machine à glaçons Conduite d’alimentation...
- Page 80 * Changez toujours le robinet d’eau quand vous remplacez une machine à glaçons qui fait des glaçons ronds. Cette nouvelle machine à glaçons utilise un voltage différent qui peut occasionner une panne de vieux robinet. Pour les modèles à distributeur, commandez la pièce GE numéro WR57X96.
- Page 81 Instructions d’installation ENLEVEZ LE SUPPORT ACTUEL DE PLATEAU À GLAÇONS Suivez les instructions suivantes pour le support de plateau à glaçons qui ressemble au vôtre. Type 1 Type 4 •Décrochez le côté et le bas du support de plateau à •Enlevez les 2 vis et mettez-les de côté...
- Page 82 Instructions d’installation CHANGEZ DE PLACE OU ENLEVEZ LA CLAYETTE DU COMPARTIMENT CONGÉLATION Sur certains modèles, vous devez enlever ou changer de place la clayette du compartiment congélation pour bien installer la machine à glaçons et le bac à glaçons. Suivez les instructions suivantes pour le support de plateau à...
- Page 83 Instructions d’installation INSTRUCTIONS D’INSTALLATION DE LA MACHINE À GLAÇONS C Est-ce que ce sont les bonnes instructions pour votre modèle? Suivez les instructions d’installation indiquées sur l’étiquette placée à l’arrière de votre réfrigérateur — ou T AVANT DE COMMENCER INSTALLEZ LA CONDUITE D’ALIMENTATION D’EAU Lisez soigneusement chaque étape avant de Coupez la rallonge de conduite d’alimentation (10)
- Page 84 Instructions d’installation BRANCHEZ LA MACHINE À GLAÇONS ADAPTATEUR DE CORDON D’ALIMENTATION ÉLECTRIQUE Placez la machine à glaçons dans le compartiment congélation, de côté comme l’indique la figure. (sur certains modèles) Insérez la fiche de cordon d’alimentation électrique Un adaptateur de cordon d’alimentation électrique de la machine à...
- Page 85 Instructions d’installation INSTALLEZ LE BAC À GLAÇONS COLLEZ L’ÉTIQUETTE DE GARANTIE Mettez le bac à glaçons directement en dessous de la Vous trouverez dans cette trousse une étiquette (9), machine à glaçons (à gauche et tout au fond de la sur laquelle vous devez noter la date de l’installation, clayette sous la machine à...
- Page 86 Instructions d’installation FIXEZ LE ROBINET D’EAU FIXEZ LE COLLIER DE SERRAGE • Trouvez la prise du connecteur femelle (A) qui • Poussez le collier de serrage de conduite d’eau est fixé à l’armoire du réfrigérateur par un lien en métal (12) sur le rebord inférieur de l’arrière métallique.
- Page 87 Instructions d’installation BRANCHEZ LA CONDUITE D’EAU FIXEZ LA CONDUITE D’EAU EN MATIÈRE PLASTIQUE • Enlevez le petit bouchon en matière plastique (B) en bas du raccord d’arrivée de conduite d’eau situé en Attachez la conduite d’eau en matière plastique haut du coin arrière droit du réfrigérateur. à...
- Page 88 Instructions d’installation INSTRUCTIONS D’INSTALLATION DE LA MACHINE À GLAÇONS F Est-ce que ce sont les bonnes instructions pour votre modèle? Suivez les instructions d’installation indiquées sur l’étiquette placée à l’arrière de votre réfrigérateur — ou T DÉVISSEZ LES VIS DE MONTAGE AVANT DE COMMENCER Desserrez les deux vis de montage (A) sans les Lisez soigneusement chaque étape avant de...
- Page 89 Instructions d’installation METTEZ LE COMMUTATEUR DE INSTALLEZ LE RÉCIPIENT DE MARCHE EN POSITION OFF (arrêt) REMPLISSAGE DE LA MACHINE Mettez le commutateur de marche de la machine à À GLAÇONS glaçons en position OFF (arrêt). Laissez le commutateur Installez le récipient de remplissage (montage de marche en position OFF (arrêt) tant que vous n’avez de côté) (17) dans la machine à...
- Page 90 Instructions d’installation INSTALLEZ LE BAC À GLAÇONS MONTEZ À NOUVEAU LE COUVERCLE DE PRISE ÉLECTRIQUE Mettez le bac à glaçons (11) directement en Si le couvercle de prise enlevé pendant la première dessous de la machine étape correspond à la figure 1, passez à l’étape 9. à...
- Page 91 Instructions d’installation INSTRUCTIONS D’INSTALLATION DE L’ENSEMBLE DE ROBINET D’EAU F Est-ce que ce sont les bonnes instructions pour votre modèle? Suivez les instructions d’installation indiquées sur l’étiquette placée à l’arrière de votre réfrigérateur — ou T FIXEZ LE ROBINET D’EAU AVANT DE COMMENCER •...
- Page 92 Instructions d’installation MONTEZ LE COLLIER DE SERRAGE FIXEZ LA CONDUITE D’EAU EN DE LA CONDUITE D’EAU MATIÈRE PLASTIQUE Fixez le collier de serrage de la conduite d’eau Attachez la conduite d’eau en matière plastique • en métal (8) au réfrigérateur. Vissez l’une des vis, à...
- Page 93 Instructions d’installation INSTRUCTIONS D’INSTALLATION DE LA MACHINE À GLAÇONS G Est-ce que ce sont les bonnes instructions pour votre modèle? Suivez les instructions d’installation indiquées sur l’étiquette placée à l’arrière de votre réfrigérateur — ou T ENLEVEZ LE COUVERCLE AVANT DE COMMENCER DE LA PRISE Lisez soigneusement chaque étape avant de Enlevez le couvercle de la prise...
- Page 94 Instructions d’installation INSTALLEZ LE RÉCIPIENT DE METTEZ LE COMMUTATEUR DE REMPLISSAGE ET L’INSERTION MARCHE EN POSITION OFF (arrêt) DE LA MACHINE À GLAÇONS Mettez le commutateur de marche de la machine à glaçons en position OFF (arrêt). Laissez le commutateur Installez le récipient de remplissage de la machine de marche en position OFF (arrêt) tant que vous n’avez à...
- Page 95 Instructions d’installation MONTEZ LA MACHINE À GLAÇONS INSTALLEZ LE BAC À GLAÇONS Mettez le bac à glaçons • Soulevez la machine à glaçons de manière à ce (11) directement sous la que la rallonge de conduite d’alimentation (10) machine à glaçons (à la entre dans l’ouverture du récipient de gauche et tout au fond remplissage (C).
- Page 96 Instructions d’installation INSTRUCTIONS D’INSTALLATION DE L’ENSEMBLE DE ROBINET D’EAU Est-ce que ce sont les bonnes instructions pour votre modèle? Suivez les instructions d’installation indiquées sur l’étiquette placée à l’arrière de votre réfrigérateur — ou T FIXEZ LE ROBINET D’EAU AVANT DE COMMENCER •...
- Page 97 Instructions d’installation MONTEZ LE COLLIER DE SERRAGE FIXEZ LA CONDUITE D’EAU DE LA CONDUITE D’EAU EN MATIÈRE PLASTIQUE • Fixez le collier de serrage de la conduite d’eau Attachez la conduite d’eau en matière plastique en métal (8) au réfrigérateur. Vissez la vis (7) de la à...
- Page 98 Instructions d’installation INSTRUCTIONS D’INSTALLATION DE LA MACHINE À GLAÇONS H Est-ce que ce sont les bonnes instructions pour votre modèle? Suivez les instructions d’installation indiquées sur l’étiquette placée à l’arrière de votre réfrigérateur — ou T NOTE : Si votre réfrigérateur est un modèle TNS22 ouTNX22, veuillez consulter les instructions d’installation au lieu d’utiliser les instructions INSTALLEZ LE RACCORD DE...
- Page 99 Instructions d’installation DESSERREZ LES VIS DE MONTAGE ADAPTATEUR DE CORDON D’ALIMENTATION ÉLECTRIQUE Desserrez les deux vis de montage (A) sans les dévisser complètement. Ces vis doivent sortir (sur certains modèles) d’environ 13 mm (1/2 po) de la paroi du Un adaptateur de cordon d’alimentation électrique compartiment congélation.
- Page 100 Instructions d’installation BRANCHEZ LA MACHINE À GLAÇONS INSTALLEZ LE BAC À GLAÇONS Placez la machine à glaçons dans le compartiment Mettez le bac à glaçons congélation, de côté (11) en place en dessous comme l’indique la de la machine à glaçons. figure.
- Page 101 Instructions d’installation INSTRUCTIONS D’INSTALLATION DE L’ENSEMBLE DE ROBINET D’EAU H Est-ce que ce sont les bonnes instructions pour votre modèle? Suivez les instructions d’installation indiquées sur l’étiquette placée à l’arrière de votre réfrigérateur — ou T • Branchez le connecteur femelle (B) aux contacts AVANT DE COMMENCER mâles du robinet d’eau (4).
- Page 102 Instructions d’installation BRANCHEZ LA CONDUITE D’EAU UNE FOIS LE ROBINET D’EAU INSTALLÉ • Pincez les extrémités du collier de serrage de tuyau (3) de la trousse avec des pinces et faites Consultez Instructions d’installation de la conduite glisser le collier de serrage sur le raccord d’arrivée d’eau pour brancher à...
- Page 103 Instructions d’installation INSTRUCTIONS D’INSTALLATION DE LA MACHINE À GLAÇONS J Est-ce que ce sont les bonnes instructions pour votre modèle? Suivez les instructions d’installation indiquées sur l’étiquette placée à l’arrière de votre réfrigérateur — ou T PRÉPAREZ VOTRE RÉFRIGÉRATEUR AVANT DE COMMENCER Trouvez l’étiquette située à...
- Page 104 Instructions d’installation METTEZ LE COMMUTATEUR DE ADAPTATEUR DE CORDON MARCHE EN POSITION OFF (arrêt) D’ALIMENTATION ÉLECTRIQUE (sur certains modèles) Mettez le commutateur de marche de la machine à glaçons en position OFF (arrêt). Laissez le Un adaptateur de cordon d’alimentation électrique commutateur de marche en position OFF (arrêt) (18) est compris dans la trousse.
- Page 105 Instructions d’installation FIXEZ LA MACHINE À GLAÇONS COLLEZ L’ÉTIQUETTE DE GARANTIE • Soulevez la machine à glaçons de manière à ce Vous trouverez dans cette trousse une étiquette (9), que la rallonge de la conduite d’alimentation (10) sur laquelle vous devez noter la date de l’installation, entre dans l’ouverture du récipient de remplissage à...
- Page 106 Instructions d’installation INSTRUCTIONS D’INSTALLATION DE L’ENSEMBLE DE ROBINET D’EAU J Est-ce que ce sont les bonnes instructions pour votre modèle? Suivez les instructions d’installation indiquées sur l’étiquette placée à l’arrière de votre réfrigérateur — ou T FIXEZ LE ROBINET D’EAU AVANT DE COMMENCER •...
- Page 107 Instructions d’installation MONTEZ LE COLLIER DE SERRAGE FIXEZ LA CONDUITE D’EAU DE LA CONDUITE D’EAU EN MATIÈRE PLASTIQUE Placez la conduite d’eau en matière plastique le • Poussez le collier de serrage de la conduite d’eau long de l’arrière du réfrigéragteur jusqu’au trou en métal (12) sur le rebord inférieur derrière de la machine à...
- Page 108 Instructions d’installation INSTRUCTIONS D’INSTALLATION DE LA MACHINE À GLAÇONS K Est-ce que ce sont les bonnes instructions pour votre modèle? Suivez les instructions d’installation indiquées sur l’étiquette placée à l’arrière de votre réfrigérateur — ou T MONTEZ LE TUYAU D’ALIMENTATION AVANT DE COMMENCER ISOLÉ...
- Page 109 Instructions d’installation METTEZ LE COMMUTATEUR DE BRANCHEZ LA MACHINE MARCHE EN POSITION OFF (arrêt) À GLAÇONS Mettez le commutateur de marche de la En tenant la machine à glaçons en place, insérez la machine à glaçons en position OFF (arrêt). Laissez fiche de cordon d’alimentation électrique dans la le commutateur de marche en position OFF (arrêt) prise située sur la paroi arrière du réfrigérateur.
- Page 110 Instructions d’installation FIXEZ LA MACHINE À GLAÇONS COLLEZ L’ÉTIQUETTE DE GARANTIE • Soulevez la machine à glaçons et accrochez-la au Vous trouverez dans cette trousse une étiquette (9), support de machine à glaçons (26). Assurez-vous sur laquelle vous devez noter la date de l’installation, que la conduite d’alimentation d’eau isolée (21) à...
- Page 111 Instructions d’installation INSTRUCTIONS D’INSTALLATION DE L’ENSEMBLE DE ROBINET D’EAU K Est-ce que ce sont les bonnes instructions pour votre modèle? Suivez les instructions d’installation indiquées sur l’étiquette placée à l’arrière de votre réfrigérateur — ou T FIXEZ LE ROBINEAU D’EAU AVANT DE COMMENCER Modèle à...
- Page 112 Instructions d’installation FIXEZ LE COLLIER DE SERRAGE PLACEZ LA CONDUITE D’EAU EN MATIÈRE PLASTIQUE ET FIXEZ-LA • Fixez le collier de la conduite d’eau (8) au réfrigérateur. Vissez la vis (7) de la trousse dans AU RÉFRIGÉRATEUR le petit trou situé à l’arrière de l’armoire du •...
- Page 113 Instructions d’installation INSTRUCTIONS D’INSTALLATION DE LA MACHINE À GLAÇONS L Est-ce que ce sont les bonnes instructions pour votre modèle? Suivez les instructions d’installation indiquées sur l’étiquette placée à l’arrière de votre réfrigérateur — ou T PRÉPAREZ VOTRE INSTALLATION AVANT DE COMMENCER •...
- Page 114 Instructions d’installation METTEZ LE COMMUTATEUR DE BRANCHEZ LA MACHINE MARCHE EN POSITION OFF (arrêt) À GLAÇONS Mettez le commutateur de marche de la machine à Insérez la fiche de cordon d’alimentation électrique glaçons en position OFF (arrêt). Laissez le commutateur dans la prise située sur la paroi arrière, en vous de marche en position OFF (arrêt) tant que vous n’avez assurant de mettre les bonnes broches dans les bons...
- Page 115 Instructions d’installation MONTEZ LA MACHINE À GLAÇONS COLLEZ L’ÉTIQUETTE DE GARANTIE • Soulevez la machine à glaçons de manière à ce Vous trouverez dans cette trousse une étiquette (9), sur que la rallonge de conduite d’alimentation (10) laquelle vous devez noter la date de l’installation, à des entre dans l’ouverture du récipient de fins de garantie.
- Page 116 Instructions d’installation INSTRUCTIONS D’INSTALLATION DE L’ENSEMBLE DE ROBINET D’EAU L Est-ce que ce sont les bonnes instructions pour votre modèle? Suivez les instructions d’installation indiquées sur l’étiquette placée à l’arrière de votre réfrigérateur — ou T AVANT DE COMMENCER FIXEZ LE ROBINET D’EAU •...
- Page 117 Instructions d’installation MONTEZ LE COLLIER DE SERRAGE PLACEZ LA CONDUITE D’EAU EN DE LA CONDUITE D’EAU MATIÈRE PLASTIQUE ET FIXEZ-LA Fixez le collier de serrage de la conduite d’eau AU RÉFRIGÉRATEUR • en métal (8) au réfrigérateur. Vissez l’une des vis, •...
- Page 118 Instructions d’installation INSTRUCTIONS D’INSTALLATION DE LA MACHINE À GLAÇONS M Est-ce que ce sont les bonnes instructions pour votre modèle? Suivez les instructions d’installation indiquées sur l’étiquette placée à l’arrière de votre réfrigérateur — ou T ENLEVEZ LE COUVERCLE AVANT DE COMMENCER DE LA PRISE ÉLECTRIQUE Lisez soigneusement chaque étape avant de •...
- Page 119 Instructions d’installation METTEZ LE COMMUTATEUR DE BRANCHEZ LA MACHINE MARCHE EN POSITION OFF (arrêt) À GLAÇONS Mettez le commutateur de marche de la machine à En tenant la machine à glaçons en place, insérez glaçons en position OFF (arrêt). Laissez le commutateur la fiche de cordon d’alimentation électrique dans de marche en position OFF (arrêt) tant que vous n’avez la prise située sur la paroi de côté, en vous assurant...
- Page 120 Instructions d’installation MONTEZ LA MACHINE À GLAÇONS INSTALLEZ LE BAC À GLAÇONS • Soulevez la machine à glaçons de manière à ce que Mettez le bac à glaçons (11) sous la machine à la rallonge de conduite d’alimentation d’eau (10) glaçons.
- Page 121 Instructions d’installation INSTRUCTIONS D’INSTALLATION DE L’ENSEMBLE DE ROBINET D’EAU M Est-ce que ce sont les bonnes instructions pour votre modèle? Suivez les instructions d’installation indiquées sur l’étiquette placée à l’arrière de votre réfrigérateur — ou T FIXEZ LE ROBINET D’EAU AVANT DE COMMENCER •...
- Page 122 Instructions d’installation BRANCHEZ LA CONDUITE D’EAU PLACEZ LA CONDUITE D’EAU EN MATIÈRE PLASTIQUE ET FIXEZ-LA • Assurez-vous que suffisamment de conduite d’eau en matière plastique sorte du robinet AU RÉFRIGÉRATEUR d’eau pour bien pénétrer dans le raccord Placez la conduite d’eau en matière plastique •...
- Page 123 Instructions d’installation INSTRUCTIONS D’INSTALLATION DE LA MACHINE À GLAÇONS N Est-ce que ce sont les bonnes instructions pour votre modèle? Suivez les instructions d’installation indiquées sur l’étiquette placée à l’arrière de votre réfrigérateur — ou T ENLEVEZ LA CLAYETTE DU PLATEAU AVANT DE COMMENCER À...
- Page 124 Instructions d’installation INSTALLEZ LA CONDUITE INSTALLEZ LE RÉCIPIENT DE D’ALIMENTATION REMPLISSAGE DE LA MACHINE À GLAÇONS • Coupez la conduite d’alimentation garnie du revêtement d’eau (16) à la longueur Installez le récipient de remplissage (montage de (consultez le gabarit à la page 154) côté) (17) dans la machine à...
- Page 125 Instructions d’installation BRANCHEZ LA MACHINE INSTALLEZ LE BAC À GLAÇONS À GLAÇONS Montez la clayette du compartiment congélation en position inférieure. Placez le bac à glaçons (11) En tenant la machine à glaçons en place, insérez sur la clayette située sous la machine à glaçons. la fiche de cordon d’alimentation électrique dans la prise située sur la paroi de arrière, en vous Assurez-vous que le commutateur de marche de la...
- Page 126 Instructions d’installation INSTRUCTIONS D’INSTALLATION DE L’ENSEMBLE DE ROBINET D’EAU N Est-ce que ce sont les bonnes instructions pour votre modèle? Suivez les instructions d’installation indiquées sur l’étiquette placée à l’arrière de votre réfrigérateur — ou T FIXEZ LE ROBINET D’EAU AVANT DE COMMENCER •...
- Page 127 Instructions d’installation UNE FOIS LE ROBINET D’EAU BRANCHEZ LA CONDUITE D’EAU INSTALLÉ • Assurez-vous que suffisamment de conduite Consultez Instructions d’installation de la conduite d’eau en matière plastique sorte du robinet d’eau pour brancher à l’alimentation d’eau de la d’eau pour bien pénétrer dans le raccord maison.
- Page 128 Instructions d’installation INSTRUCTIONS D’INSTALLATION DE LA MACHINE À GLAÇONS P Est-ce que ce sont les bonnes instructions pour votre modèle? Suivez les instructions d’installation indiquées sur l’étiquette placée à l’arrière de votre réfrigérateur — ou T PRÉPAREZ VOTRE INSTALLATION AVANT DE COMMENCER •...
- Page 129 Instructions d’installation INSTALLEZ LA CONDUITE ADAPTATEUR DE CORDON D’ALIMENTATION D’ALIMENTATION ÉLECTRIQUE (sur certains modèles) • Coupez la conduite d’alimentation (16) à la Un adaptateur de cordon d’alimentation électrique longueur (consultez le (18) est compris dans la trousse. Inspectez-le gabarit page 154) avec visuellement pour vérifier que le cordon d’alimentation un couteau aiguisé...
- Page 130 Instructions d’installation BRANCHEZ LA MACHINE INSTALLEZ LE BAC À GLAÇONS À GLAÇONS Montez la clayette du compartiment congélation En tenant la machine à glaçons en place, insérez la en position inférieure. Placez le bac à glaçons (11) sur fiche de cordon d’alimentation électrique (D) dans la clayette située sous la machine à...
- Page 131 Instructions d’installation INSTRUCTIONS D’INSTALLATION DE L’ENSEMBLE DE ROBINET D’EAU P Est-ce que ce sont les bonnes instructions pour votre modèle? Suivez les instructions d’installation indiquées sur l’étiquette placée à l’arrière de votre réfrigérateur — ou T FIXEZ LE ROBINET D’EAU AVANT DE COMMENCER •...
- Page 132 Instructions d’installation BRANCHEZ LA CONDUITE D’EAU UNE FOIS LE ROBINET D’EAU INSTALLÉ • Assurez-vous que suffisamment de conduite d’eau en matière plastique sorte du robinet d’eau pour Consultez Instructions d’installation de la conduite bien pénétrer dans le raccord d’arrivée de d’eau pour brancher à...
- Page 133 Instructions d’installation INSTRUCTIONS D’INSTALLATION DE LA MACHINE À GLAÇONS Q Est-ce que ce sont les bonnes instructions pour votre modèle? Suivez les instructions d’installation indiquées sur l’étiquette placée à l’arrière de votre réfrigérateur — ou T PRÉPAREZ VOTRE INSTALLATION AVANT DE COMMENCER •...
- Page 134 Instructions d’installation INSTALLEZ LA CONDUITE INSTALLEZ LE RÉCIPIENT DE D’ALIMENTATION REMPLISSAGE DE LA MACHINE À GLAÇONS • Coupez la conduite d’alimentation (16) à Installez le récipient de remplissage (montage de la longueur (consultez le côté) (17) dans la machine à glaçons comme gabarit page 154) avec un l’indique la figure.
- Page 135 Instructions d’installation INSTALLEZ LE BAC À GLAÇONS BRANCHEZ LA MACHINE À GLAÇONS Mettez le bac à glaçons (11) en place en dessous de la machine à glaçons. En tenant la machine à glaçons en place, insérez la fiche de cordon d’alimentation électrique dans la Assurez-vous que le commutateur de marche de la prise située sur la paroi arrière, en vous assurant de machine à...
- Page 136 Instructions d’installation INSTRUCTIONS D’INSTALLATION DE L’ENSEMBLE DE ROBINET D’EAU Q Est-ce que ce sont les bonnes instructions pour votre modèle? Suivez les instructions d’installation indiquées sur l’étiquette placée à l’arrière de votre réfrigérateur — ou T • Fixez le robinet d’eau au trou situé sur le rebord de AVANT DE COMMENCER l’armoire du réfrigérateur à...
- Page 137 Instructions d’installation PLACEZ LA CONDUITE D’EAU EN BRANCHEZ LA CONDUITE D’EAU MATIÉRE PLASTIQUE ET FIXEZ-LA Vous aurez peut-être à enlever la vis de l’agrafe • AU RÉFRIGÉRATEUR de montage en haut à droite du condensateur pour avoir un meilleur accès au raccord de Attachez la conduite d’eau en matière plastique •...
- Page 138 Instructions d’installation INSTRUCTIONS D’INSTALLATION DE LA MACHINE À GLAÇONS R Est-ce que ce sont les bonnes instructions pour votre modèle? Suivez les instructions d’installation indiquées sur l’étiquette placée à l’arrière de votre réfrigérateur — ou T INSTALLEZ LA CONDUITE AVANT DE COMMENCER D’ALIMENTATION •...
- Page 139 Instructions d’installation METTEZ LE COMMUTATEUR DE INSTALLEZ LE RÉCIPIENT DE MARCHE EN POSITION OFF (arrêt) REMPLISSAGE ET L’INSERTION Mettez le commutateur de marche de la machine DE LA MACHINE À GLAÇONS à glaçons en position OFF (arrêt). Laissez le Installez le récipient de remplissage de la machine commutateur de marche en position OFF (arrêt) à...
- Page 140 Instructions d’installation INSTALLEZ LE BAC À GLAÇONS BRANCHEZ LA MACHINE À GLAÇONS Placez le panier inférieur du compartiment congélation En tenant la machine à glaçons en place, insérez la dans le tiroir du fiche de cordon d’alimentation électrique dans la compartiment congélation.
- Page 141 Instructions d’installation INSTRUCTIONS D’INSTALLATION DE L’ENSEMBLE DE ROBINET D’EAU R Est-ce que ce sont les bonnes instructions pour votre modèle? Suivez les instructions d’installation indiquées sur l’étiquette placée à l’arrière de votre réfrigérateur — ou T FIXEZ LE ROBINET D’EAU AVANT DE COMMENCER •...
- Page 142 Instructions d’installation PLACEZ LA CONDUITE D’EAU EN MONTEZ LE COLLIER DE SERRAGE DE LA CONDUITE D’EAU MATIÈRE PLASTIQUE ET FIXEZ-LA Fixez le collier de serrage de la conduite d’eau • AU RÉFRIGÉRATEUR en métal (8) au réfrigérateur. Vissez la vis (7) •...
- Page 143 Instructions d’installation INSTRUCTIONS D’INSTALLATION DE LA MACHINE À GLAÇONS S Est-ce que ce sont les bonnes instructions pour votre modèle? Suivez les instructions d’installation indiquées sur l’étiquette placée à l’arrière de votre réfrigérateur — ou T PRÉP. POUR L’INSTALLATION (suite) AVANT DE COMMENCER •...
- Page 144 Instructions d’installation INSTALLATION DES VIS DE MONTAGE MONTEZ LA MACHINE À GLAÇONS • Soulevez la machine à glaçons de manière à ce • Passez à l’étape 5 si les vis sont que la conduite d’alimentation d’eau entre dans déjà placée dans la paroi de côté l’ouverture du récipient de remplissage (E).
- Page 145 Instructions d’installation INSTRUCTIONS D’INSTALLATION DE L’ENSEMBLE DE ROBINET D’EAU S Est-ce que ce sont les bonnes instructions pour votre modèle? Suivez les instructions d’installation indiquées sur l’étiquette placée à l’arrière de votre réfrigérateur — ou T FIXEZ LE ROBINET D’EAU AVANT DE COMMENCER •...
- Page 146 Instructions d’installation FIXEZ LE ROBINET D’EAU PLACEZ LA CONDUITE D’EAU ET (suite) FIXEZ-LA AU RÉFRIGÉRATEUR • Agrafez l’extrémité du fil de mise à la terre à l’armoire du réfrigérateur. • Attachez la conduite d’eau en matière plastique à l’arrière du réfrigérateur avec trois des dispositifs de fixation avec envers adhésif (5), en espaçant les dispositifs de fixation comme l’indique la figure.
- Page 147 Instructions d’installation INSTRUCTIONS D’INSTALLATION DE LA MACHINE À GLAÇONS T Est-ce que ce sont les bonnes instructions pour votre modèle? Suivez les instructions d’installation indiquées sur l’étiquette placée à l’arrière de votre réfrigérateur — ou T ENLEVEZ LE COUVERCLE AVANT DE COMMENCER DE LA PRISE ÉLECTRIQUE Lisez soigneusement chaque étape avant de •...
- Page 148 Instructions d’installation INSTALLATION DES VIS DE MONTAGE MONTEZ LA MACHINE À GLAÇONS • Soulevez la machine à glaçons de manière à ce • Passez à l’étape 6 si les vis sont que la conduite d’alimentation d’eau entre dans déjà placée dans la paroi de côté l’ouverture du récipient de remplissage (E).
- Page 149 Instructions d’installation INSTRUCTIONS D’INSTALLATION DE L’ENSEMBLE DE ROBINET D’EAU T Est-ce que ce sont les bonnes instructions pour votre modèle? Suivez les instructions d’installation indiquées sur l’étiquette placée à l’arrière de votre réfrigérateur — ou T COUPEZ LA CONDUITE D’EAU AVANT DE COMMENCER EN MATIÈRE PLASTIQUE Lisez soigneusement chaque étape avant de...
- Page 150 Instructions d’installation MONTEZ LE COLLIER DE SERRAGE BRANCHEZ LA CONDUITE D’EAU DE LA CONDUITE D’EAU • Enlevez le petit bouchon en matière plastique (B) Fixez le collier de serrage de la conduite d’eau • en bas du raccord d’arrivée de conduite d’eau en métal (8) au réfrigérateur.
- Page 151 Refrigerator Tubing, diamètre extérieur de 1/4 po pour est celle de la trousse GE RVKIT. Pour les autres systèmes brancher le réfrigérateur à l’alimentation d’eau. Si vous d’osmose de l’eau, suivez les recommandations du utilisez un tuyau en cuivre, assurez-vous que les deux fabricant.
- Page 152 éviter de recevoir des OU BIEN sédiments du tuyau • Si vous utilisez une trousse GE SmartConnect ™ d’alimentation d’eau. Refrigerator Tubing, les garnitures nécessaires sont déjà montées au tuyau.
- Page 153 Assurez-vous que le tuyau soit bien inséré dans le robinet. Serrez fort l’écrou de compression. Pour le tuyau en matière plastique d’une trousse GE SmartConnect Refrigerator Tubing, insérez ™ l’extrémité moulée du tuyau dans le robinet d’arrêt et...
- Page 154 Installez-le sur la conduite d’eau près de votre réfrigérateur. Si vous utilisez une trousse GE SmartConnect ™ Refrigerator Tubing, vous aurez besoin d’un tuyau additionnel (WX08X10002) pour brancher le filtre. Ne BRANCHEZ VOTRE RÉFRIGÉRATEUR...
- Page 155 GABARITS DE CONDUITE D’ALIMENTATION Trouvez le gabarit de conduite d’alimentation d’eau sur l’étiquette placée à l’arrière du réfrigérateur— ou S...
- Page 156 GABARITS DE RALLONGE DE CONDUITE D’ALIMENTATION Trouvez le gabarit de rallonge de conduite d’alimentation d’eau sur l’étiquette placée à l’arrière du réfrigérateur — ou M Coupez la rallonge de conduite d’alimentation d’eau (10) 11,1 cm à cette longueur pour Coupez la rallonge de conduite d’alimentation d’eau (10) 15,2 cm (6 po) à...
- Page 157 Notes.
- Page 158 Cette garantie couvre l’acheteur original et tout acheteur ultérieur de produits achetés à des fins domestiques à l’intérieur des États- Unis. Si le produit est installé dans une région où ne se trouve aucun réparateur autorisé GE, vous devrez peut-être assumer les frais de transport ou apporter expédier le produit à...
- Page 159 Prolongation de garantie www.electromenagersge.ca Achetez un contrat d’entretien GE avant que votre garantie n’expire et bénéficiez d’un rabais substantiel. Ainsi le service après-vente GE sera toujours là après expiration de la garantie. Visitez notre site Web ou appelez-nous au 1.800.461.3636.
-
Page 160: Precauciones De Seguridad
Garantía ......230 Cómo remover el sostén de la bandeja de los cubos de hielo ..166 Kit IM-6 Cómo reponer o remover Este kit se ajusta a la mayoría el estante del congelador . - Page 161 Sobre la máquina automática de hielos. Un refrigerador recién instalado puede tomar desde 12 hasta 24 horas para empezar a hacer hielo. Máquina automática de hielos Máquina de hielos La máquina de hielos producirá siete cubos Deseche los primeros cubos de hielo para por ciclo, aproximadamente entre 100-130 permitir que la tubería se limpie.
- Page 162 Antes de llamar a solicitar servicio… ge.com Consejos para la solución de averías. ¡Ahorre tiempo y dinero! Revise primero las tablas de las siguientes páginas y quizás no necesite llamar a solicitar servicio. Problema Posibles causas Qué hacer La máquina automática El compartimiento del congelador •...
- Page 163 Antes de llamar a solicitar servicio… Consejos para la solución de averías. Problema Posibles causas Qué hacer Fuga de agua Espuma en la taza de llenado • Si el tubo de llenado fue instalado deslizándolo a través de alrededorde la de la instalación del tubo la parte posterior del refrigerador, es posible que haya taza de llenado...
- Page 164 Kit para hielos Instrucciones para IM-6 a instalación ¿Preguntas? Llame 800.GE.CARES (800.432.2737) o ge.com Visite nuestra página en la red en: ¿ESTÁ REEMPLAZANDO LA MÁQUINA ANTES DE EMPEZAR DE HIELOS CON ESTE KIT? Lea estas instrucciones completa y Es importante que utilice la válvula del agua y la cuidadosamente.
- Page 165 Instrucciones para la instalación CONTENIDO DEL KIT IM-6 15 Entrada para la tubería del agua Recipiente de llenado del fabricador (montaje central) Máquina de hielos (La apariencia podría variar) Tubo de llenado con lámina metálica (5/8″ D.E.) Abrazadera para la tubería Separador del del agua (alivio de presión)
- Page 166 * Siempre cambie la válvula del agua cuando reemplace una máquina de hielo que haga cubos redondeados. Esta nueva máquina de hielos utiliza un voltaje diferente que puede hacer que la válvula antigua falle. Para modelos de dispensador, ordene la parte GE No. WR57X96.
- Page 167 Instrucciones para la instalación CÓMO RETIRAR EL SOPORTE EXISTENTE DE LA BANDEJA DE HIELOS Siga las instrucciones a continuación para el soporte de la bandeja de hielos que se parezca al suyo. Tipo 1 Tipo 4 • • Remueva los dos tornillos y guárdelos para la instalación de Despegue el costado y la parte de abajo del soporte de la máquina de hielos.
- Page 168 Instrucciones para la instalación CÓMO REEMPLAZAR O RETIRAR LOS ESTANTES DEL CONGELADOR En algunos modelos, es posible que necesite reemplazar o retirar el estante del congelador de tal forma que la máquina de hielos y la cubeta queden en la posición apropiada. Siga las instrucciones que se presentan a continuación para el soporte de la bandeja del congelador que se parezca al suyo.
- Page 169 Instrucciones para la instalación INSTRUCCIONES PARA LA INSTALACIÓN DE LA MÁQUINA DE HIELOS C ¿Son estas las instrucciones correctas para su modelo? Siga las Instrucciones para la instalación indicadas — por la etiqueta en la parte posterior del refrigerador ANTES DE EMPEZAR INSTALE EXTENSIÓN DEL TUBO DE LLENADO Lea cada paso completamente antes de proceder.
- Page 170 Instrucciones para la instalación INSTALE LA CUBETA DE HIELOS INSTALE LA TAZA DE LLENADO Coloque la cubeta de hielos (11) directamente debajo Instale la taza de llenado de la máquina de hielos de la máquina de hielos (a la izquierda y al fondo del (montada al costado) (17) en la máquina de hielos estante debajo de la máquina de hielos).
- Page 171 Instrucciones para la instalación INSTRUCCIONES PARA LA INSTALACIÓN DEL ENSAMBLE DE LA VÁLVULA DEL AGUA C ¿Son estas las instrucciones correctas para su modelo? Siga las Instrucciones para la instalación indicadas — por la etiqueta en la parte posterior del refrigerador INSTALE LA VÁLVULA DEL AGUA ANTES DE EMPEZAR •...
- Page 172 Instrucciones para la instalación UNA LA ABRAZADERA DE ALIVIO INSTALE LA TUBERÍA PLÁSTICA DEL AGUA DE PRESIÓN Fije la tubería plástica del agua en la parte posterior del gabinete con sujetadores con adhesivo posterior (5), • Empuje la abrazadera metálica de la tubería del agua espaciando los sujetadores como se muestra para tensar (de alivio de presión) (12) en el borde más bajo de la tubería.
- Page 173 Instrucciones para la instalación INSTRUCCIONES PARA LA INSTALACIÓN DE LA MÁQUINA DE HIELOS F ¿Son estas las instrucciones correctas para su modelo? Siga las Instrucciones para la instalación indicadas — por la etiqueta en la parte posterior del refrigerador INSTALE EL TUBO DE LLENADO ANTES DE EMPEZAR •...
- Page 174 Instrucciones para la instalación MONTE LA MÁQUINA DE HIELOS INSTALE LA TAZA DE LLENADO • Levante la máquina de hielos de manera que la Instale la taza de llenado de la máquina de hielos extensión del tubo de llenado (10) encaje en la (montada al costado) (17) en la máquina de hielos abertura de la taza de llenado (C).
- Page 175 Instrucciones para la instalación INSTRUCCIONES PARA LA INSTALACIÓN DEL ENSAMBLE DE LA VÁLVULA DEL AGUA F ¿Son estas las instrucciones correctas para su modelo? Siga las Instrucciones para la instalación indicadas — por la etiqueta en la parte posterior del refrigerador ANTES DE EMPEZAR INSTALE LA VÁLVULA DEL AGUA •...
- Page 176 Instrucciones para la instalación INSTALE LA ABRAZADERA DE LA TUBERÍA INSTALE LA TUBERÍA PLÁSTICA DEL AGUA DEL AGUA Fije la tubería plástica del agua en la parte posterior del gabinete con sujetadores con adhesivo posterior (5), • Una la abrazadera metálica de la tubería del agua espaciando los sujetadores como se muestra para tensar (alivio de presión) (8) al refrigerador.
- Page 177 Instrucciones para la instalación INSTRUCCIONES PARA LA INSTALACIÓN DE LA MÁQUINA DE HIELOS G ¿Son estas las instrucciones correctas para su modelo? Siga las Instrucciones para la instalación indicadas — por la etiqueta en la parte posterior del refrigerador ANTES DE EMPEZAR AFLOJE LOS TORNILLOS DEL MONTAJE Afloje los dos tornillos de montaje (B) pero no los saque Lea cada paso completamente antes de proceder.
- Page 178 Instrucciones para la instalación 6 ADAPTADOR PARA EL CABLE MONTE LA MÁQUINA DE HIELOS DE CORRIENTE (en algunos modelos) • Levante la máquina de hielos de manera que la extensión del tubo de llenado (10) encaje en la abertura Hay un adaptador para el cable de corriente (18) incluido de la taza de llenado (C).
- Page 179 Instrucciones para la instalación INSTRUCCIONES PARA LA INSTALACIÓN DEL ENSAMBLE DE LA VÁLVULA DEL AGUA G ¿Son estas las instrucciones correctas para su modelo? Siga las Instrucciones para la instalación indicadas — por la etiqueta en la parte posterior del refrigerador ANTES DE EMPEZAR INSTALE LA VÁLVULA DEL AGUA •...
- Page 180 Instrucciones para la instalación INSTALE LA ABRAZADERA DE LA TUBERÍA INSTALE LA TUBERÍA PLÁSTICA DEL AGUA DEL AGUA Fije la tubería plástica del agua en la parte posterior del gabinete con sujetadores con adhesivo posterior (5), • Una la abrazadera metálica de la tubería del agua espaciando los sujetadores como se muestra para tensar (alivio de presión) (8) al refrigerador.
- Page 181 Instrucciones para la instalación INSTRUCCIONES PARA LA INSTALACIÓN DE LA MÁQUINA DE HIELOS H ¿Son estas las instrucciones correctas para su modelo? Siga las Instrucciones para la instalación indicadas — por la etiqueta en la parte posterior del refrigerador NOTA: Si usted tiene un refrigerador modelo TNS22 ó TNX22, por favor consulte las instrucciones de instalación para , en vez de usar las instrucciones para •...
- Page 182 Instrucciones para la instalación ADAPTADOR PARA EL CABLE DE CORRIENTE MONTE LA MÁQUINA DE HIELOS (en algunos modelos) • Levante la máquina de hielos de manera que el tubo de llenado (16) encaje en la abertura de la taza de llenado Hay un adaptador para el cable de corriente (18) incluido (C).
- Page 183 Instrucciones para la instalación INSTRUCCIONES PARA LA INSTALACIÓN DEL ENSAMBLE DE LA VÁLVULA DEL AGUA H ¿Son estas las instrucciones correctas para su modelo? Siga las Instrucciones para la instalación indicadas — por la etiqueta en la parte posterior del refrigerador •...
- Page 184 Instrucciones para la instalación CONECTE LA TUBERÍA DEL AGUA VÁLVULA DEL AGUA INSTALADA • Presione los extremos de la abrazadera para manguera Consulte las instrucciones para la Instalación de la (3) del kit con alicates y deslice la abrazadera sobre la tubería del agua para la conexión al suministro de agua entrada de la tubería del agua.
- Page 185 Instrucciones para la instalación INSTRUCCIONES PARA LA INSTALACIÓN DE LA MÁQUINA DE HIELOS J ¿Son estas las instrucciones correctas para su modelo? Siga las Instrucciones para la instalación indicadas — por la etiqueta en la parte posterior del refrigerador PREPARE EL REFRIGERADOR ANTES DE EMPEZAR Encuentre el adhesivo que Lea cada paso completamente antes de proceder.
- Page 186 Instrucciones para la instalación MONTE LA MÁQUINA DE HIELOS INSTALE LA TAZA DE LLENADO • Levante la máquina de hielos de manera que la extensión Instale la taza de llenado de la máquina de hielos del tubo de llenado (10) encaje en la abertura de la taza (montada al costado) (17) en la máquina de hielos de llenado (C).
- Page 187 Instrucciones para la instalación INSTRUCCIONES PARA LA INSTALACIÓN DEL ENSAMBLE DE LA VÁLVULA DEL AGUA J ¿Son estas las instrucciones correctas para su modelo? Siga las Instrucciones para la instalación indicadas — por la etiqueta en la parte posterior del refrigerador ANTES DE EMPEZAR INSTALE LA VÁLVULA DEL AGUA •...
- Page 188 Instrucciones para la instalación INSTALE LA ABRAZADERA DE LA TUBERÍA INSTALE LA TUBERÍA PLÁSTICA DEL AGUA DEL AGUA Fije la tubería plástica del agua en la parte posterior del • Empuje la abrazadera metálica (de alivio de presión) (12) gabinete con sujetadores con adhesivo posterior (5), en el borde más bajo de la parte posterior del gabinete, espaciando los sujetadores como se muestra para tensar directamente en línea con la válvula del agua.
- Page 189 Instrucciones para la instalación INSTRUCCIONES PARA LA INSTALACIÓN DE LA MÁQUINA DE HIELOS K ¿Son estas las instrucciones correctas para su modelo? Siga las Instrucciones para la instalación indicadas — por la etiqueta en la parte posterior del refrigerador ANTES DE EMPEZAR INSTALE EL TUBO DE RELLENO •...
- Page 190 Instrucciones para la instalación INSTALE LA TAZA DE LLENADO Y EL MONTAJE LA MÁQUINA DE HIELOS INSERTO DE LA MÁQUINA DE HIELOS • Levante la máquina de hielos y cuélguela del soporte para la máquina de hielos (26). Asegúrese de que el tubo de Instale la taza de llenado de la máquina de hielos (montada llenado aislado (21) vaya dentro de la abertura de la taza de en el centro) (23) y el inserto de la máquina de hielos (24) en...
- Page 191 Instrucciones para la instalación PEGUE LA ETIQUETA DE GARANTÍA GUARDE ESTE MANUAL Se suministra una etiqueta (9) con este kit para registrar La garantía para la máquina de hielos está impresa en la fecha de instalación para propósitos de la garantía. este manual.
- Page 192 Instrucciones para la instalación DIRIJA E INSTALE LA TUBERÍA PLÁSTICA UNA LA ABRAZADERA DE ALIVIO DE PRESIÓN DEL AGUA • Sujete la abrazadera de la línea de agua (alivio de • Dirija la tubería plástica del agua a lo largo de la parte presión) (8) al refrigerador.
- Page 193 Instrucciones para la instalación INSTRUCCIONES PARA LA INSTALACIÓN DE LA MÁQUINA DE HIELOS L ¿Son estas las instrucciones correctas para su modelo? Siga las Instrucciones para la instalación indicadas — por la etiqueta en la parte posterior del refrigerador ANTES DE EMPEZAR 2 PREPÁRESE PARA LA INSTALACIÓN •...
- Page 194 Instrucciones para la instalación INSTALE LA TAZA DE LLENADO MONTE LA MÁQUINA DE HIELOS Instale la taza de llenado de la máquina de hielos • Levante la máquina de hielos de manera que la extensión (montada al costado) (17) en la máquina de hielos del tubo de llenado (10) encaje en la abertura de la taza como se muestra.
- Page 195 Instrucciones para la instalación INSTRUCCIONES PARA LA INSTALACIÓN DEL ENSAMBLE DE LA VÁLVULA DEL AGUA L ¿Son estas las instrucciones correctas para su modelo? Siga las Instrucciones para la instalación indicadas — por la etiqueta en la parte posterior del refrigerador INSTALE LA VÁLVULA DEL AGUA ANTES DE EMPEZAR •...
- Page 196 Instrucciones para la instalación INSTALE LA ABRAZADERA DE LA TUBERÍA DIRIJA E INSTALE LA TUBERÍA PLÁSTICA DEL AGUA DEL AGUA • Una la abrazadera metálica de la tubería del agua • Dirija la tubería plástica del agua a lo largo de la (alivio de presión) (8) al refrigerador.
- Page 197 Instrucciones para la instalación INSTRUCCIONES PARA LA INSTALACIÓN DE LA MÁQUINA DE HIELOS M ¿Son estas las instrucciones correctas para su modelo? Siga las Instrucciones para la instalación indicadas — por la etiqueta en la parte posterior del refrigerador ANTES DE EMPEZAR PREPÁRESE PARA LA INSTALACIÓN En el congelador, afloje los dos tornillos de montaje (B) Lea cada paso completamente antes de proceder.
- Page 198 Instrucciones para la instalación MONTE LA MÁQUINA DE HIELOS INSTALE LA TAZA DE LLENADO • Levante la máquina de hielos de manera que la extensión Instale la taza de llenado de la máquina de hielos del tubo de llenado (10) encaje en la abertura de la taza (montada al costado) (17) en la máquina de hielos de llenado (D).
- Page 199 Instrucciones para la instalación INSTRUCCIONES PARA LA INSTALACIÓN DEL ENSAMBLE DE LA VÁLVULA DEL AGUA M ¿Son estas las instrucciones correctas para su modelo? Siga las Instrucciones para la instalación indicadas — por la etiqueta en la parte posterior del refrigerador INSTALE LA VÁLVULA DEL AGUA ANTES DE EMPEZAR •...
- Page 200 Instrucciones para la instalación INSTALE LA ABRAZADERA DE LA TUBERÍA DIRIJA E INSTALE LA TUBERÍA PLÁSTICA DEL AGUA DEL AGUA • Una la abrazadera de la tubería del agua (alivio de • Una la tubería plástica del agua a la parte posterior del presión) (8) del kit al refrigerador.
- Page 201 Instrucciones para la instalación INSTRUCCIONES PARA LA INSTALACIÓN DE LA MÁQUINA DE HIELOS N ¿Son estas las instrucciones correctas para su modelo? Siga las Instrucciones para la instalación indicadas — por la etiqueta en la parte posterior del refrigerador 2 PREPÁRESE PARA LA INSTALACIÓN ANTES DE EMPEZAR •...
- Page 202 Instrucciones para la instalación MONTE LA MÁQUINA DE HIELOS INSTALE LA TAZA DE LLENADO • Levante la máquina de hielos de manera que el tubo Instale la taza de llenado de la máquina de hielos de llenado (16) encaje en la abertura de la taza de llenado (montada al costado) (17) en la máquina de hielos (17).
- Page 203 Instrucciones para la instalación INSTRUCCIONES PARA LA INSTALACIÓN DEL ENSAMBLE DE LA VÁLVULA DEL AGUA N ¿Son estas las instrucciones correctas para su modelo? Siga las Instrucciones para la instalación indicadas — por la etiqueta en la parte posterior del refrigerador INSTALE LA VÁLVULA DEL AGUA ANTES DE EMPEZAR •...
- Page 204 Instrucciones para la instalación 4 CONECTE LA TUBERÍA DEL AGUA VÁLVULA DEL AGUA INSTALADA Consulte las instrucciones para la Instalación de la • Asegúrese de que haya suficiente tubería plástica del tubería del agua para la conexión al suministro de agua agua para que se extienda desde la válvula del agua de la casa.
- Page 205 Instrucciones para la instalación INSTRUCCIONES PARA LA INSTALACIÓN DE LA MÁQUINA DE HIELOS P ¿Estas son las instrucciones correctas para su modelo? Siga las Instrucciones para la instalación indicadas — por la etiqueta en la parte posterior del refrigerador INSTALE EL TUBO DE LLENADO ANTES DE EMPEZAR •...
- Page 206 Instrucciones para la instalación ADAPTADOR PARA EL CABLE DE CORRIENTE MONTE LA MÁQUINA DE HIELOS (en algunos modelos) • Levante la máquina de hielos de manera que el tubo de llenado (16) encaje en la abertura de la taza de llenado Hay un adaptador para el cable de corriente (18) incluido (E).
- Page 207 Instrucciones para la instalación INSTRUCCIONES PARA LA INSTALACIÓN DEL ENSAMBLE DE LA VÁLVULA DEL AGUA P ¿Estas son las instrucciones correctas para su modelo? Siga las Instrucciones para la instalación indicadas — por la etiqueta en la parte posterior del refrigerador INSTALE LA VÁLVULA DEL AGUA ANTES DE EMPEZAR •...
- Page 208 Instrucciones para la instalación 4 CONECTE LA TUBERÍA DEL AGUA VÁLVULA DEL AGUA INSTALADA • Asegúrese de que haya suficiente tubería plástica para Consulte las instrucciones para la Instalación de la tubería el agua que se extienda hasta la entrada de la tubería del agua para la conexión al suministro de agua de la del agua (15).
- Page 209 Instrucciones para la instalación INSTRUCCIONES PARA LA INSTALACIÓN DE LA MÁQUINA DE HIELOS Q ¿Son estas las instrucciones correctas para su modelo? Siga las Instrucciones para la instalación indicadas — por la etiqueta en la parte posterior del refrigerador 2 INSTALE LA ENTRADA DE LA TUBERÍA ANTES DE EMPEZAR •...
- Page 210 Instrucciones para la instalación MONTE LA MÁQUINA DE HIELOS INSTALE LA TAZA DE LLENADO • Levante la máquina de hielos de manera que del tubo de Instale la taza de llenado de la máquina de hielos llenado (16) encaje en la abertura de la taza de llenado (E). (montada al costado) (17) en la máquina de hielos Cuelgue la máquina de hielos sobre los dos tornillos de como se muestra.
- Page 211 Instrucciones para la instalación INSTRUCCIONES PARA LA INSTALACIÓN DEL ENSAMBLE DE LA VÁLVULA DEL AGUA Q ¿Son estas las instrucciones correctas para su modelo? Siga las Instrucciones para la instalación indicadas — por la etiqueta en la parte posterior del refrigerador •...
- Page 212 Instrucciones para la instalación 3 CONECTE LA TUBERÍA DEL AGUA VÁLVULA DEL AGUA INSTALADA • Puede que sea necesario remover el tornillo del sujetador Consulte las instrucciones para la Instalación de la tubería del agua para la conexión al suministro de agua de montaje del condensador superior derecho para lograr de la casa.
- Page 213 Instrucciones para la instalación INSTRUCCIONES PARA LA INSTALACIÓN DE LA MÁQUINA DE HIELOS R ¿Son estas las instrucciones correctas para su modelo? Siga las Instrucciones para la instalación indicadas — por la etiqueta en la parte posterior del refrigerador INSTALE EL TUBO DE LLENADO ANTES DE EMPEZAR •...
- Page 214 Instrucciones para la instalación MONTE LA MÁQUINA DE HIELOS INSTALE LA TAZA DE LLENADO • Levante la máquina de hielos de manera que el tubo Instale la taza de llenado de la máquina de hielos de llenado (16) se ajuste en la abertura de la taza de (montada al costado) (17) en la máquina de hielos llenado (E).
- Page 215 Instrucciones para la instalación INSTRUCCIONES PARA LA INSTALACIÓN DEL ENSAMBLE DE LA VÁLVULA DEL AGUA R ¿Son estas las instrucciones correctas para su modelo? Siga las Instrucciones para la instalación indicadas — por la etiqueta en la parte posterior del refrigerador ANTES DE EMPEZAR INSTALE LA VÁLVULA DEL AGUA •...
- Page 216 Instrucciones para la instalación INSTALE LA ABRAZADERA DE LA TUBERÍA DIRIJA E INSTALE LA TUBERÍA PLÁSTICA DEL AGUA DEL AGUA • Una la abrazadera de la tubería del agua (alivio de • Dirija la tubería plástica del agua a lo largo de la parte presión) (8) del kit al refrigerador.
- Page 217 Instrucciones para la instalación INSTRUCCIONES PARA LA INSTALACIÓN DE LA MÁQUINA DE HIELOS S ¿Son estas las instrucciones correctas para su modelo? Siga las Instrucciones para la instalación indicadas — por la etiqueta en la parte posterior del refrigerador PREPÁRESE PARA LA INSTALACIÓN ANTES DE EMPEZAR (cont.) •...
- Page 218 Instrucciones para la instalación MONTE LA MÁQUINA DE HIELOS INSTALE LOS TORNILLOS DE MONTAJE • Levante la máquina de hielos de manera que el tubo • Pase al Paso 5 si los tornillos ya están en su lugar en la de llenado enviado con el refrigerador se ajuste en la pared del congelador.
- Page 219 Instrucciones para la instalación INSTRUCCIONES PARA LA INSTALACIÓN DEL ENSAMBLE DE LA VÁLVULA DEL AGUA S ¿Son estas las instrucciones correctas para su modelo? Siga las Instrucciones para la instalación indicadas — por la etiqueta en la parte posterior del refrigerador INSTALE LA VÁLVULA DEL AGUA ANTES DE EMPEZAR •...
- Page 220 Installation Instructions DIRIJA E INSTALE LA TUBERÍA DEL AGUA INSTALE LA VÁLVULA DE AGUA (cont.) • Engrape el extremo del cable de conexión a tierra • Una la tubería plástica del agua a la parte posterior al gabinete del refrigerador. del refrigerador con tres sujetadores con adhesivo posterior (5), espaciando los sujetadores como se muestra.
- Page 221 Instrucciones para la instalación INSTRUCCIONES PARA LA INSTALACIÓN DE LA MÁQUINA DE HIELOS T ¿Son estas las instrucciones correctas para su modelo? Siga las Instrucciones para la instalación indicadas — por la etiqueta en la parte posterior del refrigerador RETIRE LA CUBIERTA DEL ENCHUFE ANTES DE EMPEZAR •...
- Page 222 Instrucciones para la instalación MONTE LA MÁQUINA DE HIELOS INSTALE LOS TORNILLOS DE MONTAJE • Levante la máquina de hielos de manera que el tubo • Pase al Paso 6 si los tornillos ya están en su lugar en la de llenado enviado con el refrigerador se ajuste en la pared del congelador.
- Page 223 Instrucciones para la instalación INSTRUCCIONES PARA LA INSTALACIÓN DEL ENSAMBLE DE LA VÁLVULA DEL AGUA T ¿Son estas las instrucciones correctas para su modelo? Siga las Instrucciones para la instalación indicadas — por la etiqueta en la parte posterior del refrigerador INSTALE LA VÁLVULA DEL AGUA ANTES DE EMPEZAR •...
- Page 224 Instrucciones para la instalación RETIRE LA CUBIERTA DE LA TUBERÍA DIRIJA E INSTALE LA TUBERÍA PLÁSTICA DEL AGUA • En la parte inferior trasera derecha del refrigerador, quite los tornillos que sostienen la cubierta de la tubería (A) a • Una la tubería plástica del agua a la parte posterior del la parte posterior de la caja del refrigerador.
- Page 225 Al conectar su refrigerador a un Sistema de Agua de Ósmosis SmartConnect™ de GE, 1/4″ de diámetro externo para Inversa de GE, la única instalación aprobada es con un kit de conectar el refrigerador al suministro de agua. Si usa cobre, Ósmosis Inversa de GE.
- Page 226 O BIEN • Si está usando un kit de tubería para el refrigerador SmartConnect™ de GE, los accesorios necesarios ya vienen preinstalados en la tubería. • Si su tubería existente de cobre para el agua tiene un accesorio con vuelo en el extremo, necesitará...
- Page 227 Apriete la tuerca de compresión firmemente. Para tubería de plástico de un kit de tubería para el Válvula de refrigerador SmartConnect™ de GE, inserte el extremo Tubería vertical cierre tipo silla moldeado de la tubería en la válvula de cierre y apriete de agua fría...
- Page 228 Instálelo en la tubería del agua cerca al refrigerador. Si usa un kit de tubería para el refrigerador SmartConnect™ de GE, necesitará un tubo adicional (WX08X10002) para conectar el filtro. No corte la tubería plástica para CONECTE EL REFRIGERADOR instalar el filtro.
- Page 229 GUÍAS DEL TUBO DE LLENADO Consulte la guía apropiada del tubo de llenado indicada por la etiqueta en la parte posterior del refrigerador —...
- Page 230 GUÍAS DE LA EXTENSIÓN DEL TUBO DE LLENADO Consulte la guía apropiada de la extensión del tubo de llenado indicada por la etiqueta en la parte posterior del refrigerador— Corte la extensión del tubo de llenado (10) a esta longitud para 11,1 cm ″) Corte la extensión del tubo de llenado (10) a esta longitud para...
- Page 231 Estados Unidos. Si el producto está situado en un área que no dispone de servicio por parte de un proveedor de servicio autorizado de GE, podría tener que hacerse cargo de los costes de envío o bien podría solicitársele que lleve el producto a una centro de servicio de GE autorizado para realizar la reparación.
- Page 232 El servicio de expertos GE está a tan sólo un paso de su puerta. ¡Entre en línea y solicite su reparación cuando le venga bien 24 horas al día cualquier día del año! O llame al 800.GE.CARES (800.432.2737) durante horas normales de oficina.
- Page 233 Contact Us ge.com In the U.S.: If you are not satisfied with the service you receive from GE, contact us on our Website with all the details including your phone number, or write to: General Manager, Customer Relations GE Appliances, Appliance Park Louisville, KY 40225 In Canada: www.geappliances.ca, or write to:...
Need help?
Do you have a question about the IM-6 and is the answer not in the manual?
Questions and answers