
Related Manuals for Cooke & Lewis CLIND1BK-C


Summary of Contents for Cooke & Lewis CLIND1BK-C
- Page 1 Induction Hob Table à induction CLIND1BK-C A110093_CLIND1BK-C_hob_v1_EN_FR_2011_12_29.indb 1 06/01/2012 5:24 PM...
- Page 2 [01] x 1 [03] x 4 [02] x 4 Induction Hob by Cooke & Lewis A110093_CLIND1BK-C_hob_v1_EN_FR_2011_12_29.indb 2 06/01/2012 5:24 PM...
- Page 3 Induction Hob Table à induction Installation Installation A110093_CLIND1BK-C_hob_v1_EN_FR_2011_12_29.indb 3 06/01/2012 5:24 PM...
- Page 4 Induction Hob by Cooke & Lewis EAN: 5052931055784 A110093_CLIND1BK-C_hob_v1_EN_FR_2011_12_29.indb 4 06/01/2012 5:24 PM...
-
Page 5: Table Of Contents
These instructions are for your safety. Please read through them thoroughly before use and retain them for future reference. Before you start Safety Installation Operation Care and maintenance Technical and legal information Installation Installation 01 – 04 The hand followed by a number refers to an 01 –... - Page 6 A110093_CLIND1BK-C_hob_v1_EN_FR_2011_12_29.indb 6 06/01/2012 5:24 PM...
- Page 7 Induction Hob by Cooke & Lewis Before you start Safety Installation Operation A110093_CLIND1BK-C_hob_v1_EN_FR_2011_12_29.indb 7 06/01/2012 5:24 PM...
-
Page 8: Before You Start
Before you start Induction Hob by Cooke & Lewis Before you start > Keep this manual in a convenient place so you can always refer to it for the safe and proper use of the appliance. > If you sell the appliance, give it away, or leave it behind when you move house, make sure you also pass on this manual so that the new owner has the relevant information. -
Page 9: Safety
Safety Induction Hob by Cooke & Lewis Safety These instructions are for your safety. Please read through them thoroughly prior to installation and retain them for future reference. Electrical risk This symbol indicates electrical warnings of a safety risk or of serious and fatal injuries. - Page 10 Safety Induction Hob by Cooke & Lewis This appliance is not intended for use by persons (including children) with reduced physical sensory, or mental capabilities, or by those who lack experience and knowledge, unless they have been given supervision and instruction concerning the use of the appliance by a person responsible for their safety.
-
Page 11: Installation
Installation Induction Hob by Cooke & Lewis Installation instructions Remove all the packing materials plus disposal statement. Siting (See fig.1) Caution Good ventilation is required around the appliance for easier dissipation of heat and low power consumption. Sufficient clearance is required around the appliance. -
Page 12: Hob Installation
Installation Induction Hob by Cooke & Lewis Hob Installation Caution The ceramic hob must be installed by a suitably qualified person. Never try to install the appliance yourself. The ceramic hob must not be installed above refrigerators, freezers, dishwashers or tumble dryers. The wall and the area above the hob should be able to withstand heat. - Page 13 Installation Induction Hob by Cooke & Lewis Caution This appliance must be wired to a all pole disconnection switch with protected socket, which has a 3 mm separation between contacts and is placed in an easily accessible place next to the appliance. •...
- Page 14 Installation Induction Hob by Cooke & Lewis N (Blue) N (Blue) L (Brown) L (Brown) (Green / (Green / Yellow) Yellow) Direct Connection > If the appliance is being connected directly to the mains an omnipolar circuit-breaker must be installed with a minimum opening of 3 mm between contacts.
-
Page 15: Operation
Operation Induction Hob by Cooke & Lewis Product functions > The induction hob caters for all kind of cooking, with its electromagnetic cooking zones and its electronic touch controls and multi-functions, making it the ideal choice for the modern family. >... - Page 16 Operation Induction Hob by Cooke & Lewis Detection of small or non-magnetic items When an unsuitably sized or non-magnetic pan (e.g. aluminium) or some other small item (e.g. knife, fork, key) has been left on the hob, the hob switches automatically to standby one minute later. Residual heat indicator When the hob has been operating for some time, there will be some residual heat.
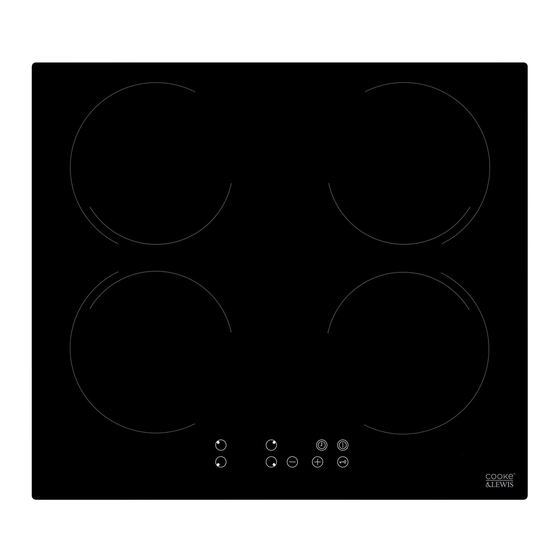
- Page 17 Operation Induction Hob by Cooke & Lewis Operation Heating zone selection Key Timer key ON/OFF Power regulating key System key Reference Description Heating zone selection key (A) Power regulating key (reduce) (B) Power regulating key (increase) (C) Child lock (D) ON / OFF (E) Timer key (F) Preparation before use...
-
Page 18: Operating Instructions
Operation Induction Hob by Cooke & Lewis Operating instructions Caution • When the ON/OFF key (E) is pressed, the induction hob returns to standby mode if no other operation is carried out within one minute. • The four zones can take a maximum power of 3000 W. Consequently, the hob automatically reduces the maximum output power by allowing a maximum sum of total power levels of 12. -
Page 19: Timer Function
Operation Induction Hob by Cooke & Lewis Timer function 1. Press the timer key (F) and the Reference Description indicator will start to flash. 2. Then set the time for between 1 and 99 minutes by pressing the "+" (C) and "-"... - Page 20 Operation Induction Hob by Cooke & Lewis Safety mode (Child lock) To ensure the safety of children, the induction hob is fitted with an interlock device. Reference Description To lock: 1. Hold down the "Lock" (D); the hob then switches to "Lock" mode. 2.
- Page 21 Operation Induction Hob by Cooke & Lewis Oil Frying Pan Stainless steel pot Iron pan Enamel coking utensil Iron plate You may have a number of different cooking vessels This induction hob can identify a variety of cooking vessels, which you can test by one of the following methods: 1.
- Page 22 A110093_CLIND1BK-C_hob_v1_EN_FR_2011_12_29.indb 22 06/01/2012 5:24 PM...
-
Page 23: Care And Maintenance Technical And Legal Information Installation
Induction Hob by Cooke & Lewis more detail... Care and maintenance Technical and legal information Installation A110093_CLIND1BK-C_hob_v1_EN_FR_2011_12_29.indb 23 06/01/2012 5:24 PM... - Page 24 Care and maintenance Induction Hob by Cooke & Lewis Care Damaged power cables should be replaced by a competent person or qualified electrician. For indoor use only. Never place the induction hob directly into water. Never place an empty pan on the hob as this will cause an error message to appear on the control panel.
- Page 25 Care and maintenance Induction Hob by Cooke & Lewis Never use the ceramic hob near another appliance that generates high temperatures, such as a gas cooker or a paraffin heater. Do not store detergents or flammable materials beneath the hob. NOTE: If the appliance is not in use for a long period of time, disconnect power, clean the inside parts, place the appliance in a dry area and leave the door slightly open.
-
Page 26: Troubleshooting
Care and maintenance Induction Hob by Cooke & Lewis Troubleshooting The following circumstances may not be a problem. Do not contact the customer services until the problem has been confirmed. If your appliance is still not functioning properly after making the above checks, please contact the customer services. - Page 27 Care and maintenance Induction Hob by Cooke & Lewis Recycling and disposal Environmental Protection Waste electrical products should not be disposed of with household waste. Please recycle where facilities exist. Check with your Local Authority or retailer for recycling advice. The symbol on the product or its packaging indicates that this product cannot be treated as normal household waste.
-
Page 28: Technical Data
Technical and legal information Induction Hob by Cooke & Lewis Technical data Power supply V / Hz 220-240 V~/50 Hz External dimensions 590 x 55 x 520 (WxHxD) Net weight Legal information The Manufacturer declines all liability for damage caused to persons and objects due to incorrect or improper installation of the appliance. - Page 29 Technical and legal information Induction Hob by Cooke & Lewis Guarantee This appliance is covered by a 24 months guarantee. The guarantee will in no way affect your statutory rights and cannot be varied by any other guarantee, which may have been issued with the unit. This Guarantee Does Not Cover: A.
- Page 30 We herebyc ertify that them entioned accessoryc ompliesw itht he essentialr equirements of theE uropeanD irectivesa pplicable,i ncluding theirm odifications andt he corresponding transpositions from the national law. MACHINE APPLICATION: CLIND1BK-C Induction Hob TYPE: Comply with the following European Directives 2006/95/CE:...
- Page 31 Technical and legal information Induction Hob by Cooke & Lewis Customer Service Helplines When calling customer service, please ensure you have the model number and serial number to hand. Please keep your receipt or invoice in a safe place as they will be required as proof of date of purchase.
- Page 32 A110093_CLIND1BK-C_hob_v1_EN_FR_2011_12_29.indb 32 06/01/2012 5:25 PM...
- Page 33 C'est parti Ces instructions visent à assurer votre sécurité. Veuillez les lire attentivement avant toute utilisation, puis les conserver pour pouvoir vous y référer ultérieurement. Pour bien commencer Avant de commencer Sécurité Installation Mise en route dans détail... Soin et entretien Informations techniques et juridiques Installation Installation...
- Page 34 A110093_CLIND1BK-C_hob_v1_EN_FR_2011_12_29.indb 34 06/01/2012 5:25 PM...
-
Page 35: Pour Bien Commencer
Table à induction de Cooke & Lewis Pour bien commencer... Avant de commencer Sécurité Installation Mise en route A110093_CLIND1BK-C_hob_v1_EN_FR_2011_12_29.indb 35 06/01/2012 5:25 PM... - Page 36 Avant de commencer Table à induction de Cooke & Lewis Avant de commencer > Conservez ce manuel dans un endroit pratique de sorte à toujours pouvoir vous y référer pour utiliser l'appareil de manière sûre et appropriée. > Si vous vendez l'appareil, que vous le donnez ou que vous le laissez sur place lorsque vous déménagez, veillez également à...
- Page 37 Sécurité Table à induction de Cooke & Lewis Sécurité Ces instructions visent à assurer votre sécurité. Veuillez les lire attentivement avant de procéder à l’installation, puis les conserver pour pouvoir les consulter ultérieurement. Risque électrique Ce symbole indique un avertissement sur les risques de sécurité électrique ou les risques de blessures graves ou mortelles.
- Page 38 Sécurité Table à induction de Cooke & Lewis Ne laissez pas des enfants ou des personnes à capacité réduite jouer avec l'appareil ou les matériaux d'emballage. Respectez la règlementation locale en vigueur pour vous débarrasser de l'appareil en raison des réfrigérants et gaz inflammables. Avant de racler l'appareil, veuillez enlever les portes afin d'éviter que des éléments ne restent à...
- Page 39 Sécurité Table à induction de Cooke & Lewis Nous vous recommandons également le plus grand soin pendant l'utilisation et le nettoyage. Lisez attentivement les sections relatives au nettoyage et à l'entretien de l'appareil. N’utilisez pas de nettoyeur à vapeur. L’appareil est exclusivement destiné à une utilisation domestique.
- Page 40 Installation Table à induction de Cooke & Lewis Instructions d'installation Retirez tous les matériaux d'emballage ainsi que l'énoncé relatif à l'élimination. Pose (voir fig.1) Attention Une bonne ventilation autour de l'appareil est nécessaire pour une meilleure dissipation de la chaleur et une consommation d'énergie faible. Un espace suffisant autour de l'appareil est nécessaire.
-
Page 41: Installation De La Table De Cuisson
Installation Table à induction de Cooke & Lewis Installation de la table de cuisson Attention La table de cuisson céramique doit être installée par une personne dûment qualifiée. Ne tentez jamais d'installer cet appareil par vous-même. La table de cuisson céramique ne doit pas être installée au-dessus d'un frigidaire, d'un congélateur ou d'un lave-vaisselle. - Page 42 Installation Table à induction de Cooke & Lewis Attention Ces appareils sont répertoriés dans la classe I. La terre est obligatoire, comme le prévoit la loi. Le fabricant décline toute responsabilité si les règles de prévention des accidents n'ont pas été respectées.
- Page 43 Installation Table à induction de Cooke & Lewis > L’ensemble de l’installation doit être confié à une personne compétente ou à un électricien professionnel. > Avant de raccorder le secteur, assurez-vous que la tension du secteur correspond à la tension de la plaque signalétique à l'intérieur de la hotte de cuisine.
- Page 44 Installation Table à induction de Cooke & Lewis BOÎTIER DE DÉRIVATION AVEC FUSIBLE À INTERRUPTEUR BIPOLAIRE FUSIBLE (Allumé) UTILISEZ UN FUSIBLE DE 13 AMPÈRES Connexion directe > Si l'appareil est connecté directement à la prise de courant, un disjoncteur omnipolaire avec un minimum de 3 mm entre les contacts doit être installé.
- Page 45 Mise en route Table à induction de Cooke & Lewis Fonctions du produit > La table à induction convient à tous les types de cuisson avec ses zones de cuisson électromagnétiques, ses commandes tactiles électroniques et multifonctions, ce qui en fait le choix idéal d'une famille moderne. >...
- Page 46 Mise en route Table à induction de Cooke & Lewis Détection de petits éléments ou d'éléments non magnétiques Si une casserole de taille inadaptée ou non magnétique (ex. en aluminium) ou un autre petit élément (ex. un couteau, une fourchette, une clé) est resté sur la table de cuisson, celle-ci est automatiquement mise en veille une minute plus tard.
- Page 47 Mise en route Table à induction de Cooke & Lewis Mise en route Touche MARCHE/ Touche de sélection de la zone de chauffe minuteur ARRÊT Touche puissance Touche système Référence Description Touche de sélection de la zone de chauffe (A) Touche puissance (réduire) (B) Touche puissance (augmenter) (C) Sécurité...
- Page 48 Mise en route Table à induction de Cooke & Lewis Instructions d'utilisation Attention • Si vous appuyez sur la touche ON/OFF (MARCHE/ARRÊT) (E), la table à induction revient en mode veille si aucune autre opération n'est effectuée dans un délai d'une minute. •...
- Page 49 Mise en route Table à induction de Cooke & Lewis Fonction minuteur 1. Appuyez sur la touche minuteur (F) et l'indicateur commencera à clignoter. 2. Définissez ensuite la durée entre 1 Référence Description et 99 minutes en appuyant sur les touches «...
- Page 50 Mise en route Table à induction de Cooke & Lewis Mode sécurité (sécurité enfant) Pour assurer la sécurité des enfants, la table à induction est équipée d'un dispositif de verrouillage. Référence Description Verrouillage : 1. Maintenez enfoncé le « verrou » (D) ;...
- Page 51 Mise en route Table à induction de Cooke & Lewis Sélection des récipients à chauffer Attention La base de la casserole doit contenir un matériau magnétique. Elle doit avoir un fond plat avec un diamètre supérieur à 12 cm. Poêle à frire à huile Ustensiles de Plaque en fer cuisine en émail...
- Page 52 A110093_CLIND1BK-C_hob_v1_EN_FR_2011_12_29.indb 52 06/01/2012 5:25 PM...
-
Page 53: Et Dans Le Détail
Table à induction de Cooke & Lewis dans détail... Soin et entretien Informations techniques et juridiques Installation A110093_CLIND1BK-C_hob_v1_EN_FR_2011_12_29.indb 53 06/01/2012 5:25 PM... - Page 54 Soin et entretien Table à induction de Cooke & Lewis Soin Les cordons d'alimentation endommagés doivent être remplacés par une personne compétente ou un électricien qualifié. Utilisation réservée à l'intérieur. Ne mettez jamais la table à induction directement dans l'eau. Ne placez jamais une casserole vide sur la table de cuisson car cela fera apparaître un message d'erreur sur le panneau de commande.
- Page 55 Soin et entretien Table à induction de Cooke & Lewis N'utilisez jamais la table en céramique à proximité d'un autre appareil générant des températures élevées, par exemple une cuisinière à gaz ou un chauffe-paraffine. N'entreposez pas de détergents ou de matériaux inflammables sous la table de cuisson.
- Page 56 Soin et entretien Table à induction de Cooke & Lewis Dépannage Les circonstances suivantes peuvent ne pas constituer un problème. Ne contactez pas le service client avant que le problème ne soit confirmé. Si votre appareil ne fonctionne toujours pas correctement après avoir effectué...
- Page 57 Soin et entretien Table à induction de Cooke & Lewis Recycling and disposal Environmental Protection Waste electrical products should not be disposed of with household waste. Please recycle where facilities exist. Check with your Local Authority or retailer for recycling advice. The symbol on the product or its packaging indicates that this product cannot be treated as normal household waste.
- Page 58 Informations techniques et juridiques Table à induction de Cooke & Lewis Données techniques Alimentation électrique V / Hz 220-240 V~/50 Hz Dimensions externes 590 x 55 x 520 (LxHxP) Poids net Informations juridiques Le fabricant décline toute responsabilité pour les dommages aux personnes et aux objets causés par une installation incorrecte ou non conforme de l'appareil.
- Page 59 Informations techniques et juridiques Table à induction de Cooke & Lewis Garantie Cet appareil est couvert par une garantie de 24 mois. Vos droits légaux ne sont aucunement limités et ne peuvent pas être modifiés par une autre garantie, qui aurait été...
- Page 60 Nous certifions par la présente que les accessoires mentionnés sont conformes aux exigences essentielles des directives européennes en vigueur, y compris leurs modifications et les transpositions correspondantes de la législation nationale. APPLICATION MACHINE : CLIND1BK-C TYPE: Table à induction DIRECTIVES CE Conformes aux directives européennes...
- Page 61 Informations techniques et juridiques Table à induction de Cooke & Lewis Lignes d’assistance à la clientèle Lorsque vous appelez le service client, veillez à toujours avoir le numéro du modèle et le numéro de série sous les yeux. Veuillez conserver votre reçu ou votre facture en lieu sûr car ils seront demandés comme preuve de la date d'achat.
- Page 62 Installation [02] [01] x1 [03] [02] x4 [01] [03] x4 A110093_CLIND1BK-C_hob_v1_EN_FR_2011_12_29.indb 62 06/01/2012 5:25 PM...
- Page 63 SEAL BOURRELET 590 mm 520 mm 55 mm 490 mm 560 mm A110093_CLIND1BK-C_hob_v1_EN_FR_2011_12_29.indb 63 06/01/2012 5:25 PM...
- Page 64 B&Q plc, GB-IE Chandlers Ford, Hants, SO53 3LE United Kingdom www.diy.com Castorama France BP 101 - 59175 Templemars www.castorama.fr A110093_CLIND1BK-C_hob_v1_EN_FR_2011_12_29.indb 64 06/01/2012 5:25 PM...
Need help?
Do you have a question about the CLIND1BK-C and is the answer not in the manual?
Questions and answers
The 2 left cooking zones are not working. I set the temperature and then after a few seconds it turns off. The 2 right cooking zines are working fine as usual
The issue with the left cooking zones turning off after setting the temperature on the Cooke & Lewis CLIND1BK-C induction hob could be due to one of the following reasons:
1. Detection of Small or Non-Magnetic Items – If an unsuitable pan (e.g., aluminum or too small) is placed on the hob, it will switch to standby mode after one minute.
2. Overheating Protection – A sensor monitors the temperature, and if it exceeds a safe level, the cooking zone automatically switches off.
3. Auto Shutdown Feature – If the hob is left on without interaction for a set period, it will turn off as a safety measure.
4. Abnormal Temperature Error (E3/E4) – Poor heat radiation in the cooking zone may cause an automatic shutdown. Let the zone cool down before restarting.
To resolve the issue, ensure a compatible pan is used, allow the hob to cool if overheated, and check for any error messages on the display.
This answer is automatically generated