Table of Contents
Advertisement
Quick Links
Advertisement
Table of Contents

Related Manuals for Zanussi ZWC 1301


Summary of Contents for Zanussi ZWC 1301
- Page 1 User Manual GETTING STARTED? EASY. ZWC 1301 EN User Manual Washing Machine...
-
Page 2: Safety Information
SAFETY INFORMATION Before the installation and use of the appliance, carefully read the supplied instructions. The manufacturer is not responsible for any injuries or damages that are the result of incorrect installation or usage. Always keep the instructions in a safe and accessible location for future reference. -
Page 3: Safety Instructions
Do not exceed the maximum load of 3 kg (refer to the • "Programme chart" chapter). The operating water pressure at the water entry point from the • outlet connection must be between 0.5 bar (0.05 MPa) and 8 bar (0.8 MPa). The ventilation opening in the base must not be covered by a •... -
Page 4: Installation
ELECTRICAL CONNECTION • You can extend the drain hose to maximum 400 cm. Contact the Authorised Service Centre for WARNING! Risk of fire and electric the other drain hose and the extension. shock. • Make sure that there is access to the tap after the installation. -
Page 5: Lifting The Machine
You are advised to keep all transit devices so that they can be refitted if the machine ever has to be transported again. 1. Spread some of the polystyrene packaging materials on the floor behind the machine and then lay the machine carefully rear side down on them. -
Page 6: Water Inlet
POSITIONING inlet hose, be sure to tighten the ring nut again to prevent leaks. Install the machine on a flat hard floor. Make sure that air circulation around the machine is not impeded by carpets, rugs etc. Check that the machine does not touch the wall or furniture. -
Page 7: Installation On Suspended Flooring
There must be an air gap around and below the end of drain hose. This means that the internal diameter of the standpipe must be larger than the outer diameter of the hose. The hose must not be sticked into the standpipe more than 50 mm and it has to be fixed in this position. -
Page 8: Product Description
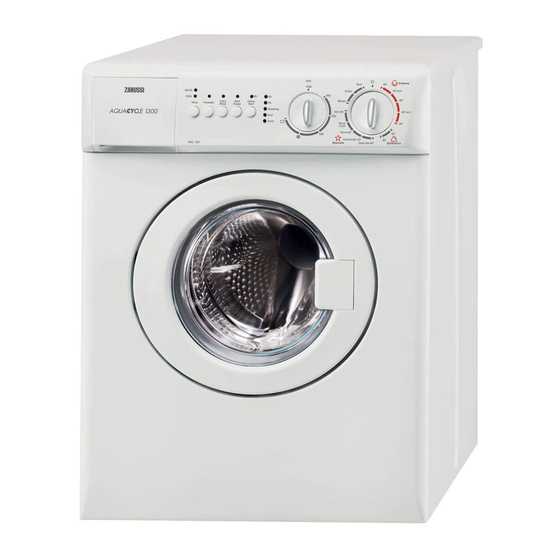
PRODUCT DESCRIPTION APPLIANCE OVERVIEW Detergent dispenser drawer Drain hose Control panel Inlet hose Door handle Transit bolts Rating plate Mains cable Feet for levelling the appliance CONTROL PANEL CONTROL PANEL DESCRIPTION Spin Cottons Spin 90° 1300 Quick Drain Daily 60° Rinses Extra Start... -
Page 9: Extra Rinse
DELAY START button PREWASH button START/PAUSE button TIME saving button EXTRA RINSE button TIME SAVING BUTTON DELAY START By means of this button, you can select only one of The start of the programme can be delayed by 8, 4 the options. -
Page 10: Washing Programmes
WASHING PROGRAMMES Programme/ Description of the Type of laundry Available options Temperature programme White cotton (heavily SPIN REDUCTION/NO Main wash COTTONS and normally soiled cot- SPIN/RINSE HOLD Rinses 90°-60°-30°C ton items) DELAY START Reference spin PREWASH speed 1300 rpm DAILY/QUICK Max load 3 kg EXTRA RINSE COTTONS ECO... -
Page 11: Before First Use
Programme/ Description of the Type of laundry Available options Temperature programme MINI 30 For lightly soiled laundry SPIN REDUCTION/NO Main wash 30°C or for laundry which SPIN/RINSE HOLD Rinses needs freshening up. DELAY START Reference spin speed 700 rpm Max Load 1,5 kg With this programme it is SPIN REDUCTION/NO Rinses... -
Page 12: Daily Use
DAILY USE Compartment for powder or liquid detergent WARNING! Refer to Safety chapters. used for main wash. If using liquid detergent, pour it just before starting the programme. When you set a programme LOADING THE LAUNDRY with prewash, put the detergent 1. -
Page 13: Select The Desired Options
SELECT THE DESIRED OPTIONS You must select this option after you have set the programme and before you press button Start/ Depending on the programme, different functions Pause. can be combined. These must be selected after choosing the desired programme and before You can cancel or modify the delay time at any pressing the button Start/Pause. -
Page 14: Hints And Tips
ALTERING AN OPTION OR A RUNNING • The machine doesn’t spin. PROGRAMME If you cannot open the door but it is absolutely It is possible to change any option before the necessary to open it you have to switch the programme carries it out. -
Page 15: Care And Cleaning
STUBBORN STAINS • If your appliance does not have the detergent dispenser with the flap device, add the liquid For some stains, water and detergent is not detergents with a dosing ball (supplied by the sufficient. detergent's manufacturer). We recommend that you pre-treat these stains before you put the items in the appliance. -
Page 16: Cleaning The Drawer Recess
1. If necessary, the whole detergent drawer can CLEANING THE DRAWER RECESS be taken out of the machine for cleaning. You Having removed the drawer, use a small brush to need to pull it firmly outwards, so that it comes clean the recess, ensuring that all washing powder free of retaining stop. -
Page 17: The Dangers Of Freezing
45° 20° THE DANGERS OF FREEZING • Select the programme "Drain" and let it run until it is finished. If the machine is exposed to temperatures below 0°C, certain precautions should be taken. • Turn the programme selector to position. •... -
Page 18: Troubleshooting
Approximate Energy con- Water con- Remaining programme Programmes Load (kg) sumption sumption (li- duration (mi- moisture (%) (kWh) tre) nutes) 0,30 Wool plus 30°C Standard cotton programmes Standard 60°C cot- 0,59 Standard 60°C cot- 0,54 Standard 40°C cot- 0,49 1) At the end of spin phase. 2) Not available for some models. -
Page 19: Possible Failures
POSSIBLE FAILURES Problem Possible cause/Solution The machine does not The door has not been closed. start: • Close the door firmly. The plug is not properly inserted in the power socket. • Insert the plug into the power socket. There is no power at the socket. •... -
Page 20: Technical Data
Problem Possible cause/Solution The door will not open: The programme is still running. • Wait the end of washing cycle. The door lock has not been released. • Wait until the indicator light for door locked has gone out. There is water in the drum. •... -
Page 21: Environmental Concerns
Maximum Load Cotton 3 kg Energy Efficiency Class Spin Speed Maximum spin speed 1251 rpm 1) The appliance works correctly if the water pressure is not lower than 0.05 MPa (0.5 bar). If you cannot connect the water inlet hose to the cold water tap of the primary hydraulic system, connect it to your do- mestic cold water storage system. - Page 24 WWW.ZANUSSI.COM/SHOP...
Need help?
Do you have a question about the ZWC 1301 and is the answer not in the manual?
Questions and answers