Table of Contents
Advertisement
Advertisement
Table of Contents

Related Manuals for Euromaid ECCK64


Summary of Contents for Euromaid ECCK64
-
Page 1: User Manual
User Manual 60cm Ceramic Cooktop ECCK64... -
Page 2: Table Of Contents
Contents For your safety .................... 3 Product overview ..................8 The control panel ..................9 Using the touch controls ................10 Choosing the right cookware ..............10 Using your hob ..................11 Cooking guidelines ................... 13 Heat settings ....................14 Care and Cleaning .................. -
Page 3: For Your Safety
SAFETY WARNINGS PLEASE READ THE FOLLOWING INSTRUCTIONS CAREFULLY BEFORE USING THE APPLIANCE. Installation Electrical Shock Hazard • Disconnect the appliance from the mains electricity supply before carrying out any work or maintenance on it. • Connection to a properly earthed wiring system is essential and mandatory. - Page 4 according to these instructions for installation. • This appliance is to be properly installed and earthed only by a suitably qualified person. • This appliance should be connected to a circuit which incorporates an isolating switch providing full disconnection from the power supply. •...
- Page 5 Hot Surface Hazard • WARNING: Accessible parts may become hot during use. Young children should be kept away • Do not let your body, clothing or any item other than suitable cookware contact the ceramic glass until the surface is cool. •...
- Page 6 stand, or climb on it. • Do not store items of interest to children in cabinets above the appliance. Children climbing on the cooktop could be seriously injured. • Do not leave children alone or unattended in the area where the appliance is in use.
- Page 7 • Care should be taken to avoid touching heating elements. • This appliance is not intended for use by persons (including children) with reduced physical, sensory or mental capabilities, or lack of experience and knowledge, unless they have been given supervision or instruction concerning use of the appliance by a person responsible for their safety.
-
Page 8: Product Overview
• Congratulations on the purchase of your new hob. We recommend that you spend some time to read this Instruction / Installation Manual in order to fully understand how to install correctly and operate it. Read all the safety instructions carefully before use and keep this Instruction / Installation Manual for future reference. -
Page 9: The Control Panel
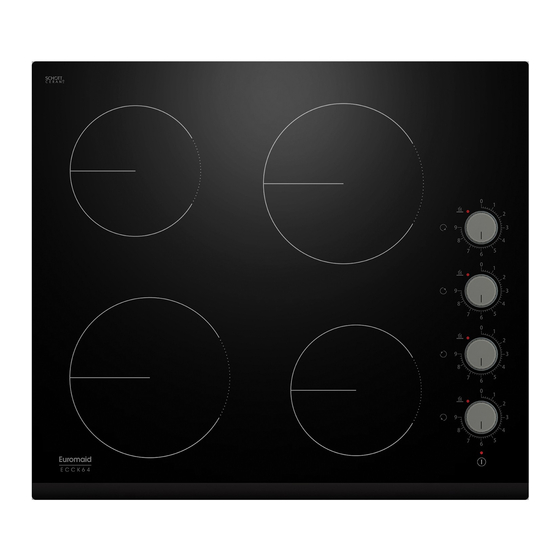
The Control Panel ECC 64 3. Residual heat indicator 1. ON/OFF key 4. Heating zone indicator 2. Knob / Power level indicators Before using your New Hob Read this guide, taking special note of the ‘Safety Warnings’ section. • Remove any protective film that may still be on your ceramic hob. •... -
Page 10: Using The Touch Controls
Using the Touch Controls The controls respond to touch, so you don’t need to apply any pressure. • Use the ball of your finger, not its tip. • You will hear a beep each time a touch is registered. • Make sure the controls are always clean, dry, and that there is no object (e.g. -
Page 11: Using Your Hob
Using your Hob To start cooking 1. Touch the ON/OFF key, and the power indicator will display. Note: Each cooking zone is independent of others. 2. Place a suitable pan on the cooking zone that you wish to use. Make sure the bottom of the pan and the surface of the cooking zone are clean and dry. - Page 12 Residual Heat Warning When the hob has been operating for some time, there will be some residual heat. The indicator “” appears to warn you to keep away from the particular zone. Auto Shutdown Safety feature of the hob is auto shut down. This occurs whenever you forget to switch off a cooking zone.
-
Page 13: Cooking Guidelines
Cooking Guidelines ke care when frying as the oil and fat heat up very quickly. At extremely high temperatures oil and fat can ignite spontaneously and this may present a serious fire risk. Cooking Tips When food comes to the boil, reduce the power setting. •... -
Page 14: Heat Settings
For stir-frying 1. Choose a ceramic compatible flat-based wok or a large frying pan. 2. Have all the ingredients and equipment ready. Stir-frying should be quick. If cooking large quantities, cook the food in several smaller batches. 3. Preheat the pan briefly and add two tablespoons of oil. 4. -
Page 15: Care And Cleaning
Care and Cleaning What? How? Important! • When the power to the cooktop is Everyday soiling on glass 1. Switch the power to the cooktop off. (fingerprints, marks, 2. Apply a cooktop cleaner while the switched off, there will be no ‘hot stains left by food or non- glass is still warm (but not hot!) surface’... -
Page 16: Troubleshooting
Troubleshooting Problem Possible causes What to do The cooktop cannot No power. Make sure the cooktop is connected Be turned on. to the power supply and that it is switched on. Check whether there is a power outage in your home or area. If you’ve checked everything and the problem persists, contact the Technika service department. -
Page 17: Installation
Installation Preparation of the work surface Cut out the work surface according to the sizes shown in the drawing. • For the purpose of installation and use, a minimum of 50mm space shall be • preserved around the hole. Be sure the thickness of the work surface is at least 30mm. and suitable for •... - Page 18 A(mm) B(mm) C(mm) 600 min 50 min 20 min Air intake Air exit 5mm Before you install the hob, make sure that The work surface is square and level, and no structural members interfere with space • requirements. The work surface is made of a suitable material. •...
- Page 19 When you have installed the hob, make sure that The power supply cable is not accessible through cupboard doors or drawers. • There is adequate flow of air from outside the cabinetry to the base of the hob. • If the hob is installed above a drawer or cupboard space, a thermal protection •...
-
Page 20: Electrical Connection
Cautions • The hob must be installed by a suitably qualified person. Please never conduct the operation by yourself. • The hob shall not be mounted to cooling equipment, dishwashers and rotary dryers. • The hob shall be installed in a way that ensures correct ventilation and clearances. •... -
Page 21: Disposal
Warning! • If the cable is damaged or needs replacing, this must be done by the manufacturer or suitably qualified person. The installer must ensure that the correct electrical connection has • been made and that it complies with safety regulations. The cable must not be bent or compressed. -
Page 22: Notes
NOTES ______________________________________________________ ______________________________________________________ ______________________________________________________ ______________________________________________________ ______________________________________________________ ______________________________________________________ ______________________________________________________ ______________________________________________________ ______________________________________________________ ______________________________________________________ ______________________________________________________ ______________________________________________________ ______________________________________________________ ______________________________________________________ ______________________________________________________ ______________________________________________________ ______________________________________________________ ______________________________________________________ ______________________________________________________ ... - Page 23 NOTES ______________________________________________________ ______________________________________________________ ______________________________________________________ ______________________________________________________ ______________________________________________________ ______________________________________________________ ______________________________________________________ ______________________________________________________ ______________________________________________________ ______________________________________________________ ______________________________________________________ ______________________________________________________ ______________________________________________________ ______________________________________________________ ______________________________________________________ ______________________________________________________ ______________________________________________________ ______________________________________________________ ______________________________________________________ ...
- Page 24 NOTES ______________________________________________________ ______________________________________________________ ______________________________________________________ ______________________________________________________ ______________________________________________________ ______________________________________________________ ______________________________________________________ ______________________________________________________ ______________________________________________________ ______________________________________________________ ______________________________________________________ ______________________________________________________ ______________________________________________________ ______________________________________________________ ______________________________________________________ ______________________________________________________ ______________________________________________________ ______________________________________________________ ______________________________________________________ ...
-
Page 25: Manufacturer Guarantee
Subject to the exclusions below, we warrant that the product will not have any electrical or mechanical breakdowns within: a) In the case of Euromaid products used for personal, domestic or household purposes, a period of 2 years from the date the product is purchased as a brand-new product from a retailer located in Australia / New Zealand. - Page 26 c) The repair relates to the replacement of consumable parts such as fuses and bulbs or any other parts of the product which require routine replacement; d) You are unable to provide us with reasonable proof of purchase for the product; e) the breakdown occurs after the expiry of the express warranty period set out in section 1 or f) the product was not purchased in Australia / New Zealand as a brand-new product.
- Page 27 5. Warranty claims If you make a valid claim under this warranty and none of the exclusions set out in section 2 apply, we will, at our election, either repair the product or replace the product with a product of identical specification (or where the product is superseded or no longer in stock, with a product of as close a specification as possible).
- Page 28 READ THE INSTRUCTION BOOKLET BEFORE INSTALLING AND USING THE APPLIANCE. The manufacturer will not be responsible for any damage to property or to persons caused by incorrect installation or improper use of the appliance. The manufacturer is not responsible for any inaccuracies, due to printing or transcription errors, contained in this manual.
Need help?
Do you have a question about the ECCK64 and is the answer not in the manual?
Questions and answers