
Related Manuals for Dobot Conveyor Belt


Summary of Contents for Dobot Conveyor Belt
- Page 1 Conveyor Belt Instruction Conveyor Belt Instructions AN01010101 V1.11 Date: 2017/08/09 Shenzhen Yuejiang Technology Co.,Ltd...
- Page 2 Conveyor Belt Instruction Revised History Version Date Reason V1.10 2017/05/16 Create a document V1.11 2017/08/09 Update the information of the new version sensor Shenzhen Yuejiang Technology Co., Ltd...
-
Page 3: Table Of Contents
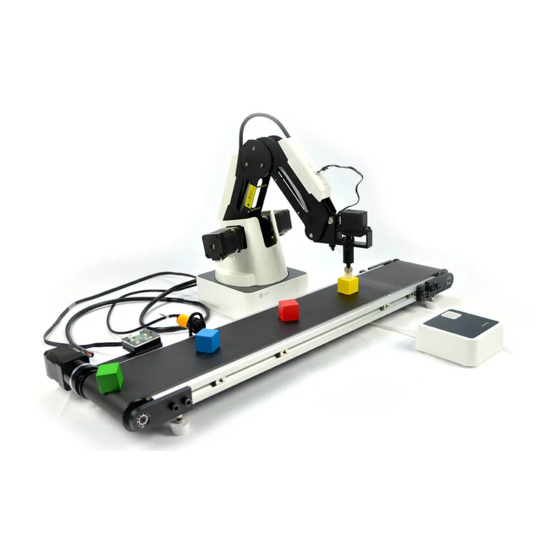
1.1.1 Installation Steps ...................... 5 1.1.2 Overall wiring diagram .................... 6 2. Software ............................8 2.1 Conveyor Belt Picking & Sorting Demo ................8 2.1.1 Install software ......................8 2.1.2 Open the software ....................8 2.1.3 Import the blockly demos for picking and sorting ........... 9 2.1.4 Start running the picking and sorting demos ............ - Page 4 Overview of Conveyor Belt Kit: Figure 1.1 Overview of Conveyor Belt Kit Put 3 attached acrylic boards as shown below to keep the conveyor belt and Dobot Magician at a fixed position. Put the wood blocks randomly near the acrylic board.
-
Page 5: Hardware
Bluetooth, WIFI, Stick controller, Infrared sensor, Color sensor etc... Not powering down the Dobot before doing so may damage or break your Dobot! Note that only once the status light completely turns off, the Dobot has powered down. -
Page 6: Installation Steps
Conveyor Belt Instruction 1.1.1 Installation Steps 1 Connect the motor wire to interface Stepper1 on the main control box of the Dobot1. Figure 1.4 Connecting the motor wire 2 Connect the color sensor to the GP1/GP2/GP4/GP5 of Dobot2. (Take GP4 as an example here): Figure 1.5 Color sensor connection... -
Page 7: Overall Wiring Diagram
Conveyor Belt Instruction 3 Connect the photoelectric sensor to the GP1/GP2/GP4/GP5 of Dobot2 (Take GP2 as an example here): Figure 1.6 The photoelectric sensor connection 1.1.2 Overall wiring diagram Figure 1.7 The wiring diagram of Dobot1 Shenzhen Yuejiang Technology Co., Ltd... - Page 8 Conveyor Belt Instruction Figure 1.8 The wiring diagram of Dobot2 Shenzhen Yuejiang Technology Co., Ltd...
-
Page 9: Software
Figure 2.1The download interface for the software 2.1.2 Open the software When the software has finished installing, please connect the two Dobot arms to the computer. Make sure to open two Dobotstudio interfaces. Open the interface: Figure 2.2 The opening interface of the software... -
Page 10: Import The Blockly Demos For Picking And Sorting
Figure 2.3 The save path of Blockly demos 2.1.4 Start running the picking and sorting demos Open the Dobot Studio and program through the Blockly to carry out picking and sorting. Figure 2.4 Click “Blockly” Dobot1 will select the picking program, and Dobot2 will select the sorting program. - Page 11 Conveyor Belt Instruction Figure 2.5 Open the two Blockly demos Figure 2.6 Picking Program Shenzhen Yuejiang Technology Co., Ltd...
- Page 12 Conveyor Belt Instruction Figure 2.7 Sorting Program Shenzhen Yuejiang Technology Co., Ltd...
-
Page 13: 3.Position Adjustment
Conveyor Belt Instruction 3.Position Adjustment 3.1 Adjust the picking and placing positions of Dobot1 3.1.1 Adjust the picking position Press the Unlock button to move Dobot1 to the first block and press the suction cup on the block. Figure 3.1 The picking position The operation panel in DobotStudio will record the values of X, Y, Z coordinates automatically. -
Page 14: Adjust The Placing Position
Conveyor Belt Instruction 3.1.2 Adjust the placing position Tick Suction Cup, then press the Unlock button to move the block to the conveyor belt. Figure 3.3 The placing position The operation panel of DobotStudio will record the values of X, Y, Z coordinates automatically. -
Page 15: Adjust The Sorting Positions Of Dobot2
Figure 3.5 The picking position The operation panel of Dobot Studio will record the values of X, Y, Z coordinates automatically, write the values of the XYZ coordinates in the blanks. Figure 3.6 Modify the X, Y, Z coordinates in Blockly demo... -
Page 16: Adjust The Color-Identified Position
Conveyor Belt Instruction 3.2.2 Adjust the color-identified position Tick Suction Cup, then press the Unlock button and put the block above the color sensor. Note: The distance between the color sensor and block shouldn’t be too high or too low. -
Page 17: Adjust The Placing Position
Figure 3.10 Modify the X, Y, Z coordinates in Blockly demo After adjusting the positions, click “Save”. Then, click “Start” to turn on the conveyor belt. Note: Please start the sorting demo at first, then start the pick & place demo.
Need help?
Do you have a question about the Conveyor Belt and is the answer not in the manual?
Questions and answers