Advertisement
Quick Links
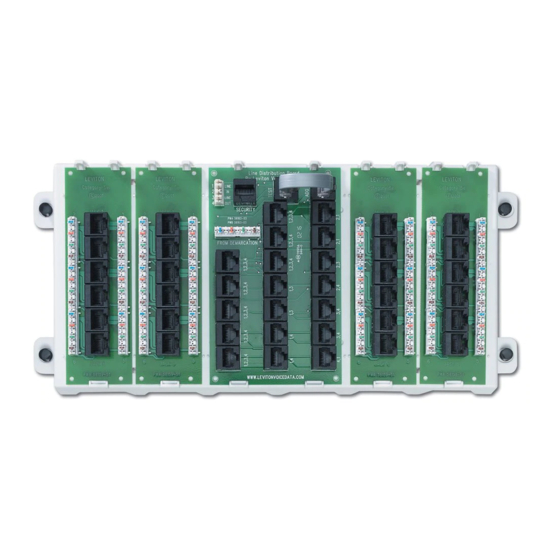
Pre-Configured Structured Cabling Panels
APPLICATION
One of six Pre-Configured Structured Cabling Panels, which may be used to connect basic telephone
service, data (with a network hub) and, on selected versions, video service for home or office cabling.
Panels are designed to fit into Structured Media Centers™ (Models 100, 140, 280 or 420), or plastic
mounting hardware may be removed and unit may be screwed directly onto a plywood backboard.
PLANNING
Your Pre-Configured Structured Cabling Panel may consist of one or more of the following components: a
1x9 Bridged Telephone Module, a Category 5e Voice and Data Module, a Telephone Distribution Module
or a 6-way Video Splitter.
Plan all of your cable routing carefully to be sure the selected distribution panel will satisfy your
requirements. Determine the number of outlet locations required for basic phone, fax, modem and TV
service. Additional Category 5e Voice and Data Modules (PN# 47603-C5) and 1x9 Bridged Telephone
Expansion modules (PN# 47603-110) are available separately.
Modules:
Your Pre-Configured Structured Cabling Panel consists of one or more of the following modules:
Category 5e Voice and Data Module: used for terminating remote connections (from wall outlets) for voice,
fax, modem and computer. Use it to provide dial tone to an outlet, or to link to a network hub.
Telephone Distribution Module: accepts incoming service from the telephone service provider (dial tones)
and provides dial tone (for up to 4 lines) to ports on the Category 5e Voice and Data Module by way of
short patch cords.
1x9 Bridged Phone Module: used for connecting up to four phone lines for voice, fax and modem in a
bridged wiring configuration.
6-way Video Splitter: routes basic video signals from one input to as many as six remote televisions.
[Should local signal need active attenuation, optional video module will be required (PN#48210-VA).]
Installation:
Position the Structured Cabling Panel inside the SMC enclosure. Align the plastic Push Lock Pins (plunger
out) on the distribution panel with the appropriate mounting holes on the enclosure. Seat the panel in
place, resting flat against the back of the panel, and then press the Push Lock Pins inward with your
thumb to lock into place. You will know the push locks are secure if they "click" when pressing in.
47603-ASO 47603-BHN 47603-18P
47603-AHT 47603-BTV 47603-24P
Typical wiring of an SMC 140 shown, using an
Advanced Small Office Pre-configured Structured
Cabling Panel.
PK-93091-10-02-0A
1
Advertisement

Related Manuals for Leviton 47603-ASO


Summary of Contents for Leviton 47603-ASO
- Page 1 47603-ASO 47603-BHN 47603-18P 47603-AHT 47603-BTV 47603-24P Pre-Configured Structured Cabling Panels APPLICATION One of six Pre-Configured Structured Cabling Panels, which may be used to connect basic telephone service, data (with a network hub) and, on selected versions, video service for home or office cabling.
- Page 2 CATEGORY 5e VOICE & DATA MODULE UTP to Wallplates Connecting the Category 5e Voice and Data Module Run twisted pair cable to the Category 5e Voice and Data Module from wall outlets. Strip about 3˝ of outer jacket from the cable. Punch individual cable pairs down on the six white connectors on the sides of the Module.
- Page 3 1X9 BRIDGED TELEPHONE MODULE Connecting the 1x9 Bridged Telephone Module Run twisted pair cable to the Bridged Telephone Module from the telephone company demarcation point. Strip 3˝ of outer jacket from the cable. Punch individual cable pairs down on the first white connector at the top of the Bridged Telephone Module. If you do not have a professional grade termination tool, use the plastic tool supplied with this panel.
- Page 4 THE FOLLOWING PANELS ARE AVAILABLE FROM LEVITON: Basic Telephone and Video Unit: Combines a Bridged Telephone Module and 6-Way Video Splitter in a dedicated bracket for essential telephone and video distribution. Will distribute 9 cables for telephone and 6 for video. Available as a stand-alone unit or as part of a kit with SMC-100 or SMC-140.
- Page 5 Paneles de Cableado Estructurado Pre-Configurados APLICACIÓN: Uno de los seis paneles de cableado estructurado pre-configurados que pueden usarse para conectar servicio telefónico básico, datos (con una terminal de red) y, en algunas versiones, servicio de vídeo para cableado de hogar u oficina. Los paneles están diseñados para encajar en Centros Estructurados de Medios (Modelos 100, 140, 280 o 420), o se puede remover el conjunto de montaje de plástico y atornillarse la unidad directamente a un tablero de contrachapado.
- Page 6 MÓDULO DE VOZ Y DATOS CATEGORÍA 5e UTP a las tomas Conexión del Módulo de Voz y Datos Categoría 5e de pared Lleve cable par trenzado al Módulo de Voz y Datos Categoría 5e desde las tomas de pared. Quite unos 8 cm de la camisa exterior del cable. Presione los pares de cable individuales en los seis conectores blancos en los laterales del Módulo.
- Page 7 Blanco/Azul Blanco/Verde Azul/Blanco Verde/Blanco Blanco/Naranja Blanco/Naranja Naranja/Blanco Naranja/Blanco Blanco/Verde Blanco/Azul Verde/Blanco Azul/Blanco Blanco/Café Blanco/Café Café/Blanco Café/Blanco MÓDULO TELEFÓNICO DERIVADO DE 1X9 Conexión del Módulo Telefónico Derivado de 1x9 Lleve cable par trenzado al Módulo Telefónico Derivado desde el punto de demarcación de la compañía telefónica.
- Page 8 2. Empuje directamente hacia abajo hasta que la herramienta se asiente y corte el cable, haciendo un ruido de “clic”. LEVITON TIENE DISPONIBLES LOS SIGUIENTES PANELES: Unidad Básica de Teléfono y Vídeo: Combina un Módulo Telefónico Derivado y un Duplicador de Vídeo de 6-vías en un soporte dedicado a la distribución esencial de...
- Page 9 Distribuye 12 cables para voz/teléfono y/o datos de operación en red con 6 para vídeo. 47603-ASO Está disponible como unidad individual o como parte de un kit con el CEM-100 o el CEM-140.
- Page 10 Panneaux de câblage structurés préconfigurés APPLICATIONS On peut se servir de n'importe lesquels de six panneaux de câblage structurés préconfigurés pour distribuer le service téléphonique de base, les lignes de transmission de données (en présence d'un concentrateur de réseau) et, avec certains modèles, le service vidéo pour la résidence ou le bureau. Ils sont conçus pour s'adapter aux centres médias structurés (CMS, modèles 100, 140, 280 ou 420) ou, si on en retire les dispositifs de fixation en plastique, pour être vissés directement sur un panneau de contreplaqué.
- Page 11 MODULE DE TRANSMISSION DE DONNÉES/DE LA VOIX DE CATÉGORIE 5e PTNB aux prises murales Raccordement du module de transmission de données/de la voix de catégorie 5e Acheminer le câble à paires torsadées des prises murales au module. Dégainer le câble sur environ 8 cm (3 po). Percuter chaque paire dans les six connecteurs blancs sur les côtés du module.
- Page 12 Utilisation du module de distribution téléphonique avec celui de transmission de données/de la voix de catégorie 5e. Pour répartir le service téléphonique d'un module de distribution aux diverses prises murales d'une résidence ou d'un bureau, il suffit de raccorder un cordon de connexion entre la colonne appropriée du module de distribution et le point de connexion désiré...
- Page 13 1. orienter la lame de l'outil dans le sens indiqué (figure 6); 2. pousser directement vers le bas jusqu'à ce que l'outil insère et coupe le fil, en produisant un déclic. LES PANNEAUX SUIVANTS SONT OFFERTS PAR LEVITON : Unité téléphonique et vidéo de base : Combine un module téléphonique shunté...
- Page 14 12 câbles téléphoniques ou informatiques et 6 câbles coaxiaux. Offerte en 47603-ASO version autonome ou sous forme de composant des CMS 100 et 140.
Need help?
Do you have a question about the 47603-ASO and is the answer not in the manual?
Questions and answers