Diplomat ADEPT DA 270 Product Information
Hide thumbs
Also See for ADEPT DA 270:
- User manual (12 pages) ,
- Instructions for use manual (67 pages)

Related Manuals for Diplomat ADEPT DA 270


Summary of Contents for Diplomat ADEPT DA 270
- Page 1 DIPLOMAT DENTAL s.r.o. Vrbovská cesta 17 921 01 Piešťany SLOVAKIA PRODUCT INFORMATION Dental unit DIPLOMAT ADEPT DA 270 DIPLOMAT ADEPT DA 280...
-
Page 2: Table Of Contents
CONTENTS 1. PURPOSE AND USE ......................3 2. PRODUCT DESCRIPTION ....................4 3. TECHNICAL DATA ........................ 4 4. DESCRIPTION OF THE DENTAL UNIT ................5 4.1 D .......................... 6 ATA PLATE 5. PRE-INSTALLATION REQUIREMENTS ................8 5.1 E ....................8 NVIRONMENTAL CONDITIONS .............. -
Page 3: Purpose And Use
1. PURPOSE AND USE These Instructions for Use describes how to use the dental units of DIPLOMAT ADEPT DA 270 and DA 280. Please read these Instructions for Use thoroughly before attempting to use the unit. The dental unit is allowed to be operated only by the dentist who has been made familiar with the present Instructions for Use and the dental apllications that can be done by means of the dental unit in question. -
Page 4: Product Description
2. PRODUCT DESCRIPTION The dental unit of DIPLOMAT ADEPT DA 270 is designed as a stationary unit with a carried chair and upper hose delivery and DIPLOMAT ADEPT DA 280 with lower hose delivery of instruments. DIPLOMAT ADEPT DA 280 dental unit is also available in a Cart Version. Control... -
Page 5: Description Of The Dental Unit
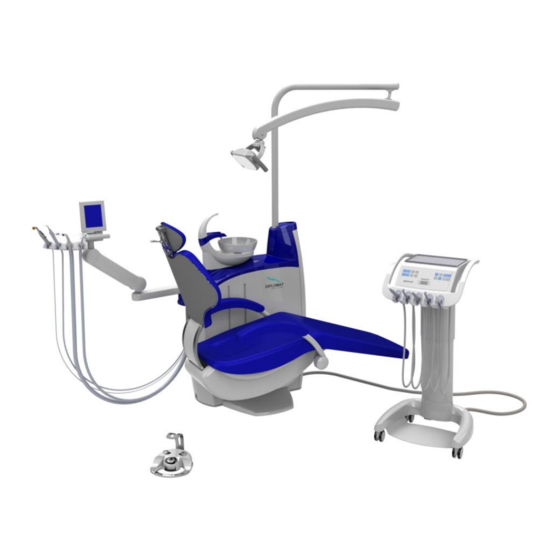
Caution To eliminate the risk of electric shock, the present equipment must be connected to the supply mains with protective earthing. 4. DESCRIPTION OF THE DENTAL UNIT 1.Spittoon block with assistant arm 2.Control panel 3.Foot controller 4.Pantograph of the control panel 5.Dental operating light 6.Pantograph of the light 7.Dental chair... - Page 6 DESCRIPTION OF THE DENTAL UNIT DA 280 CART 1.Spittoon block with assistant arm 2.Control panel 3.Foot controller Cart 5.Dental operating light 6.Pantograph of the light 7.Dental chair 6/42 gb_da270,da280_2014_06...
-
Page 7: Data Plate
4.1 Data plate 1 – designation of the unit type 2 – basic electrical parameters 3 – serial number 4 – production date 5 – chair operation type 7/42 gb_da270,da280_2014_06... -
Page 8: Pre-Installation Requirements
Pre-installation and installation must be performed according to the applicable standards of the particular country and in accordance with the valid documentation of the manufacturer, which is owned by each authorized representative of Diplomat Dental s.r.o. Note If the regulations of the country in which the installation is carried out require an amalgam... -
Page 9: Floor
to an external amalgam catcher. Installation of the external amalgam catcher must be carried out according to the instruction of its manufacturer! Recommended mains fuse rating Recommended rating of the fuse of the supply main is 16A (in the event of circuit breaker – circuit breaker with switching-off characteristic of C type). -
Page 10: Putting The Unit Into Operation
7. PUTTING THE UNIT INTO OPERATION 1. switch on the compressor and let it get pressurized 2. open the central water supply 3. turn on the suction unit (if the spittoon block is fitted with the big and small aspirator) 4. -
Page 11: Product Operation
8. PRODUCT OPERATION 8.1 Control panel with instruments Membrane keyboard Membrane keyboard Glass keyboard Glass keyboard Note The display is legible in each working position of the dentist (both sitting and standing). In the event of the glass keyboard, after pressing the button it is active for ca 10 seconds – indicated by means of the indicator of the pressing of the button on the display. -
Page 12: Description Of Buttons
Button Description Button Description Button Description negatoscope setting of the amount rotation of the spittoon bowl of cooling water (only for el. control) illumination changing-over of the instrument cooling program sets switch to move the chair up reversing of the main light control rotations of the switch to move the chair... - Page 13 Representations on the display Glass keyboard Membrane keyboard M3X N W M3X N W N = 100000RPM 50 , 00% N = 100000RPM 50 , 00% T= 0 , 300Ncm 1 : 5 T= 0 , 300Ncm 1 : 5 Description of the data of the display–...
- Page 14 Negatoscope illumination Press (touch) the button to turn the negatoscope illumination on. To turn the illumination off, press (touch) it again. To control the intensity of the negatoscope, press (touch) the button and the buttons PLUS and MINUS simultaneously with the negatoscope turned on.
- Page 15 Press (touch) the button to turn the illumination of the rotary instruments (turbine, micromotor) on and off. By pressing (touching) it is possible to modify the instrument that has been taken. When the instrument illumination is turned on, "L" is displayed. The instrument illumination goes on after putting the instrument into operation.
- Page 16 Control of the main light (according to the version of the dental unit) The button serves to control the main dental light. Press (touch) the button to change-over between the three conditions – lower illuminance, higher illuminance, light turned off. At the higher illuminance it is possible to control the illuminance by simultaneous pressing (touching) the button and the buttons PLUS or MINUS, namely so that in changing-...
- Page 17 Changing-over of the function of the foot controller (analogue - ON/OFF) The button serves to change-over the mode of the foot controller. It is possible to change- over between the mode of the proportional control and the "on /off" mode ( O/A on the display).
- Page 18 button should be held (ca 3 seconds) until you hear an audio signal (short – long tone). Only then the unit switches to the programming mode and it is possible to go on programming. Otherwise the new data on the position will not be saved into the memory. With the glass keyboard it is necessary to use the button from the foot controller.
- Page 19 After the button has been pressed, there is a short beep and after a time interval of more than 1s and less than 4s there is a long beep. After a time interval of more than 4s there is a triple beep. The chair should be pre-programmed so that the rinsing position is saved under the button for seat down movement.
- Page 20 For the movement of the chair in the upper half of the trajectory it is necessary that the bowl be in the basic position. If that is not the case, then the chair movement is blocked and this is indicated by three long beeps and an error message: „O“...
-
Page 21: Setting Of Water Amount
wires – value outside the permissible limit „8“ - potentiometer3 – error of connection : short-circuited, disconnected or misconnected wires – value outside the permissible limit „9.“ - error at autoset if the upper limit of the potentiometer than the lower limit – some of the potentiometer does not sense the position „A.“... -
Page 22: Fitting Of The Tray Of The Tray Table
8.1.4 Fitting of the tray of the tray table The tray table with a tray is installed for the DA 270 dental unit. The tray of the tray table is made of stainless steel and it is possible to remove it by pulling it out of the holder in the direction of the arrow (see the illustration). - Page 23 automatically for 0,5 s after the activity has been finished. It is not possible to turn the CHIPBLOWER function off. It is not possible to control the revolutions for the turbine. After the operation time of the turbine has reached the lubricating interval of 20 minutes, the message ...
- Page 24 lubricating interval of 20 minutes, the message OIL is displayed and audio signal sounds (triple beep – after the instrument has been taken out of the holder). After the instrument has been replaced in the holder (and lubricated), the timer is set automatically to 20 minutes. Micromotor MX/MX2 (Bien Air) Display for the MX micromotor Glass keyboard...
- Page 25 After reaching the set limit torque, the micromotor starts to rotate in the opposite direction (counter-clockwise revolutions, in the same time the instrument illumination starts to flash), namely until the drill has been loosen, then it remains in the said direction for the set time (AFT) and returns to the original revolutions (clockwise revolutions).
- Page 26 NLX Plus micromotor is controlled as a standard micromotor, except that the revolutions are set and it is possible to set the limit torque by means of the button . The limit torque can be set only when the revolutions are set within the range of 100 – 5000 RPM. Auto-reverse mode After reaching the set limit torque, the micromotor starts to rotate in the opposite direction (counter-clockwise revolutions, namely until the foot controller has been released.
-
Page 27: Foot Controller
Pmax = 33% L - instrument illumination turned on; if the symbol is not lit, the instrument illumination is turned off W – cooling with water turned on; if the symbol is not lit, the cooling is turned off ... - Page 28 (from 0 up to the value set on the display). The buttons GETTING-ON POSITION, CHAIR PROGRAMMING and CROSS TO CONTROL THE CHAIR are intended to control the dental chairs of DIPLOMAT series. Caution If no instrument is taken: ...
- Page 29 Transmitter: The foot controller is supplied from two accumulators NiMH 1,2V / 1800-2400 mAh. Accumulator life is at least 2 months in standard operation. The need for charging is indicated on the RECEIVER by regular flashing of the red LED diode. After the need for charging the accumulators has been indicated it is possible to work with the foot controller for a few more hours without connection to the charging.
- Page 30 controller. After the charging has been finished, first disconnect the adapter from the mains and then unplug the connector from the foot controller. The charging takes about 3 hours and is also interrupted automatically once the accumulator has been charged. FC comprises the test of HW part which is performed when the accumulators are connected.
-
Page 31: Spittoon Block
8.3 Spittoon block The spittoon block contains the following (according to the version): main switch connection to the supply of mains voltage connection to the supply of water and air spittoon bowl flushing and cup filling ... -
Page 32: Assistant Table
8.3.1 Assistant table Stolík sestry Assistant table keyboard Description Description Description Button Button Button control of the main button acc.to the button are used only with light version hygiene button are used spittoon bowl rotation (for button are used only only with hygiene el. -
Page 33: Equipment Of The Spittoon Block
Double arm of the saliva ejector Instruments placed in the holder are ready for operation after having been taken out. Besides the saliva ejector, the polymerization lamp, syringe and big and small aspirator can be placed in the holder. Also there are buttons to control the cup filling and bowl flushing (without the TIMER). -
Page 34: Hygiene
It does not form an integral part of the standard equipment – upon order only! For detailed information see a separate enclosure „Hygiene system of the Diplomat ADEPT DA 270/DA 280 dental unit“. 8.7 Manual control of the head rest The head rest is controlled manually. -
Page 35: Manual Control Of The Right Arm Rest
8.8 Manual control of the right arm rest To enhance the patient’s comfort, right arm rest is available. This enables two movements to be made: tilting forward (movement no.1) tilting downwards (movement no. 2) Description of the activity at tilting forward (movement no.1) CLICK POSITION NO.1... -
Page 36: Completion Of Work
POSITION no.2 CLICK POSITION no.1 POSITION no.3 grip the arm rest and move it from the position no.1 to the position no.2, the arm rest loosened in such a way can be folded to the lower position no.3. repeat securing is made as follows: tilt the arm rest from the position no.3 until click is heard, then the rest is secured against movement downwards. -
Page 37: Cleaning, Disinfection And Decontamination
check and/or adjustment of all media (input, setting of turbine pressures and the like.) the manufacturer determines the range of above-mentioned work to be 1 to 1,5 hours authorized service technician is obliged to confirm the periodical inspection carried out in the guarantee card. -
Page 38: Cleaning And Decontamination Of The Bog And Small Aspirator
Decontamination of the saliva ejector should be made at least once a day (e.g. after the completion of work) with SAVO Prim agent in 1% concentration in the volume of min. 1 dcl of diluted solution by sucking through the tip of the saliva ejector. After each use of the saliva ejector, clean the hose of the saliva ejector by rinsing it with clean water of approx.1 dcl after each patient. - Page 39 instructions for use of the said agent at least once a day or when the surface of the equipment is incidentally contaminated with biological material. Clean the following at least once a day (according to the version): aspirator sieve located in the spittoon block ...
-
Page 40: Disposal Of The Eqipment
and disinfection dilute two doses (20ml) of the doser in 2,5 l of warm water (50°C) and suck it. For the very cleaning of the system dilute one dose of the doser (10ml). Do not rinse, proteolytic and disinfecting effect of PULI – JET PLUS reveals with time. 11. -
Page 41: Content Of The Packaging
13. CONTENT OF THE PACKAGING Standard equipment DA 270 DA 280 Dental chair Pantograph* of the control panel with the control panel (*except a CART version) CART (only DA280 CART version) Control panel and control panel pantograph Spittoon block with assistant arm Spittoon bowl Light pantograph Light... -
Page 42: Installation Plan
15.2 Storage Dental units can be stored in dry indoor warehouses in max. 3 plies with no dramatic temperature changes. Protect non-varnished parts from corrosion with rust-preventive treatment. Do not store together with chemicals! Required environmental conditions: relative humidity at max. 75 %, temperature range for transporting and storage: -25 °C to +50 °C. Caution Defects /failures/ caused by negligent operation and/or by not observing the instructions in the Instructions for Operation shall not be accepted as the subject of the claim under guarantee.
Need help?
Do you have a question about the ADEPT DA 270 and is the answer not in the manual?
Questions and answers