
Subscribe to Our Youtube Channel
Related Manuals for WimTec SanTec OCEAN B7


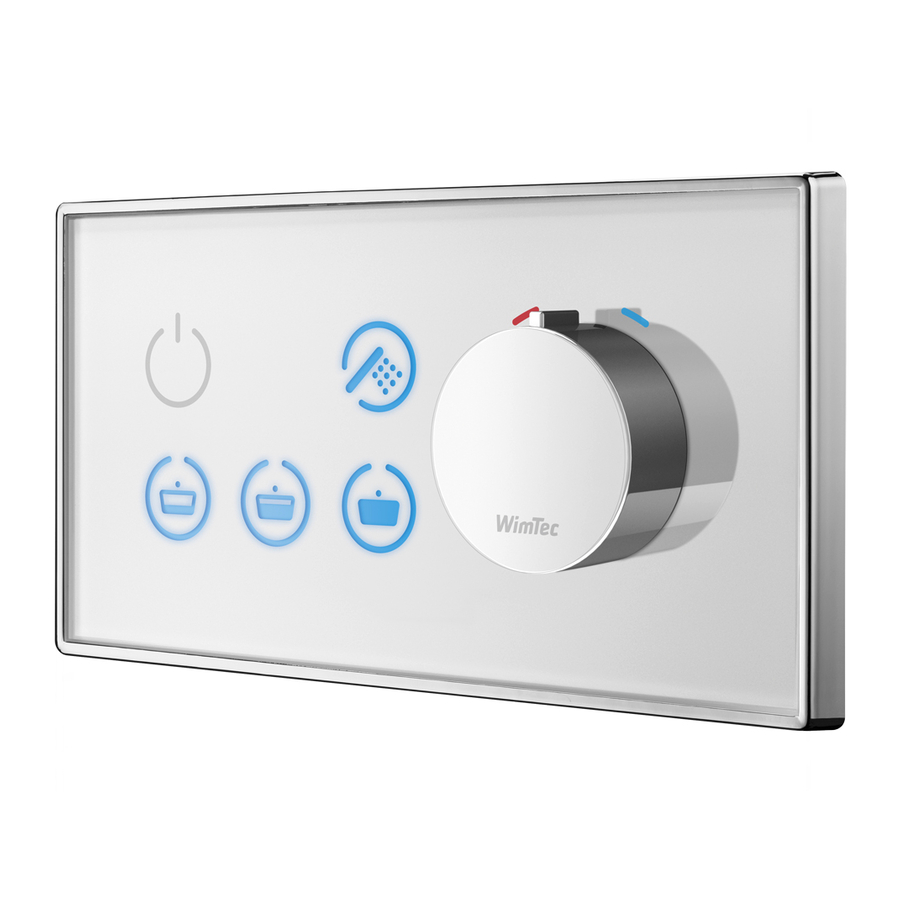
Summary of Contents for WimTec SanTec OCEAN B7
- Page 1 OCEAN B7 Montage- und Bedienungsanleitung Assembly and operating instructions...
-
Page 2: Allgemeine Hinweise
Glasfrontplatte zu einer Beeinträchtigtung der Touch-Tronic-Funktion kommen. Um dies vorbeugend zu vermeiden, empfehlen wir ein regelmäßiges Reinigen der Glasoberfläche mit einem Kraftreiniger. Diese Anleitung ist gültig für folgende Produkte: SanTec OCEAN B7 Wannenmatur für 12 V externe Versorgung: Glas weiß Art.Nr. 120 806 Glas schwarz Art.Nr. -
Page 3: Technische Daten
Wasserzulauf: R 1/2“ IG Wasserablauf Brause: R 1/2“ IG Wasserablauf Wanne: R 1/2“ IG Frontplatte: Sicherheitsglas (ESG) Mischergriff: Messing verchromt Montage ACHTUNG: Nur für Wandmontage geeignet! Empfohlene Montagehöhe des OCEAN B7 Rohbausets 12 - 17 cm SanTec OCEAN B7 Wannenarmatur... - Page 4 Mischer 12 V= Abgang Wannenfüllung Spannungsversorgung: Netzteil 230 V / 12 V nicht in 2 x 0,5 mm max. 100 m Gesamt-Kabellänge Rohbauset oder Schutzbereichen Netzteil 1-fach Art.Nr. 117 899 anbringen. Netzteil 5-fach Art.Nr. 113 792 SanTec OCEAN B7 Wannenarmatur...
-
Page 5: Einstellung Der Funktionen
Generell gilt für alle Regler: Die am Wannenfüll-Regler einge- stellte Zeit definiert die maximale Gegen den Uhrzeiger- Füllzeit die auf einem der drei sinn zum Reduzieren. Touch-Tronic-Icons zur Wannenfül- Im Uhrzeigersinn zum lung gespeichert werden kann. Erhöhen. SanTec OCEAN B7 Wannenarmatur... - Page 6 Anschlusskabel (Kabeltyp: 2 x 0,2 - 0,5 mm ) in den UP- Kasten einziehen und am Netzteil (Art.Nr. 117 899, oder Art.Nr. ) anschließen. 113 792 Achtung: Stromversorgung muß abgeschaltet sein und Netzteil darf nicht im Rohbauset bzw. Schutzbereich ver- baut werden! SanTec OCEAN B7 Wannenarmatur...
- Page 7 Reihenfolge ausführen! Magnetventile für Wannenfüllung und Handbrause am Elektronikmodul anstecken. 10. Steckverbindung von Glas-Frontplatte zu Elektronikmodul herstellen und Spannungsversorgung einschalten (Sicherheits- schließimpuls der Magnetventile erfolgt). Beide Vorabsperrungen mit einem Schraubendreher öffnen. Elektronikmodul in das vorgesehene Fach einschieben. SanTec OCEAN B7 Wannenarmatur...
- Page 8 Reihenfolge ausführen! Glasfrontplatte von vorne mit leichtem Druck aufsetzen (Klick-System). Kontrolle, ob Frontplatte waagerecht montiert ist. Gegebenefalls wie auf Seite 9 beschrieben korrigieren. Hauptwasserleitung öffnen. Funktionstest durchführen. Speicherbelegung der drei Wannenfüll-Icons zur automatischen Wannenfüllung siehe Seite 12. SanTec OCEAN B7 Wannenarmatur...
- Page 9 1 mm nach unten – Befestigungsclip wieder einschrauben, bis dieser fliesenbündig abschliesst. Nase zeigt nach oben Nase mittig Nase am Befestigungsclip zeigt nach oben – Korrektur von 1 mm nach oben – Befestigungsclip wieder einschrauben, bis dieser fliesenbündig abschliesst. SanTec OCEAN B7 Wannenarmatur...
- Page 10 Die Armatur befindet sich Regler eingestellten Sicher- nun für 3 min im Standby- heitsspülstopp-Zeit. Modus. Sicherheitsspülstopp Im Falle einer unbeabsichtigten Daueraktivierung schaltet die Armatur nach Ablauf der am Handbrause-Regler (siehe S. 5) eingestellten Sicherheitspülstopp-Zeit automatisch ab. SanTec OCEAN B7 Wannenarmatur...
- Page 11 Die Armatur befindet sich tes Antippen des aktivieren nun für 3 min im Standby- Wannenfüll-Icons. Modus. Füllaufzeit Sicherheitsspülstopp Im Falle einer unbeabsichtigten Daueraktivierung schaltet die Armatur nach Ablauf der am Wannenfüll-Regler (siehe S. 5) eingestellten Sicherheitspülstopp-Zeit automatisch ab. SanTec OCEAN B7 Wannenarmatur...
- Page 12 über ein Somit kann die Wannenfül- erneutes Antippen eines lung bis zu der am Wan- der drei Wannenfüll-Icons nenfüll-Regler eingestellten die Fülllaufzeit verlängert Maximallaufzeit beliebig werden, oft gestartet und gestoppt werden. ca. 5 s SanTec OCEAN B7 Wannenarmatur...
- Page 13 Für 10 min sind damit alle in den Normalbetrieb über. Touch-Tronic-Icons deaktiviert. Manuelles Deaktivieren Während des Reinigungs- gleich wie beim Aktivieren. stopps blinken alle Leucht- symbol alle 3 s zweimal. ca. 5 s 10 min SanTec OCEAN B7 Wannenarmatur...
- Page 14 Reinigungsstopps aus. Alle drei Füllmengen Icons 5 s vor und nach der Stagna- leuchten während der Stag- tionsfreispülung wird diese nationsfreispülung. durch ein schnelles Blinken der drei Füllmengen Icons signalisiert. 10 s 3 - 48 h SanTec OCEAN B7 Wannenarmatur...
-
Page 15: Ersatzteile & Zubehör
120 790 Mischeradapter Verlänger- ungsset bis 35 mm 119 794 Filterabdeckung (1 Stk.) 119 787 Rückflussverhinderer (1 Stk.) 119 770 Schmutzfilter (1 Stk.) 231 205 Magnetventil (1 Stk.) 117 899 Netzteil (1-fach) Netzteil (5-fach) 113 792 SanTec OCEAN B7 Wannenarmatur... -
Page 16: General Notes
To ensure proper operation, we re- commend regular cleaning of the glass panel using a power cleaner. This manual is valid for the following products: SanTec OCEAN B7 bathtub fitting for 12-V external power supply: glass white art. -
Page 17: Specifications
Water outlet bath: R 1/2“ IT Front plate: Safety glass (ESG) Thermost handle: Chromed brass Assembly ATTENTION: Only suited for wall mounting! Recommended mounting height for the OCEAN B7 flush-mount set 12 - 17 cm SanTec OCEAN B7 Bath fitting... - Page 18 100 m Power supply, 1-connect. art. no. 117 899 Do not mount the 230 V / 12 V power supply Power supply, 5-connect. art. no. 113 792 in the fl ush-mount set or protected zones. SanTec OCEAN B7 Bath fi tting...
- Page 19 The time configured at the bathtub Move counterclockwise to filling control defines the max. decrease the setting. filling time that can be stored on Move clockwise to any of the three touch-tronic icons increase the setting. for filling the bathtub. SanTec OCEAN B7 Bath fitting...
- Page 20 (art. no. 117 899 or art. no. 113 792 Attention: The power must be switched off, and the pow- er supply must not be assembled in the flush-mount set or the protected zone! SanTec OCEAN B7 Bath fitting...
- Page 21 10. Connect the cable between the glass front plate and the elec- tronics module. Then switch on the power (causing the safety locking mechanism of the magnetic valves to activate). Open both integrated stop valves using a screwdriver. Insert the electronics module into the designated slot. SanTec OCEAN B7 Bath fitting...
- Page 22 If not, correct the alignment as described on page 23. Open the main water valve. Perform a system test. For instructions on how to program the three fill level icons for automatic tub filling, see page 26. SanTec OCEAN B7 Bath fitting...
- Page 23 Nose points Nose in centre upwards position The mounting clip’s nose points upwards – adjust 1 mm upwards – fasten the mounting clip again until it aligns with the tiles. SanTec OCEAN B7 Bath fitting...
-
Page 24: Description Of The Functions
Safety flow arrest After the water arrest time configured at the shower unit control (see p. 19) has elapsed, the water flow will automati- cally stop to prevent unintentional continuous activation. SanTec OCEAN B7 Bath fitting... - Page 25 Filling time Safety flow arrest After the water arrest time configured at the tub filling control (see p. 19) has elapsed, the water flow will automatically stop to prevent unintentional continuous activation. SanTec OCEAN B7 Bath fitting...
- Page 26 – the filling time can be extended using the memory function. This means that you can start or stop filling the tub any number of times up to the maximum filling time set at the tub filling control. SanTec OCEAN B7 Bath fitting...
- Page 27 While the cleaning stop func- stop, perform the same steps tion is enabled, all illumina- used to enable the function. ting icons will light up two times every 3 s. approx. 5 s 10 min SanTec OCEAN B7 Bath fitting...
- Page 28 While stagnation rinse is in has been disabled. progress, all three fill level icons light up. 5 s before and after the stagnation rinse, the three fill level icons will flash rapidly. 10 s 3–48 h SanTec OCEAN B7 Bath fitting...
-
Page 29: Replacement Parts And Accessories
119 794 Filter cover (1 pc.) 119 787 Return flow valve (1 pc.) 119 770 Dirt filter (1 pc.) 231 205 Magnetic valve (1 pc.) 117 899 Power supply (1-connect.) 113 792 Power supply (5-connect.) SanTec OCEAN B7 Bath fitting... - Page 30 OCEAN B7 SanTec OCEAN B7 Bath fitting...
- Page 31 OCEAN B7 SanTec OCEAN B7 Bath fitting...
- Page 32 WIMTEC Elektronische Steuerungs- u. Meßgeräte GmbH p: A - 3325 Ferschnitz, Freidegg 50, AUSTRIA t: +43 (0) 7473 5000 f: +43 (0) 7473 5000 - 500 m: verkauf@wimtec.com i: www.wimtec.com...
Need help?
Do you have a question about the SanTec OCEAN B7 and is the answer not in the manual?
Questions and answers