Advertisement
Available languages
Available languages
Quick Links
QUICK START GUIDE
Your phone is smart. Your home should be too.
Thank you for purchasing a NuTone Smart Home Series product that will allow
you to automate your home on your terms. To control your lights from your favorite
Home Automation app you will need to replace an existing switch with a NuTone
Smart Home Series switch. Choose your favorite Home Automation gateway with
Z-Wave, connect it to the internet and start adding NuTone Smart Home Series
switches to control your lights!
A video of this installation procedure can be viewed on-line at:
www.nutone.com/HomeAutomation
For additional help, please view the NWD500Z
Troubleshooting and FAQ guide.
INSTALLATION
1
2
Turn power OFF for switch at
Remove wall plate from switch.
the main circuit breaker panel.
6
7
Connect all switch wires.
Install
NWD500Z
1
LOAD
(BLUE)
1
2
POWER
2
(BLACK)
3
NEUTRAL
3
(WHITE)
4
GROUND
(GREEN)
4
OPERATION
Refer to the NWD500Z instructions included with this
Transmitter Switch and the Home Automation gateway
instructions for your specific system to add devices to your
system network.
When adding this device to the network, push the top or the
bottom of the rocker switch as required and when requested by
the controller to define its operation in the system.
Pull out switch to remove power to the load.
Switch must be pushed in for the dimmer to work.
SPECIFICATIONS
Power: 120 VAC, 60 Hz
Signal: (Frequency) 908.42 MHz
Range: Up to 100 feet line of sight between the Controller and/or closest Z-Wave repeater.
Broan-NuTone LLC 926 West State Street Hartford, WI 53027
NWD500Z
Smart Wall Dimmer Switch
Smart Wall Dimmer Switch, 500 Watt
Ensure your favorite home automation gateway (SOLD SEPARATELY) has
Z-Wave,
connect it to the internet and you are now ready to add the
NWD500Z Smart Wall Dimmer Switch
The NWD500Z Smart Wall Dimmer Switch has
Z-Wave certification which guarantees compatibility.
TOOLS REQUIRED
• Screwdriver, Flat Head
• Screwdriver, Phillips Head
• Pliers
• Wire Connectors
3
Remove screws and switch.
8
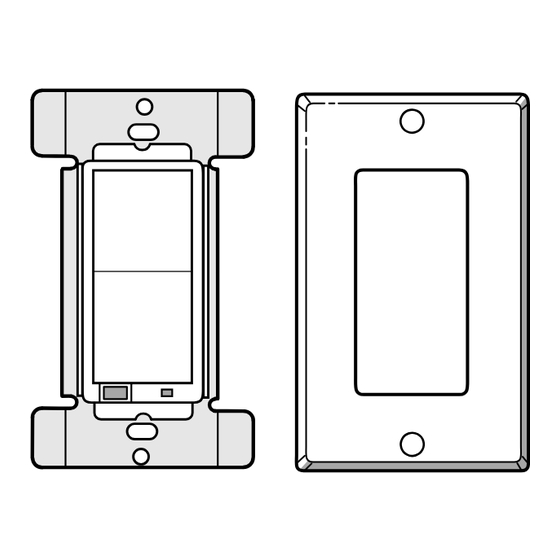
Install wall plate.
in wall box.
Convert standard White (included) to Almond with
Trim Kit sold separately.
NuTone.com Toll Free (855) 249-0610
4
Disconnect all switch wires.
1
LOAD
1
(BLUE)
2
POWER
2
(BLACK)
Ensure power to all
wires in box is turned
3
NEUTRAL
3
OFF.
(WHITE)
4
GROUND
(GREEN)
4
9
Turn power ON for switch at
the main circuit breaker panel.
ON, OFF, DIM or BRIGHT
When NWD500Z has been added to the network it operates
as follows:
· Tap top of switch to turn ON.
· Tap bottom of switch to turn OFF.
· Press and hold top of switch to brighten.
· Press and hold bottom of switch to dim.
· OR control from your Smart Phone using your Home
Automation App.
The LED on the NWD500Z will indicate the status of the devices
you are controlling. The LED will flicker when it is transmitting
commands to any of the group networks. This can be changed.
See the "NWD500Z Instructions" included with the transmitter.
IC NOTICE
This Class B digital apparatus complies with Canadian ICES-003. Operation is subject
to the following two conditions: (1) this device may not cause interference, and (2) this
device must accept any interference, including interference that may cause undesired
operation of the device.
COMPONENTS SUPPLIED
• Transmitter
• Screws, Transmitter Mounting
• Wall Plate
• Screws, Wall Plate mounting
DANGER! SHOCK HAZARD.
Read and understand the installation instructions and this quick start guide before installing.
This device is intended for installation in accordance with the National Electric code and local
regulations in the United States, or the Canadian Electrical Code and local regulations in
Canada. It is recommended that a qualified electrician perform this installation. Retain
instructions and guide for future use.
CAUTION:
To reduce the risk of overheating and possible damage to other equipment, do not install to
a control receptacle, a motor operated appliance, fluorescent light fixture, or transformer-sup-
plied appliance, but only permanently installed incandescent lamp fixtures. Make sure
lamps controlled directly from dimmer recieve no more than 500 watts total. Retain instructions
and guide for future use.
5
Multiple switch preparation.
If NWD500Z will be installed into a
box with other switches, scored tabs
on the switch should be removed as
required. Do NOT remove outside tabs
on the ends of switch groups.
To remove, bend tab back and forth
with pliers until it snaps free of switch.
10
System Pairing adding the NWD500Z to your controller
1. Place your Home Automation gateway with Z-Wave
into Discovery or Add mode.
2. Push the top or bottom rocker of the switch as required
and when requested by the controller to add it into your
Home Automation system.
3. Refer to your Z-Wave controllers instructions for additional
information on adding devices.
REGULATORY INFORMATION
The NWD500Z is certified to comply with applicable FCC and IC
rules and regulations governing RF and EMI emissions.
This device complies with Part 15 of the FCC Rules. Operation is
subject to the following two conditions: (1) This device may not cause
harmful interference, and (2) This device must accept any
interference received, including interference that may cause
undesired operation.
FCC NOTICE
Note: This equipment has been tested and found to comply with the
limits for a Class B digital device, pursuant to Part 15 of the FCC
Rules. These limits are designed to provide reasonable protection
against harmful interference in a residential installation. This
equipment generates, uses, and can radiate radio frequency energy
and, if not installed and used in accordance with the instructions may
cause harmful interference to radio communications. However, there
is no guarantee that interference will not occur in a particular
installation.
If this equipment does cause harmful interference to radio or
television reception, which can be determined by turning the
equipment off and on, the user is encouraged to try to correct the
interference by one or more of the following measures:
• Reorient or relocate the receiving antenna.
• Increase the separation between the equipment and receiver.
• Connect the equipment into an outlet on a circuit different from that
to which the receiver is connected.
• Consult the dealer or an experienced radio/TV technician for help.
Changes or modifications not expressly approved by the party
responsible for compliance could void the user's authority to operate
the equipment.
Z-Wave® is a registered trademark of Sigma Designs
99045338A
Advertisement

Subscribe to Our Youtube Channel
Related Manuals for NuTone SMART HOME NWD500Z


Summary of Contents for NuTone SMART HOME NWD500Z
- Page 1 Z-Wave certification which guarantees compatibility. DANGER! SHOCK HAZARD. Home Automation app you will need to replace an existing switch with a NuTone Read and understand the installation instructions and this quick start guide before installing. Smart Home Series switch. Choose your favorite Home Automation gateway with...
- Page 2 • Vis de montage de la plaque murale Votre téléphone est intelligent. Votre maison devrait l’être tout autant. Merci d’avoir acheté un produit NuTone Série Smart Home qui vous permettra Le gradateur mural intelligent NWD500Z a l’homologation Z-Wave, ce qui garantit sa compatibilité.
Need help?
Do you have a question about the SMART HOME NWD500Z and is the answer not in the manual?
Questions and answers