Table of Contents
Advertisement
Advertisement
Table of Contents

Related Manuals for Robot sanbot


Summary of Contents for Robot sanbot
- Page 1 ROBOT USER MANUAL...
- Page 2 If you allow juveniles to use this product, please be sure to instruct them all do’s and don’ts as well as safe use of electricity. Please tell your children not to put their fingers into the gap between the robot’s wings and its body as well as the gap between the robot’s head and its body to avoid being jammed while the robot moves.
- Page 3 ROBOT USER MANUAL Part One To Know Your Robot 1. Packing List Robot Charging pile (contains adaptor) Power line Quick guide manual We will arrange the consignment according to your choice of purchase; the above picture is for reference only.
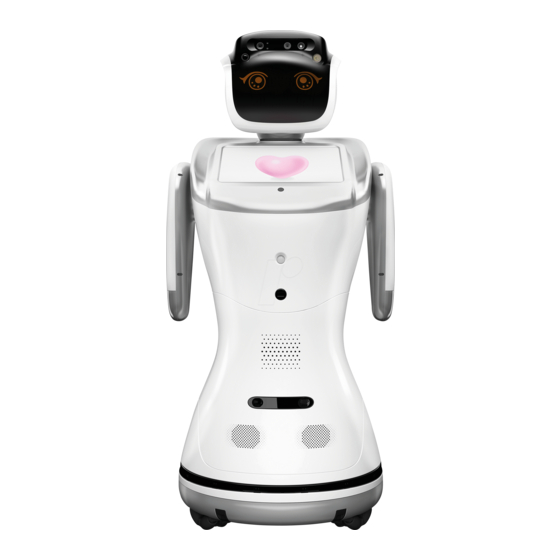
- Page 4 ROBOT USER MANUAL 2. Robot Appearance Front...
- Page 5 ROBOT USER MANUAL 2. Robot Appearance Back...
- Page 6 ROBOT USER MANUAL 2. Robot Appearance Lateral...
- Page 7 ROBOT USER MANUAL 2. Robot Appearance Bottom...
- Page 8 ROBOT USER MANUAL 3. Charging Pile Appearance Front Back...
- Page 9 Press the power switch at the bottom of the robot to turn on or turn off the power. It is easy to move the robot in the state of power-on. But when you need to move the robot in the state of power-off, please push its front body forward, i.e. push it go backwards, or push its back slowly at constant speed.
- Page 10 Note: When you create a new account, the user name should be 6 to 18 letters or a combination of letters and numbers and the password should be a combination of 6 to 18 letters and numbers. 3. Add Robot /Friends (1) Add friends Click the button on the top right corner of the “Q-Link”...
- Page 11 If you need to remote control the robot, please first add the robot, Q-Link supports add multiple robots. Click the button on the top right corner of the “Q-Link” APP and select “scan QR code” to scan QR codes of the robot (Click “Settings” on the robot → About → QR code) to add the robot.
- Page 12 Note: When you view the video from the camera of the robot via mobile APP, the ear light of the robot will turn red. It can only support one user one time to view videos.
- Page 13 You can scan the QR code on the robot to add the robot if you haven’t added it. After you have added the robot, you can select certain robot from the list, click the button on the top right corner of the “Q-Link” APP to add smart home devices for it, to ...
- Page 14 Modify the name of the robot and the smart home devices. View or delete those photos and videos that you take and record when you use the Q-Link APP to browse videos of the robot. Manage the added friends and chats message, quick contact your friends.
- Page 15 (1) Placing on the ground flat Let the charging metal sheet of the charging pile outward and lean it against a smooth wall. In order not to disturb the robot when it moves, please place the power wire along the wall and make sure there is no barriers, wires, cords, etc. within two to three meters around the charging pile. Because when robot receive infrared signal reflection by other obstacles will lead charging failure, or avoid the robot be tripped by it.
- Page 16 (3) Click the “Settings” on the touch screen of the robot → Battery → Enable auto-recharge → set a minimum residual battery capacity for auto-recharge. (4) When the robot is being used, its residual capacity is lesser than the setting value or its charging mode is enabled by clicking “Charge”, the robot will look for charging piles to charge itself automatically.
- Page 17 Note: Since the robot cannot move in the mode of wire charging, all functions related to movement, such as moving forward, circling, wandering, following, dancing, etc., will be forbidden. But other functions, such as playing films and music, turning on the projector, etc., will not be affected. When it charges via the charging pile, the robot can move freely.
- Page 18 When it isn’t charging, you can press the emergency charging button to charge it when the indicator light keeps yellow. When it is charging, the indicator light blinks as BLN. The lower the residual battery capacity is, the faster the BLN blinks and vice versa. When the robot is fully charged, charging pile will be auto closed, and the indicator light will be turned off.
- Page 19 If you allow juveniles to use this product, please be sure to instruct them all do’s and don’ts as well as safe use of electricity. Please tell your children not to put their fingers into the gap between the robot’s wings and its body as well as the gap between the robot’s head and its body to ...
- Page 20 Q: How to turn on the robot? How to turn off the robot? How to reboot the robot? A: Push the power switch on the bottom of the robot to power on or off. There is no reset button in the software or hardware. If you need to reboot the robot, please push the power switch to power off before turning it on again.
- Page 21 See if there are barriers blocking the robot or the induction area of the charging pile from transmitting and receiving infrared rays. If so, please move those barriers. Check if the robot and the charging pile are in the different rooms. If so, it takes the robot more time to find the charging pile. Please move the robot to the same ...
- Page 22 Q: How to prevent the robot from out of service as the result of dead battery? A:Access Settings to open the auto-charging mode, add the charging pile for the robot, place the charging pile in the right place and connect it to power supply.
- Page 23 Apps and download them. If you can not find the App you want from the App Market, you can apply to the after-sales service of the manufacturer for new Apps. The manufacturer will arrange some tests to confirm that this App has no effect on the stability and performance of the robot system before the App can be used. Also, you can work with us to add your App which you are developing or you are ready to develop into the App Market.
- Page 24 Then copy the file into the root directory of your USB flash disk. Import them into the robot and reboot it: plug the USB flash disk into the USB interface in the robot, open the Custom Questions and Answers App, and click the Import File on the interface.
- Page 25 Q: What if the robot turns black screen? A: Refer to the following possible: The robot is in power-saving mode by default, that is, if no one operates or wakes the robot on voice in about 1 minute, the screen will automatically go dim. When ...
- Page 26 You can access Settings → Battery → select demo mode to keep the screen light up in operation. If you touch the touch-sensitive parts of the robot and cannot waken it, please check if the battery of the robot has been used up or the robot is powered off.
- Page 27 ROBOT USER MANUAL 3. Specification (1) Robot specification parameter Items Specifications Size 92cm(Height)x 30cm(Depth)x 40cm(Width) Weight 19kg Lithium battery Battery Capacity: 20Ah/300W Running time: about 10 Hours, standby for over 20hours Head Mic x 7, RGB Camera x 2, 3D sensor x 1, Touch sensor x 7...
- Page 28 ROBOT USER MANUAL Items Specifications Wireless network ZigBee Atmosphere lamp 250 kinds customized colors, 2 cycles for ears , 2 pcs for hands, and 1 cycle for chassis Moving speed 0.8m/s max Grade 1.5cm max...
- Page 29 ROBOT USER MANUAL 3. Specification (2) Charging pile specification parameter Item Specifications Size 242.7mm (Height) x 110mm (Depth) x 248.5mm (Width) Weight 1.35kg (with adaptor) Input AC 100-240V 50/60Hz Output DC 19V/4.75A Display LEDs 1pcs for Respiration display Working Temperature 0°C ~ +35°C...
- Page 30 ROBOT USER MANUAL...
Need help?
Do you have a question about the sanbot and is the answer not in the manual?
Questions and answers