Table of Contents
Advertisement
Quick Links
Alternative Wood Blinds Collection
Tilt Automation Installation Instructions
Product View ................................................................................................................................................................. 1
Tools and Fasteners Needed ........................................................................................................................................ 2
Unpack the Blind ........................................................................................................................................................... 2
Installation Overview .................................................................................................................................................... 2
STEP 1 - Install the Brackets ..................................................................................................................................... 3
STEP 2 - Connect the Power Cable ........................................................................................................................... 6
STEP 3 - Install the Blind ............................................................................................................................................ 6
STEP 4 - Connect the Power Source, If Applicable .................................................................................................. 8
OPERATION
Testing the Blind ......................................................................................................................................................... 10
Using the Automation Remote ................................................................................................................................. 10
Resetting the Blind (If Necessary) ............................................................................................................................... 1
Complete the Installation ........................................................................................................................................... 11
Operate the Blind ........................................................................................................................................................ 12
Troubleshooting .......................................................................................................................................................... 13
Removing the Blind (If Necessary) ............................................................................................................................ 14
Cleaning Procedures ................................................................................................................................................... 14
Cord Connector ........................................................................................................................................................... 15
Reassembly of Cord Connector ................................................................................................................................. 15
Cord Cleats ................................................................................................................................................................... 16
.......................................................................................................................................................... 17
.................................................................................................................................................................. 18
3
4
2
5
open
1
6
all
close
Rev. A
9/3/19
Advertisement
Table of Contents

Related Manuals for Kirsch Alternative Wood Blinds Series


Summary of Contents for Kirsch Alternative Wood Blinds Series
-
Page 1: Table Of Contents
Alternative Wood Blinds Collection Tilt Automation Installation Instructions open close GETTING STARTED Product View ................................. 1 Tools and Fasteners Needed ............................2 Unpack the Blind ................................2 INSTALLATION Installation Overview ..............................2 STEP 1 — Install the Brackets ............................. 3 STEP 2 —... -
Page 2: Getting Started
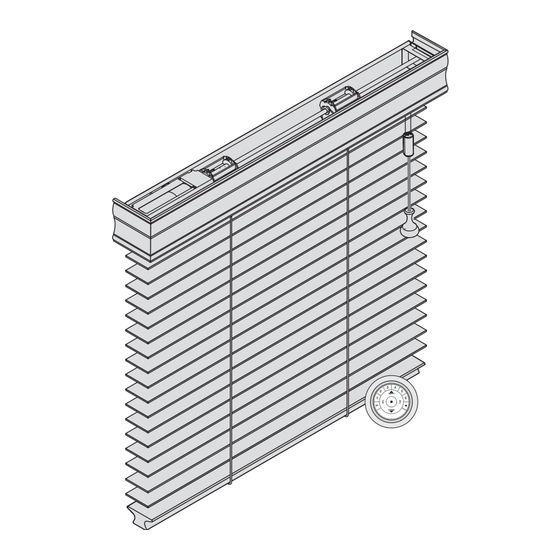
GETTING STARTED Product View Valance End Bracket Spacer Block Power Intermediate Bracket Cable Bracket Spacer Block Intermediate Bracket (If Required) Transceiver Assembly Manual Control 2" or 4" Button Extension 12V Battery Brackets Wand (Optional) Bracket Shim (Optional) Valance Splice (If Required) End Bracket Spacer Block Corner Clips for... -
Page 3: Tools And Fasteners Needed
GETTING STARTED ® Thank you for purchasing the Kirsch Alternative Wood Blinds Collection. With proper installation, operation, and care, your new blinds will provide years of beauty and performance. Please thoroughly review this instruction booklet and the enclosed packing list before beginning the installation. -
Page 4: Step 1 - Install The Brackets
INSTALLATION INSTALLATION STEP 1 — Install the Brackets Two end brackets are used to mount horizontal blinds. Wider blinds also require one or two ■ ■ intermediate brackets, as shown in the table below. Intermediate Width of Blind Brackets Intermediate Up to 48"... - Page 5 INSTALLATION INSTALLATION Attach the End Brackets With inside or ceiling mounts, attach the two end brackets flush against the sides of the window casement or to the ceiling. Choose the most appropriate of the following mounting methods: Inside mount only (Side/Top Mount): Mount the end ■...
- Page 6 INSTALLATION INSTALLATION Attach the End Brackets NOTE: The illustrations in this section show spacer blocks mounted with the end brackets for the 2" and 2 ⁄ " slat sizes. Spacer blocks are required for all outside mount 2 ⁄ " blinds, unless extension brackets are used. Spacer blocks are optional for 2" slat sizes. Align the outside edge of each end bracket with the outer marks and mark diagonal ■...
-
Page 7: Step 2 - Connect The Power Cable
INSTALLATION INSTALLATION STEP 2 — Connect the Power Cable NOTE: When power is connected to the motor, a green LED inside the programming button housing will flash to indicate the blind is ready for operation. Refer to the appropriate page based on your order: ■... - Page 8 INSTALLATION INSTALLATION Adding Projection for the Valance The magnetic valance clips have a projection adjustment feature. By pulling the clips outward, the clips can provide an additional ⁄ " projections. Remove the clips from the valance. ■ ■ Insert a small flat blade screwdriver into the slot on one side of the magnet making sure the screwdriver is all the way down in ■...
-
Page 9: Step 4 - Connect The Power Source, If Applicable
INSTALLATION INSTALLATION Adjust the Headrail Tightness If the headrail is loose in the end brackets, bend the tabs on the end bracket outward. ■ ■ NOTE: The tabs may also be bent inward if the headrail is difficult to install into the end brackets. If your headrail end brackets do not have adjustable tabs, bend the tabs on the headrail end locks to ■... -
Page 10: Operation
INSTALLATION INSTALLATION Install the battery wand cover with the slot aligned to the socket in the battery wand. ■ ■ Battery Wand Cover Extension Cable Power Cable from Blind Proceed to”Testing the Blind” on page 10. If You Have an 18V DC Power Supply... Connect the Power Supply Plug the power cable from the blind into the extension cable. -
Page 11: Testing The Blind
INSTALLATION OPERATION Testing the Blind Testing the blind with the programming button will allow you to ensure that the motor and power source are working correctly. Front of Blind Press the programming button on the front side of the headrail to test operation. If ■... -
Page 12: Resetting The Blind, If Necessary
INSTALLATION OPERATION Further Operation and Programming Information Automation Remote Operation For information regarding operation and programming of the Automation remote, refer to your Automation Remote Control Guide or to the online Automation Step-by-Step Guide. Automation App Operation The Automation Hub is required for Automation App operation. For information regarding setup and operation using the Automation App, refer to the online Automation Step-by-Step Guide. -
Page 13: Operate The Blind
INSTALLATION OPERATION Attach the Valance with Magnetic Valance Clips Align the valance to the headrail. ■ ■ Hold the valance securely from the front side with both hands. ■ ■ Position the clips to the top-front lip of the headrail until it is level and in position. ■... -
Page 14: Troubleshooting
Wand Install the batteries according to the instructions on the battery wand label. Press the cap on until it latches. NOTE: Kirsch recommends AA alkaline batteries for use with our battery- Squeeze Latch powered blinds. These will provide more than one year operation, depending on usage. -
Page 15: Care
Grab underneath the headrail using both hands and carefully pull the blind out of the end brackets. ■ ■ Cleaning Procedures Like any fine furnishings, Kirsch Alternative Wood Blinds Collection should be cleaned regularly to keep them looking new. ®... -
Page 16: Child Safety
For a more thorough cleanings, alternative wood bottom rails and slats may be immersed in a bathtub. Bathtub cleaning is not ■ ■ recommended for blinds with decorative tapes. Do not immerse headrail. ® IMPORTANT: Kirsch does not recommend ultrasonic cleaning of alternative wood blinds. CHILD SAFETY WARNING For more safety information, call 1-800-997-2389. -
Page 17: Cord Cleats
INSTALLATION CHILD SAFETY Cord Cleats Kirsch ® offers cord cleats and we recommend their use. Attach two cords cleats 6" to 12" apart at a height where they will be out of the reach of children. Take into ■ ■... -
Page 18: Declarations
INSTALLATION DECLARATIONS U.S. Radio Frequency FCC Compliance FCC ID information is located on top of the blind’s headrail. This device complies with Part 15 of the FCC Rules. Operation is subject to the following two conditions: (1) This device may not cause harmful interference, and (2) This device must accept any interference received, including interference that may cause undesired operation. -
Page 19: Warranty
This warranty gives you specific legal rights, and you may also have other rights which vary from state to state. © 2019 Kirsch Custom Window Coverings. All rights reserved. All trademarks used herein are the property of Kirsch or their respective owners. 09/19...
Need help?
Do you have a question about the Alternative Wood Blinds Series and is the answer not in the manual?
Questions and answers