Table of Contents
Advertisement
Vertical Blinds Collection
Note: These are the standard versions of the primary Kirsch® logos. These standard
versions are used everywhere, except when the width of the logo is larger than 2" in
print materials or 250px in digital formats. For use at larger sizes, use the alternate
artwork provided (file named "..._ForLargeSizes_...").
Product View ................................................................................................................................................................ 1
Tools and Fasteners Needed ....................................................................................................................................... 2
INSTALLATION
Installation Overview ................................................................................................................................................... 2
Valance Assembly ......................................................................................................................................................... 3
Mount the Installation Brackets - Inside Mount ..................................................................................................... 5
Mount the Installation Brackets - Outside Mount ................................................................................................. 6
Install the Vanes ........................................................................................................................................................... 7
Attach the Universal Cord Tensioner (Cord Loop Units Only) ................................................................................ 8
Cord Adjustment (Cord and Chain Only) .................................................................................................................. 8
OPERATION
Blind Operation ............................................................................................................................................................. 9
CARE
Removing the Headrail (If Necessary) ..................................................................................................................... 10
Removing the Vanes (If Necessary) .......................................................................................................................... 10
Cleaning Procedures .................................................................................................................................................. 10
............................................................................................................................................................ 11
Warning ....................................................................................................................................................................... 11
Cord Loop Shades ...................................................................................................................................................... 11
................................................................................................................................................................. 12
Installation Instructions
Rev. A
9/3/19
Advertisement
Table of Contents

Related Manuals for Kirsch Vertical Blinds Series


Summary of Contents for Kirsch Vertical Blinds Series
-
Page 1: Table Of Contents
Vertical Blinds Collection Installation Instructions Note: These are the standard versions of the primary Kirsch® logos. These standard versions are used everywhere, except when the width of the logo is larger than 2" in print materials or 250px in digital formats. For use at larger sizes, use the alternate artwork provided (file named “..._ForLargeSizes_...”). -
Page 2: Getting Started
GETTING STARTED Product View Outside Mount Adjustable Bracket Inside Mount Mounting Clip Headrail Cord and Wand Control System Vanes... -
Page 3: Tools And Fasteners Needed
GETTING STARTED ® Thank you for purchasing the Kirsch Vertical Blinds Collection. With proper installation, operation, and care, your new shades will provide years of beauty and performance. Please thoroughly review this instruction booklet and the enclosed packing list before beginning the installation. -
Page 4: Valance Assembly
INSTALLATION INSTALLATION Valance Assembly Please refer to the section below for your valance type. If you didn’t order a valance, proceed to “Mount the Installation Brakets - Inside Mount” on page 5 or “Mount the Installation Brakets - Outside Mount” on page 6 based on the mounting option ordered. Dust Cover Valance Assembly Single-Tiered Closed Corner Cut a fabric insert for the valance and each valance return 1”... - Page 5 INSTALLATION INSTALLATION Single-Tiered Round Corner Fabric Valance Install the round valance corners onto each end of the valance. Insert Return ■ Install the valance returns onto each end of the round valance corners. ■ Cut the fabric insert 4” longer than the total length of the valance plus both returns. ■...
-
Page 6: Mount The Installation Brackets - Inside Mount
INSTALLATION INSTALLATION Mount the Installation Brackets — Inside Mount Mark 2” to 4” in from each jamb. Measure and mark the underside of the dust cover, if ordered. ■ If more than two installation brackets came with your order, space additional bracket(s) evenly in 24” to 30” intervals ➤... -
Page 7: Mount The Installation Brackets - Outside Mount
INSTALLATION INSTALLATION Mount the Installation Brackets — Outside Mount Mark 2” to 4” in from each jamb. ■ If more than two “L” installation brackets came with your order, space additional bracket(s) evenly in 24” to 30” intervals ➤ between the end brackets and mark their location. Mount into wood whenever possible. Adjust mounting clips to allow ”... -
Page 8: Install The Vanes
INSTALLATION INSTALLATION If a valance is included, “snap” on a valance hanger next to each “L” bracket. ■ Center the valance in relationship to the headrail and slide it into the valance hangers. ■ Valance Hanger “L” Bracket Mounting Clip Valance (Optional) Wall... -
Page 9: Attach The Universal Cord Tensioner (Cord Loop Units Only)
INSTALLATION INSTALLATION Attach the Universal Cord Tensioner (Cord Loop Units Only) Before doing anything, you must first slide the cord tensioner to the bottom of the cord loop. Insert a small screwdriver, punch, or awl through the screw hole at the bottom of the cord ■... -
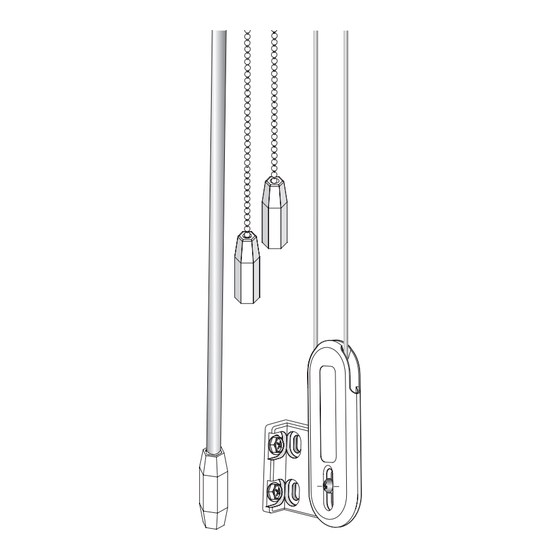
Page 10: Blind Operation
INSTALLATION OPERATION Blind Operation Cord and Chain Operated Traversing. Use the pull cords attached to the cord tensioner to open and close the blind (black arrows). ■ Tilting. Use the tassels and chains to rotate the vanes open or closed (gray arrows). ■... -
Page 11: Removing The Headrail (If Necessary)
INSTALLATION CARE Removing the Headrail (If Necessary) To remove the headrail, locate the rear tab on the mounting clip. ■ Push up on the rear tab to release the headrail. ■ Vertical Track Headrail Tilt to Rear Tab Remove Push Up Removing the Vanes (If Necessary) Push up on the vane. -
Page 12: Child Safety
Tensioner (Cord Loop Units Only)” on page 5. This can prevent children from pulling cord loops around their necks. Kirsch provides a cord tensioner installation kit with instructions for attaching the cord tensioner. For the ■ shade to operate properly, the cord tensioner must be correctly mounted and secured. -
Page 13: Warranty
© 2019 Kirsch Custom Window Coverings. All rights reserved. All trademarks used herein are the property of Kirsch or their respective owners. 09/19...
Need help?
Do you have a question about the Vertical Blinds Series and is the answer not in the manual?
Questions and answers