
Related Manuals for Elba E30-021


Summary of Contents for Elba E30-021
- Page 1 SCHOTT E30-021 E30-020 E30-040 E30-050 E30-020 E30-040 E30-050 Instructions for the use - Installation advices...
- Page 2 INTRODUCTION BEFORE USING THE COOKTOP 1. Clean the cooktop. 2. Switch on the hotplates to remove fumes and smells coming from the protective greases. EVERYDAY USE 1. Turn the control knob to the position required. 2. To switch off, turn the knob back to “0”. Please read the instructions for use carefully, to become familiar with your cooktop.
-
Page 3: Electric Hotplates
AS E30-020 ELECTRIC HOTPLATES 1. Electrical plate Ø 145 - normal (1000 W) 2. Electrical plate Ø 180 E30-021 - normal (1500 W) E30-020, AS E30-020 - rapid (red dot) (2000 W) CONTROL PANEL DESCRIPTION 3. Electrical plate 1 control knob 4. -
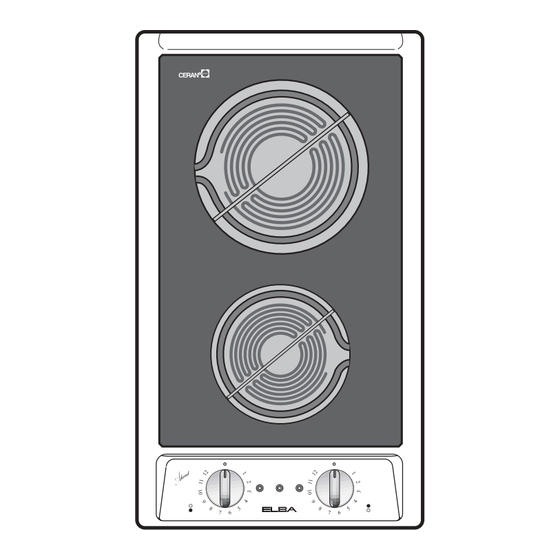
Page 4: Glass Ceramic Cooktop
GLASS CERAMIC COOKTOP E30-040 - Electrical insulation Class I. AS E30-040 - Protection against overheating of adjacent surfaces Type Y. SCHOTT COOKING ZONES 1. Halogen cooking zone Ø 145 - 1200 W 2. Halogen cooking zone Ø 180 - 1800 W CONTROL PANEL DESCRIPTION 3. -
Page 5: Before Using The Cooktop
BEFORE USING THE COOKTOP For best use of your cooktop, read the instructions for use carefully and keep them in a safe place. This appliance must only be used for the purpose for which it was designed, i.e. for cooking foods. Any other use should be considered incorrect and therefore dangerous. - Page 6 WARNINGS FOR THE USE OF ELECTRICAL APPLIANCES When using electrical appliances some important rules must always be followed. In particular: Never touch the appliance with wet or damp hands or feet. Never use the appliance with bare feet. Keep children away from the hob when it is in use. Before any cleaning or maintenance, switch off the electricity to the cooktop.
-
Page 7: Electric Hotplate Cooktop
2 ELECTRIC HOTPLATE COOKTOP Switch on the electric hotplates by turn- ing the knob to the position required. Once the food is boiling turn down the power according to the heating intensity required. The hotplate will continue to give out heat for 5 minutes after it has been switched off. - Page 8 2 ELECTRIC HOTPLATE COOKTOP TABLE FOR USE OF THE COOKING ZONES Position Type of cooking of switch For melting (butter, choco- late). To keep food warm and to heat small quantities of liq- uids. To heat larger quantities, whip creams and sauces. Slow boiling, e.g.: boiled veg- etables, spaghetti, soups, CORRECT USE OF THE...
- Page 9 GLASS CERAMIC COOKTOP TABLE FOR USE OF THE The cooktop’s glass ceramic surface allows rapid vertical heat transmission COOKING ZONES from the heating elements under the cooktop to the pans on it. Position Type of cooking of switch The heat does not propagate horizontal- ly and thus the cooktop remains “cold”...
-
Page 10: Residual Heat Indicator Lights
GLASS CERAMIC COOKTOP ADVICE FOR SAFE USE OF RESIDUAL HEAT INDICATOR THE COOKTOP LIGHTS – Before switching on make sure that When the cooking zone temperature is you have the correct knob for the hot- higher than 60°C, the corresponding indica- plate chosen. - Page 11 CLEANING AND MAINTENANCE CLEANING THE GLASS CLEANING THE COOKTOP CERAMIC COOKTOP AND CONTROL PANEL Make sure that the cooktop is switched Before cleaning the cooktop switch it off before cleaning it. off and wait for it to cool down. Clean with a cloth wetted with hot Remove any encrustation using a spe- water and soap or water and liquid cial scraper which can be bought.
-
Page 12: Installation
INSTALLATION Technical information for the installer The appliance must be installed by a qualified electrician following the manu- facturer's instructions and in compliance with local regulations in force. To fit the cooktop into the unit make an opening of the dimensions given in the figure, remembering that: –... - Page 13 INSTALLATION E30-021, E30-020, AS E30-020 Before installing the cooktop, remove the protective film. This cooktop can be built into a working surface 20 to 40 mm thick and 600 mm deep. To fit the cooktop into the unit make a...
- Page 14 – Tighten screws “B” until the cook- top is completely secured. – Using a sharp tool cut off the part of gasket “D” which protrudes from the cooktop. E30-020, E30-021 E30-040 - E30-050 AS E30-020 AS E30-040 - AS E30-050...
-
Page 15: Electrical Part
INSTALLATION ELECTRICAL PART – The connection can be made directly to the mains by putting an all-pole IMPORTANT: Install the cooktop fol- switch with minimum opening lowing the manufacturers instruc- between the contacts of 3 mm tions. between the appliance and the mains. Incorrect installation can cause dam- –... - Page 16 INSTALLATION REPAIRS Replacing the supply cable Turn the cooktop over and unhook the terminal board cover by inserting a screwdriver into the two hooks “A”. Open the cable gland by unscrewing screw “F”, unscrew the terminal screws and remove the cable. The new supply cable, of suitable type and section, is connected to the terminal board following the diagrams shown...
- Page 17 فولت ملم 220-240 V 3 x 1,5 220/230 V 220-240 V (L )
- Page 19 E30-020, E30-021 E30-040 - E30-050 AS E30-020 AS E30-040 - AS E30-050...
- Page 20 E30-021, E30-020, AS E30-020 E30-040, AS E30-040 - E30-050, AS E30-050...
- Page 29 E30-040 AS E30-040 SCHOTT E30-050 AS E30-050...
- Page 30 E30-021 E30-020 AS E30-020 )1000 W( عادية بقوةØ 145- 1. سطحية الطهي الكهربائية Ø 180- 2. سطحية الطهي الكهربائية )1500 W( عادية بقوة E30-021 )2000 W( سريعة بقوة E30-020, AS E30-020...
- Page 32 SCHOTT E30-021 E30-020 E30-040 E30-050 AS E30-020 AS E30-040 AS E30-050...
Need help?
Do you have a question about the E30-021 and is the answer not in the manual?
Questions and answers