Table of Contents
Advertisement
J
t
'J
W hitf ield
T�tTIONS
Traditions
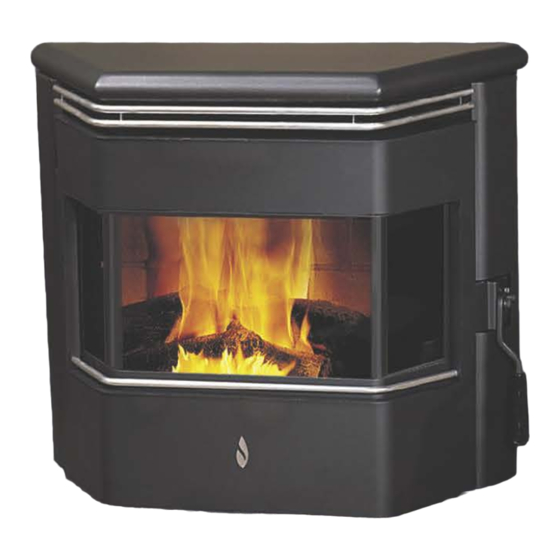
Freestanding Whitfield
™
Model P11
Serial # up to 5492
Warning: The minimum clearances specified must
be maintained for all combustible surfaces and
materials including: furniture, capet, drapes, · c loth
ing, wood, papers, etc. Do not store pellet fuel
within this clearance zone.
These stoves must be properly installed and oper
ated in order to prevent the possibility 'of a house
fire. Please read this entire owl'}er's manual before
insiamng and using your Whitfield-or Traditions
peff let stove. Failure to follow these instructions
could result in property damage, bodily injury or
even death. Contact your local building or fire offi
cials to obtain a permit and information on any
installation restrictions and inspection requirements
in your area.
Do not use class B venting intended for gas
appliances as a chimney or connector pipe on a
pellet fired appliance.
Do not connect this appliance to a chimney flue
connected to another appliance.
,-,
Warnock Hersey
■ ■
■
C
US
®
Freestanding
™
Model Profile 20
WH Report Numbers: Traditions P11: 476-1129, Profile 20: 476-6658, Profile 30: 476-1244
rNSTALLATION
INSTRUCTIONS
FREESTANDING AND INSERT
PELLET FIRED Sl'OVES
LISTED ROOM HEATER, PELLETIZED WOOD FUEL TYPE
P/N20922000, REV. A, 11/2000
MODELS
/
,
P11, Profile 20 & Profile 30 /
r, 1
1"
1
V �, • ,
·
=
'
=
=·
= · ===-'
I
n:
i Ii
f
::::.
I
Whitfield
™
Freestanding
Model Profile 30
Burning any kind of fuel consumes oxygen.
If outside air is not ducted to the appliance,
ensure that there is an adequate source of fresh
air available to the room where the appliance
is installed.
FOR YOUR SAFETY: Do not store or use gasoline or
other flammable vapors or liquids in the vicinity of
this or any other appliance.
Manufactured (mobile) home requirements: An out
side air inlet must be provide9 for combustion and
be unrestricted while unit is in use. Do not install
appliance in a sleeping room. The structural integ
rity of the manufactured home floor, walls, ceiling
and roof must be maintained. Regulations require
that the appliance must be secured to the floor and
grounded to the chassis.
This appliance requires non-combustible floor
protection or approved hearth/hearth protection as
specified in this manual.
Page 1
---
·-
-
--�- '
·--.
-�
II
l
}
I
..
t
'
�-�
. --*-
I I
=�
�
Whitfield
Insert
™
Model Profile 30
i ,
l
--
7
.
-
0
--
�,·
Advertisement
Table of Contents
Troubleshooting

Related Manuals for Lennox Traditions Freestanding P11


Summary of Contents for Lennox Traditions Freestanding P11
- Page 1 rNSTALLATION INSTRUCTIONS W hitf ield FREESTANDING AND INSERT PELLET FIRED Sl'OVES i , T�tTIONS LISTED ROOM HEATER, PELLETIZED WOOD FUEL TYPE P/N20922000, REV. A, 11/2000 MODELS P11, Profile 20 & Profile 30 / r, 1 1" ·- V �, • , --�- ' ·--.
- Page 2 �����������$���� 'n,: s� · s rancl�·.Whitfield - T radi �!arid t" -����i .. ---:;:��:��S"'= �;,-,=- ���,r_c>!!!,�2.:�, ; .ft�t� The following correction affects Installation and Operation Manual, part# 20922000 with a revision "IR", "A" or Ms•. Manuals with a revision C (March 2001) or later have this correction. Note: The manual revision date is printed on the front cover page.
-
Page 3: Table Of Contents
Table of Contents PACKAGING LIST Safety Information Safet y Preca utio ns - -- ------ - 3 4 The assembled pellet stove models P11-Traditions, Safety Testing Profile 20-freestanding, Profile 30-freestanding and Profile 30-insert are packaged with an accessory pack Glossary------------5 age which contains the following: Wiring Diagram One - Installation and operation instructions man-... -
Page 4: Safet Y Preca Utio
THIS STOVES EXHAUST SYSTEM WORKS WITH NEGATIVE COMBUSTION CHAMBER PRESSURE AND A SLIGHTLY POSITIVE CHIMNEY PRESSURE. THEREFORE, IT IS IMPERATIVE THAT THE EXHAUST SYSTEM BE GAS TIGHT AND INSTALLED CORRECTLY. SINCE LENNOX HEARTH PRODUCTS, HAS NO CONTROL OVER THE INSTALLATION OF YOUR STOVE, LENNOX HEARTH PRODUCTS GRANTS NO WARRANTY, IMPLIED OR STAT ED FOR THE INSTALLATION OR MAINTENANCE OF YOUR STOVE, AND ASSUMES NO RESPONSIBILITY FOR ANY CONSEQUENTIAL DAMAGE(S). -
Page 5: Safety Testing
Note: This stove is not intended for use in commercial installations other than where the stove is being sold without prior approval from Lennox Hearth Products. The stove will not operate using natural draft, nor without a power source for the blower and fuel feeding systems. -
Page 6: Glossary
AUTOMATIC IGNITER. If your automatic ignition system should AUGER MOTOR - The auger motor specifications are: .4 amp, I 1pm (revolu ever need troubleshooting, repair or replacement, please contact your tions per minute). The auger motor drives the auger to deliver fuel to firepot Authorized Dealer. -
Page 7: Pellet Fuels
PLEASE NOTE: Lennox Hearth Products has no control over the manufacturing of pellet fuel and will not be held responsible for poor stove performance or any damage caused by inferior pellet fuels. -
Page 8: Installation Pre-Assembly Stove Instructions
Pre-Assembly I Stove Installation All Models - Plug power cord into connector on Unit Pre-Installation Plug the power cord connector into the corresponding con 1. After removing the packaging from the stove, lift the nector on the back of appliance. (Profile 30 Insert - Route hopper lid, and remove all pre-packaged items that power cord behind side shroud panel). -
Page 9: Thermostat Installation
Thermostat Installation NOTE: ALWAYS DISCONNECT POWER BEFORE PERFORMING THE THERMOSTAT INSTALLATION. �������25� === � '!::=::: c:=) c:::::::c::::::i c::::::: c:::, c=:::>c::::::i c:::, c:=, �is:=:=Jc:::::=l��c=:)�c::=,c::::::: ��c==:,:r-=:=)c==)c::::=,'=<==:,c=;i c=::, ��(==:=Jir=.)C'=c,��l'==:,c::::::z '=> �c::=.ii�c=.i���c==,c=::z:=: c:==, (=:l'C=>�'=�c=:=:tl:=> �l=,)(===:::sc::=::')�(==:::)<=.o (:==t,c:::::=,c====ic==:>c=c,c::=:=:i� 11'=1)c=,.c=,��c:::=:ii=> '=-'lc=:::=>��--=::t:lc=::::=:� c==i, c::z:., c::=:o � c:=::::c � c:::z=., '=l>i:c=><=O<=i=:>oc:z:z=)c:==,�... - Page 10 Stove Damper Controls - Install Damper Rod Damper Operation - All models: "Traditions" model P11 (Only) The damper is a plate that helps control the amount of airflow (provided in accessory package). To install: Assembly supplied for combustion. With the damper pushed all the 1.
- Page 11 Stove Damper Controls Traditions P11 Profile 20 and Profile 30 Freestanding and Profile 30 In The damper rod is located under the bottom plate, on the sert right hand side of the stove, just behind the ash pan (see Fig. The damper rod is located behind the right-hand side panel A).
-
Page 12: Stove Clearances/Floor Protection
Stove Installation Configurations Clearances Clearances Models Profile 20-Freestanding & Profile Model Traditions P11 - Freestanding - Standard Freestanding - Standard Residential or Manufactured Residential or Manufactured (Mobile Home Installation. (Mobile Home Installation. These appliances require the These appliances require the following minimum clear following minimum clearances to combustibles: ances to combustibles: Stove Clearances to Combustibles (inches). - Page 13 Profile 30 Insert Installation Configuration Masonry and Zero Clearance Minimum Clearances to Fireplaces Combustibles The model Profile 30-insert is approved for installation into a inches/millimeters s olid fuel burning fireplace, either a masonry fireplace or an A - Insert to side wall 6"...
- Page 14 M o bi l e Home Installat ion Mo de l s - Pr of i l e 20 & 30-Freestan ding IN ADDITION TO THE STANDARD INSTALLATION INSTRUCTIONS, THE FOLLOWING INSTRUCTIONS MAY BE REQUIRED BY LOCAL, STATE OR FEDERAL BUILDING CODES: •...
- Page 15 Mobile Home Installation Model Traditions P11 - Freestanding IN ADDITION TO THE STANDARD INSTALLATION INSTRUCTIONS, THE FOLLOWING INSTRUCTIONS MAY BE REQUIRED BY LOCAL, STATE OR FEDERAL BUILDING CODES: • Stove must be permanently bolted to the floor. • Stove must have a permanent outside air source. •...
-
Page 16: Venting Requirements
Venting Requirements All Clearances and Instructions Listed By Vent Manufacturer Must Be Followed. IT IS RECOMMENDED THAT ONLY AN AUTHORIZED DEALER INSTALL YOUR PELLET STOVE. THE FOLLOWING INSTALLATION REQUIREMENTS MUST BE FOLLOWED ENSURE CONFORMITY WITH BOTH THE SAFETY LISTING THE APPLIANCE AND LOCAL BUILDING CODES. Freestanding Models - Pipe and Venting Ninety-degree elbows accumulate fly ash and soot There are several options for installing and venting of... - Page 17 Venting Termination Requirements Vent Termination E. The distance from the bottom of termination and grade - 12"/305mm minimum. This is conditional Do not terminate vent in an enclosed or semi-enclosed upon plants and nature of grade surface: The ex area such as: carports, garage, attic, crawl space, under haust gases are not hot enough to ignite grass, a deck, porch, narrow walkway, closely fenced area, or any location that can build up a concentration of fumes...
- Page 18 Determining Equivalent Pipe Length To determine w hether a 3" or 4" exhaust system is required for your installation, review the sample installation below. Fill out the top chart, and calculate your total equivalent pipe length. After you have the total equivalent pipe length, use the chart at the bottom of the page to determine if your installation requires 3"...
- Page 19 Installing Your Freestanding Pellet Stove STANDARD HORIZONTAL EXHAUST INSTALLATION 1. Locate the proper position for the listed type "L" wall thimble. Avoid cutting wall studs when installing your pipe. Use a saber saw or key hole saw to cut the proper diameter hole through the wall to accom modate the wall thimble.
- Page 20 Installation Configurations Models-Profile 20 & 30-Freestanding Standard Horizontal Installations 1"Minimum ===i-===== 6"Minimum '==c::==:J= Minimum from outer wall ----+ - --'----, ◄ 12" Minimum from ground ---------------------+---------�--------- or other surfaces NON-COMBUSTIBLE Hearth Pad {3/8" Minimum Thickness) .. -::::-..·, "-·-':'\'"11:J:. , ..
- Page 21 Installation Configurations Model -Traditions P11 - Freestanding Standard Horizontal Installations 2"Minimum 12" Minimum from outer wall ..___ 12" Minimum from ground or other ----------------------+--------�-- ------ surfaces NON-COMBUSTIBLE Hearth Pad (3/8" Minimum Thickness) Standard Horizontal Installations 3" Minimum Between Wall and Pipe Right Wall r ---------- ·- ---·...
- Page 22 Venting Options The Lennox Hearth Products Pellet Stoves may be connected to an existing flue or by installing listed type "L'' vent pipe. If a liner is run all the way to the top of the existing chimney, the existing flue should be sealed with a steel plate.
-
Page 24: Control Board Operation
Stove Operating Controls STOVE ON/OFF SWITCH - This switch will turn your stove on or off while in Manual or Automatic mode (See page 24 for details). The green on/off light at the top of control will indicate the on/off status. - . -
Page 25: Initial Start-Up
Operating Instructions Fuel Delivery Rate Once fuel starts to enter the bum grate, tum the stove OFF and then back ON. The auger tube should now be primed and The feed rate switch manages the fuel delivery rate by control the stove should deliver enough fuel for proper ignition. -
Page 26: Proper Bum Characteristics
General Operating Considerations Proper Burn Characteristics: AUTOMATIC SAFETY FEATURES The flame in your stove should be bright yellow under normal operation. If the flame becomes lazy with a red Power Outage: dish/orange color, the damper position may need to be During a power outage, the stove will shut down safely. -
Page 27: Maintenance Requirements
Routine Cleaning NOTE: STOVE WILL NEED TO BE SHUT OFF AND COOLED ENOUGH TO HANDLE BEFORE ROUTINE CLEANING IS PERFORMED. ALWAYS DISCONNECT POWER BEFORE DOING ANY ROUTINE CLEANING. The following areas need to be inspected during Routine Cleaning: • Burn Grate •... - Page 28 Routine Maintenance UNPLUG STOVE BEFORE PERFORMING ANY MAINTENANCE WORK The following areas need to be inspected as part of routine maintenance: Door Rope Gasket: The condition of the rope gasket around the door and windows should be checked periodically and replaced or repaired if necessary.
- Page 29 Routine Maintenance (can't) UNPLUG STOVE BEFORE PERFORMING ANY MAINTENANCE WORK Exhaust Passages and Vent Pipe: Inspect frequently and clean when necessary. Fly ash will accumulate at all bends in the exhaust system. Large amounts Note: of fly ash build-up will create a lack of combustion air. Removing the Tee cap on vertical installations will allow an inspection of the ash build-up in the exhaust Tee and will help you to decide how frequently more extensive cleaning must be per...
-
Page 30: Stove Specifications
SPECIFICATIONS - Model Profile 20-Freestanding '" Approx. Sq. Ft Heat t------22114 ---- Up to -1200 sq. ft. Capacity Flue Size 3" Rear 22 1/4" Width, Overall Depth, Overall 22 3/4" 28 5/8" 28 5/8" Height Floor to Rear Flue Center 11 1/4"... - Page 31 SPECIFICATIONS - Model Profile 30-Freestanding Approx. Sq. Ft Heat 25 718" Capacity Up to ~1500 sq. ft. Flue Size 3" Rear Width, Overall 25 7/8" & Depth, Overall 24 7/8" Height 31 3/8" 31 318" Floor to Rear Flue Center 16 7/8"...
- Page 32 SPECIFICATIONS - Model P11 1 · 26 .. 1/2" Approx. Sq. Ft Heat Capacity Up to ~1500 sq. ft. Flue Size 3" Rear Width, Overall 283/4" Depth, Overall 29 1/2" Height 283/4" " Floor to Rear Flue Center 8 3/4" Facing Back of Unit, Outside Edge of Left Leg To Center of Rear...
- Page 33 SPECIFICATIONS - Model Profile 30-lnsert Approx. Sq. Ft Heat Capacity Up to -1500 sq. ft. Flue Size 3" Rear Width, Overall front (w/o shroud) 26" Width, Overall back (w/o shroud) 24 1/8" Depth, Overall (w/o shroud) 26 1/4" Height, rear (w/o shroud) 19 15/16"...
-
Page 34: Troubleshooting
Troubleshooting Qualified Technicians Only Unplug Stove Before Performing any Maintenance work PROBLEM Fire burns with a lazy There is insufficient combus Remove any clinkers or ash from orange flame. Pellets build tion air. the bottom of the grate that might up in the grate and the win... -
Page 35: Troubleshooting
Troubleshooting Qualified Technicians Only Unplug Stove Before Performing any Maintenance work PROBLEM CAUSE(S) SOLUTIONS (Con't from page 30) Fire goes Ol,.Jt or stove shuts operating at a medium to high burn down automatically (can't) rate and the convection fan has been turned down low then the fan should be turned up higher. - Page 36 Troubleshooting Qualified Technicians Only Unplug Stove Before Performing any Maintenance work PROBLEM Blowers will not operate There is no power to the Check that the stove is plugged in when the start switch is stove. to the wall outlet. depressed. Check to see if your circuit breaker There is no power to the con...
-
Page 37: Warranty
All claims under this warran ty must be made in writing to the Manufacturer at Lennox Hearth Products, 695 Pease Road, Burlington WA. 98233 and should include the following: 1. -
Page 38: Shroud Assembly Components
Insert Shroud Components Profile 30 Insert Surround/Shroud Panels and Trim � O· Panel and Trim Sizes Large 36" (91 .4 cm) height 48" (121.9 cm) width Medium 32" (81.3 cm) height 44" (111.75 cm) width Small: 28 ½" (72.4 cm) height 40 ¾"... -
Page 40: Safety/Listing Labels (Rating Plate)
11 1 11 1 1 11 1 1 1 111 1 1 111 1 1 1 1 1 1 1 111 1 11 1 1 1 1 11 1 1 1 I I I I III I I I I I I I l l ll l l l II I l l l l ll Made in U.S.A. by LENNOX HEARTH PRODUCTS... - Page 41 11 1 11 1 1 11 1 1 1 111 1 1 1 11 1 1 1 1 1 1 1 111 1 11 1 1 1 1 11 1 1 1 II I I ml 1 1 1 1 1 1 1 11 1 1 111 1 1 I l l ELECTRICAL RATING: 60 HZ, 115 V, LESS THAN 10 AMP l l ll Made in U.S.A. by LENNOX HEARTH PRODUCTS 0- Burlington, WA DO NOT REMOVE THIS LABEL CD -...
- Page 43 lENNOXe HEARTH PRODUCTS 4325 Artesia Avenue Fullerton, CA 92833...
- Page 44 ..
Need help?
Do you have a question about the Traditions Freestanding P11 and is the answer not in the manual?
Questions and answers