Advertisement
Quick Links
Advertisement

Related Manuals for Diamond MCR-120P/N


Summary of Contents for Diamond MCR-120P/N
- Page 1 04/2013 Mod: MCR-120P/N Production code: 40807003F...
- Page 2 MEAT MIXERS USE AND MAINTENANCE MANUAL...
-
Page 3: Table Of Contents
INDEX Delivery and warranty 1. - In tr oduction 1.2 - Filing and using this manual 1. - W a rranty 1. - D e scription 1. - U se s 1. - N on- permitte use 1. - A ppl iance Info rmation 1.8 - Protections and safety features 1.9 - Danger and warning notices... -
Page 4: Delivery And Warranty 5
1 - Delivery and warranty Turning the appliance On and Off 5.1 - Checking connection to electricity supply 1.1 - Introduction 5.2 - Checking protections and safety features and their efficiency The following symbol is used in this manual to call the reader’s attention to points and 5.3 - Turning On the appliance operations considered dangerous for the operator or that could damage the appliance. - Page 5 1.6 - Non-permitted uses use of non-original spare parts and non-specific parts for the various models The mixer must only be used for the uses given by the manufacturer, and in particular: total or partial non-observance of the instructions given. Do Not use the appliance for mixing food other than for meat.
-
Page 6: Work Position
1.7 - Appliance Information 1.9 - Danger and Warning Notices Model............. When requesting assistance, a clear and ATTENTION When the appliance is connected to the electricity supply do not touch Serial N° ..........precise description of the “Model”, any of the electrics. There is the risk of being electrocuted. Always respect the infor- Manufacturing Year ....... -
Page 7: Main Components
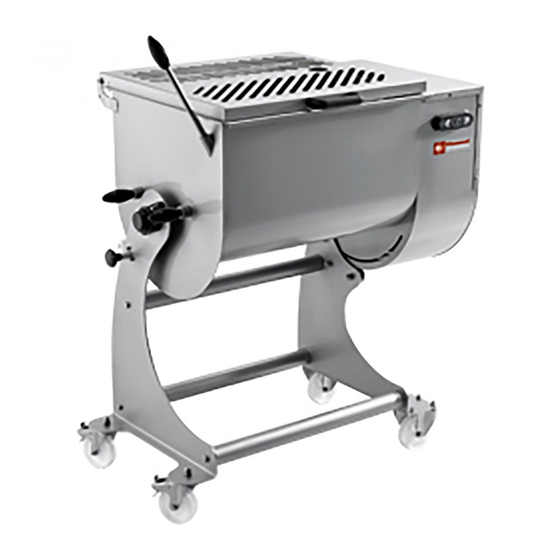
2 - Caratteristiche tecniche 2.4 - Wiring diagrams 2.4.1 - Wiring diagram three-phase 400V (Fig. 2.4.1) 2.1 - Main components For an easy comprehension of this manual the main components are listed below and are also shown in Fig. 2.1.1 . 1 - Electric motors. -
Page 8: Three-Phase Wiring Diagram Of Stainless Steel Controls
2.4.2 - Wiring diagram single-phase 230V (Fig. 2.4.2) 2.4.3 Three-phase wiring diagram of stainless steel controls (Fig.2.4.3) Fig. 2.4.2 Fig. 2.4.3... -
Page 9: Noise Level
2.5 - Noise Level 2.4.4 - Single-phase wiring diagram of stainless steel controls (Fig.2.4.3) From the noise level readings this appliance has a noise level lower than 70 dBA.Upon request the manufacturer can supply a copy of the noise level test certifi- cate. -
Page 10: Installing
3.3 - Installing 3.4.2 - Single phase appliance 230 volt 50/60 Hz ATTENTION! These models are provided with a 1,5 m long power cable with a 3x1,5 mm section. Connect the power cable to a 220 volt 50/60 Hz single phase electricity supply and The work surface or area where the appliance is to be installed must be horizontal and solid guaranteeing stability and safety. - Page 11 3 Reverse drive push-button 5.4 - Turning Off the appliance In stainless steel. To stop the appliance press push button “1” (stops the electric motor), the red Press to start the blade in opposite direction to pus-button "1". indicator light "5" will go out. 4 Network presence indicator light Indicator light “2”...
- Page 12 6.5 - Automatic use 6.3.2 - Cleaning the mixing bowl 6.5.1 - Automatic mixer With the machine off and switch in position “0” and with the plug Press the drive push-button "3": the blades will start turning and the red/yellow indica- removed from the socket proceed with cleaning the bowl.
- Page 13 With the appliance running: 7.7 - Lubrication - check efficiency of all protections and safety features. When the grille is raised the Periodically grease gears "2". appliance must automatically stop. - Unplug the machine from its power source - General functional check. - Take off the protective casing "1"...
- Page 14 8 - Problems and remedies 8.1 - Problems, causes and remedies Problemi Cause Rimedi The appliance The on/off switch is in position 0”. Switch the switch to position “1”. does not start The grille is raised. Lower the grille. The microswitch mounted on the Contact the aftersales office mixing drum does not work.
Need help?
Do you have a question about the MCR-120P/N and is the answer not in the manual?
Questions and answers