Table of Contents
Advertisement
Quick Links
Advertisement
Table of Contents

Related Manuals for Diamond P6


Summary of Contents for Diamond P6
- Page 1 07/2014 Mod: MPS18/1 Production code: P6...
- Page 2 AUTOMATIC FRESH PASTA MACHINE User and maintenance manual This handbook is an integral part of the machine. Read this handbook and the attachments with attention. Knowledge of the instructions contained is indispensable for machine use and to carry out maintenance in safety.
-
Page 4: Table Of Contents
CONTENTS CONTENTS .......................... I MACHINE DESCRIPTION ....................1 Machine main components ....................2 Accessories supplied ......................4 Optional accessories......................6 Uses provided for ......................7 Technical specifications ....................8 Manufacturer identification data ..................9 ... - Page 5 Contents IMPERIA & MONFERRINA S.p.A. FUNCTIONING ........................31 Description of the controls ....................32 Work cycle ........................33 Changing the plate ......................36 MAINTENANCE ........................ 39 General information ......................40 General safety rules ......................40 ...
-
Page 6: Contents
Contents CONTENTS CONTENTS .......................... I MACHINE DESCRIPTION ....................1 Machine main components ....................2 Accessories supplied ......................4 Optional accessories......................6 Uses provided for ......................7 Technical specifications ....................8 Manufacturer identification data ..................9 ... -
Page 7: Machine Main Components
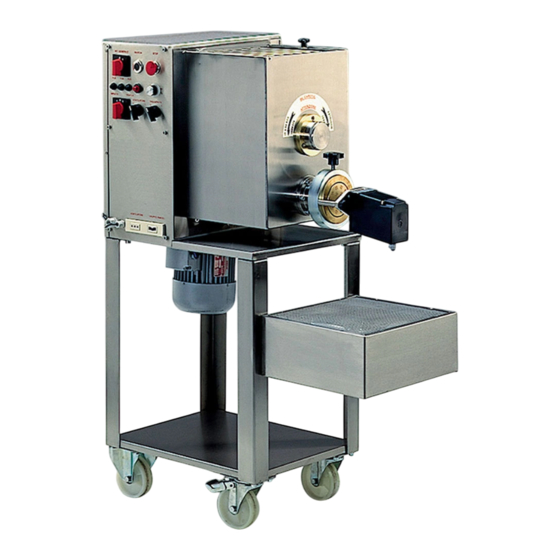
Machine description Machine main components The machine consists of the following units: 1 Stainless-steel shaft 2 Plexiglas safety cover 3 Mixer shaft clamp/release lever 4 Dough-cutter motor clamp/release knob 5 Plate support ring nut 6 Dough-cutter motor 7 Cooler blower 8 Stainless-steel feeder 9 Wheel block 10 Electric wire... - Page 8 Machine description...
-
Page 9: Accessories Supplied
Machine description Accessories supplied 4 dough plates (the type of plate is chosen by the customer when the order is placed). 1 plate ring nut support tightening spanner. 1 dough-cutter motor. 1 set of blades for the dough-cutter motor. - Page 10 Machine description 1 sieve. 1 reducer breather plug. 1 cooler blower. 1 adjustment rod.
-
Page 11: Optional Accessories
Machine description Optional accessories Ravioli unit. Gnocchi unit. Attachment point, for optional units, at the rear side of the machine. -
Page 12: Uses Provided For
Machine description Uses provided for The automatic P6 machine has been designed, built and outfitted exclusively for the production of drawn pasta, obtained from raw materials such as durum wheat flour or bread wheat flour with the addition of water and/or eggs. -
Page 13: Technical Specifications
Machine description Technical specifications Mixing tank capacity Dough production Kg/h 15 ÷ 18 Three-phase or single-phase motor Weight... -
Page 14: Manufacturer Identification Data
Machine description Machine identification plate / EC marking In the case of all communication with the manufacturer, always quote the information on the machine’s ID plate. Permitted environment conditions To guarantee correct functioning, the machine is to be placed where it is protected against weather and with an environment temperature ranging between 20 °C and 30 °C and with relative humidity ranging between 40% and 50%. -
Page 15: Overall Dimensions
Machine description Overall dimensions The overall dimensions are indicated in section “Technical data”. Scrapping Environment! When scrapping, all the machine components are to be disposed of in the appropriate waste dumps in accordance with the laws in force. The machine has a pure, unalterable stainless-steel structure and conforms to current safety regulations in Italy and abroad. -
Page 16: Guarantee
Machine description Guarantee DIAMOND provides a warranty for 12 months from the date of purchase for all parts, excluding those subject to normal wear. The warranty is annulled in the case of repairs on the machine carried out by unauthorised persons or if equipment or accessories not supplied by... -
Page 17: Professional Qualifications Of Persons Enabled To Operate On The Machine
Machine description Professional qualifications of persons enabled to operate on the machine The machine is to be used only by authorised persons who have been instructed for the purpose; the same precaution is valid for the persons who shall carry out the maintenance. Do not permit unauthorised persons to approach the machine when running or during maintenance. -
Page 18: Suggestions For Pasta Production
For any other operation not specifically foreseen in this handbook or assigned to a professional technician other than those indicated above, contact DIAMOND Suggestions for pasta production Any type of flour or durum flour or flour/durum flour mixture can be used for the dough. - Page 19 Machine description Here below we give a few recipes for different types of dough. Remember that ingredients can at all times be modified and quantities changed according to your experience and taste. Preparation for pastry for ravioli: Fine flour 70% Hard grain durum flour 30% 5 eggs per Kg of dough + water Knead for approximately 10 minutes...
-
Page 20: Safety
Safety SAFETY If in doubt do not proceed! Telephone the DIAMOND After Sales Service immediately. -
Page 21: Safety Information
Do not run or carry out maintenance on the machine until the instructions have been read and understood. DIAMOND shall not be held in any way liable for accidents or damages caused if the machine is used by persons who... -
Page 22: Safety Precautions
Safety DIAMOND is not in a position to foresee all possible circumstances involving a potential hazards. Therefore the warnings indicated in this document and on the product are not all-inclusive. Where tools, procedures working methods or techniques not expressly recommended by the... - Page 23 Safety If an unforeseen process or operation is carried out, following a procedure different to that indicated ibook, before proceeding, contact DIAMOND. If the Customer installs equipment on the machine that has not been supplied by DIAMOND it is necessary to check...
-
Page 24: Safety Devices
The handbook is always to be on hand, so that it can be consulted to check the operating cycle any time doubts arise. Should this handbook become lost or damaged, ask DIAMOND for a copy to replace it. Structural damage, modifications, alterations or improper repairs can change the machine protection capacities, hence cancelling this certification. - Page 25 Safety If, to be able to carry out a specific specialised technical operation on an electrical electronic device of the machine, it is necessary to work with the electric cabinets or control panels open and in exceptional cases with the main switch in ON position, be very careful and work with extreme caution.
-
Page 26: Safety Plates And Symbols
Clean them with a cloth, soap and water. Do not use solvents, diesel or petrol. Replace damaged, ad plates obtaining new ones from the DIAMOND. re-seller. If a plate is on a part to be replaced, make sure the new piece has a new plate attached to it. - Page 27 Safety Safety devices The components indicated are particularly important for safety. In the case of failure or wear, they are to be replaced with spare parts supplied or authorised by the manufacturer. During machine use all the protections are to be correctly mounted. Safety microswitch and limit switch There is one protective Plexiglas cover (1) on the machine, equipped with microswitch and safety latch.
-
Page 28: Residual Risks
Safety Residual risks The accurate risks analysis carried out by the manufacturer and filed in the technical folder has eliminated most of the risks connected to the use of the machine. The manufacturer recommends that the instructions, procedures and warnings contained in this handbook are scrupulously followed, as well as the safety standards in force, including the use of the foreseen protection devices, both those integrated in the machine and those for personal protection. -
Page 29: Directives Applied
The machine has been designed and tested in conformity with the “essential health and safety requirements” of annex 1 of European directive 2006/42/EC. The standards used as reference for the design, realisation and inspection of the machine are listed in the technical folder archived in DIAMOND... -
Page 30: Installation
Installation INSTALLATION If in doubt do not proceed! Telephone the DIAMOND. After Sales Service immediately. -
Page 31: Positioning
Installation Positioning Warning! Before starting the positioning, carefully visually inspect the machine to identify any damage caused during transport. If one or more components are found to be damaged, do not proceed with the installation and notify the manufacturing company of the fault found, agreeing with same on the action to be taken. -
Page 32: Installation
Installation Installation Position the machine on perfectly level ground and lock the wheels with the wheel locks provided. Fit the cooling blower onto the trolley using the screws provided. Plug the cooler blower into the socket under the control panel. Warning! The machine is not supplied with a plug for connection to the mains socket;... - Page 33 Installation Unscrew the plate support ring nut. Insert the plate required into the ring nut and screw the ring nut with plate into the machine again. If you wish to produce short pasta, choose the suitable dough-cutting blade from the three supplied. Insert the spring supplied into the blade and fit it onto the pin on the dough-cutter motor.
-
Page 34: Electrical Connection
Installation Electrical connection Caution! Before starting the machine, make sure the voltage specified on the ID plate corresponds to the mains voltage. Supply phase check (380 V Three-phase) Make sure that the master switch 1 and the “KNEAD/EXTRUDE” selector switch 2 are at ”0”. Start-up the machine by turning the knob of the master switch 1 to the right (position 1) and turning the knob below to “KNEAD”... - Page 35 Installation STOP Caution! If the mixer shaft is turning in the opposite direction, press “STOP” button immediately thereby stopping the machine. Remove the power supply plug from Blue the socket and swap the position of the brown and black wires as shown in Brown the figure.
-
Page 36: Functioning
If in doubt do not proceed! Telephone the DIAMOND After Sales Service immediately. Tel. 0039.0141.27.60.11... -
Page 37: Description Of The Controls
Functioning Description of the controls MASTER SWITCH STOP START FUSE A FUSE B FUSE C DOUGH DRAW COOLER BLOWER DOUGH-CUTTER 1. Master switch 2. START button 3. STOP button 4. Cooler blower on indicator light 5. Dough-cutter motor speed regulation knob 6. -
Page 38: Work Cycle
Functioning Work cycle Before the cycle Check the selector switches on the control panel are all at “0”. Make sure to have respected all precautions described in the Safety section. Work cycle Open the cover and fill the mixing tank with the basic ingredients (flour and/or hard-grain durum flour), water and/or eggs. - Page 39 Functioning Warning! Under no circumstances let the machine run with the selector switch 6 turned to the “EXTRUDE” position before kneading the flour. This could cause serious mechanical damage. The friable dough broken up into granules will be ready to be extruded after around 15 minutes.
- Page 40 Functioning If the machine stops during the working cycle: The thermal protection inside the machine could have tripped as the result of the motor overheating or excessive voltage fluctuation. After a few minutes, the thermal protection will be reset automatically and the machine will be ready to continue the working cycle.
-
Page 41: Changing The Plate
Functioning Changing the plate To change the pasta type it is necessary to change the plate in the following way: Press the button 3 “STOP”. Bring the “COOLING BLOWER” 7 and “DOUGH-CUTTER” 8 back to zero “0”. Unscrew the knob and remove the dough-cutter motor. - Page 42 Functioning Unscrew and remove the ring nut. Remove the plate and replace it with another. Warning! After use, the plates must always be immersed in a container full of water to prevent the dough from drying.
- Page 43 Functioning PAGE INTENTIONALLY LEFT BLANK...
-
Page 44: Maintenance
Warning! The maintenance engineer is to enter in the log book attached all operations carried out on the machine. If in doubt do not proceed! Telephone the DIAMOND After Sales Service immediately. -
Page 45: General Information
Maintenance General information This section describes the inspection and routine maintenance operations that are indispensable to ensure correct functioning of the machine. Any other intervention required to correct failures or operative anomalies are to be specifically authorised by the manufacturer. In such cases always indicate the identification data (model, serial number, identification of electrical, pneumatic systems etc.). - Page 46 Maintenance Caution! The main switch is to be set on “0” and fastened with a padlock to prevent accidental re-powering. The key of the padlock is to be kept by the maintenance engineer.. Upon termination, and before putting back into service, the maintenance engineer is to check the complete work cycle, the functioning of the safety devices and that the protections are intact.
-
Page 47: Cleaning
Maintenance Cleaning Before starting inspection or maintenance operations, remove all dirt and grime from the machine by suction and with appropriate solvents. Do not use jets of compressed air that could accumulate the dirt and cause injury to persons in the cleaning area. Clean persistent grime with soft dry cloths that do not fray or with a soft silk bristle brush. -
Page 48: Maintenance On Electrical Systems
Maintenance Maintenance on electrical systems Before working on electrical components, cut out the power supply upstream of the equipment (power supply line main switch). Always carefully check insulating coverings, terminal boards and seal of enclosures. These are always to conform with the protection class declared by the manufacturer. -
Page 49: Advice Regarding Maintenance
Maintenance Advice regarding maintenance Operations to be carried out during maintenance work When carrying out maintenance operations pay attention to all the signs that could preceded a failure: traces of wear; loose fittings or connections; oxidised contacts; Cutting down dead time after a failure It is to be borne in mind that maintenance operations carried out correctly can cut down the dead time to a minimum after a failure. -
Page 50: Cleaning And Maintenance
Maintenance Cleaning and maintenance Caution! Before starting any type of maintenance work, cut out and lock all energy sources and block the machine safeties. Place a warning signboard near the main switch. "MACHINE BEING SERVICED DO NOT POWER ON". Before putting back into service, recheck the entire system according to the start-up procedures. - Page 51 Maintenance Use spanner supplied loosen the plate support ring nut. RING NUT FEEDER Unscrew the ring nut and remove it. Remove the feeder and clean it with a damp sponge. Remove the plate from the ring nut and plunge it into a container full of water.
- Page 52 Maintenance Caution! Before starting maintenance operations, remove the plug from the mains. Do not start up the machine during maintenance operation such as cleaning, greasing and lubrication. Every six months remove the upper lid and grease the transmission chain. TRANSMISSION CHAIN...
- Page 53 Maintenance PAGE INTENTIONALLY LEFT BLANK...
-
Page 54: Spare Parts
Wiring diagram SPARE PARTS If in doubt do not proceed! Telephone the DIAMOND After Sales Service immediately. -
Page 55: Components Subject To Wear And Mechanical Fatigue
Spare parts Components subject to wear and mechanical fatigue Caution! The components subject to wear caused by the relevant functioning are to be checked at regular intervals and replaced as soon as they show significant signs of wear. The manufacturer has designed and built the machine for a rational life, taking into account the normal use conditions of the Customer;... - Page 56 Spare parts Table 1...
- Page 57 Spare parts Code Description Upright Upright Platform Wheel frame Cooling blower box Cooling blower Fixed wheel Swivelling wheel Wheel fixing plate Cover 1137 Hexagonal nut 1501 TSTC screw 1510 TCE screw...
- Page 58 Spare parts Table 2...
- Page 59 Spare parts Code Description Tank cover Seal Flange Shaft seal Tank bushing Bushing Knob Tang Ring nut Plate holder Tank Feeder Mixer shaft TCE screw Flange OR ring Shaft seal Bearing Plain washer Hexagonal nut TCE screw Reducer Washer TCE screw Reducer shaft Dowel pin Pinion...
- Page 60 Spare parts Code Description Electric motor Casing Rear guard Tang Pinion Double roller chain P.P. dowel pin Seeger ring TCE screw OR ring Flange TCE screw Frame OR seal TCE screw Casing Motor Cross-member Dowel pin Blade Spacer dowel Handweel Spring Ring Knob...
- Page 61 Spare parts Code Description Chain tightener Chain tightener pin Chain tightener roller 1113 TCTC screw 1177 TCE screw 1411 TCE screw 1506 Quick fastener 1604 Tang 1608 Microswitch 1612 Bearing 1645 Seeger 1695 Snap handle 1736 Screw...
- Page 62 Spare parts Table 3...
- Page 63 Spare parts Code Description Terminal block Cable holder Socket Socket Screw Fuse box Panel Switch Indicator light Supports Plate Casing Button A Cable holder Button M Transformer Contactor Electrical card Potentiometer Selector Reversing gear 1102 Screw 1186 1741 Thermal switch 220 V 1752 Thermal switch 380 V...
-
Page 64: Wiring Diagram
Wiring diagram WIRING DIAGRAM If in doubt do not proceed! Telephone the DIAMOND After Sales Service immediately. -
Page 65: Wiring Diagram - 220 V
Wiring diagram Wiring diagram - 220 V... -
Page 66: Wiring Diagram 380 V
Wiring diagram Wiring diagram 380 V... - Page 67 Wiring diagram PAGE INTENTIONALLY LEFT BLANK...
Need help?
Do you have a question about the P6 and is the answer not in the manual?
Questions and answers