Table of Contents
Advertisement
Quick Links
Advertisement
Table of Contents

Subscribe to Our Youtube Channel
Related Manuals for Artesian Spas PLATINUM ELITE CLASS


Summary of Contents for Artesian Spas PLATINUM ELITE CLASS
- Page 2 Notes:...
- Page 3 PLATINUM ELITE CLASS WWW.ARTESIANSPAS.COM Part # 11-1311-11...
- Page 4 © 2013 Artesian Spas (May Manufacturing, LLC) | Last Revised1/31/2013| Subject to change without notice.
-
Page 5: Table Of Contents
TABLE OF CONTENTS Congratulations.............. Safety Warnings.............. Electrical Requirements and Installation..... Picture of System Box Terminal Connection 60Hz 60 Hz GFCI Wiring Schematic....... 50 Hz Electrical Service Options......Spa Start Up..............Selecting a Location..........Inspection.............. Filling the Spa with Water........Turning the Power On..........Testing the GFCI Breaker........ - Page 6 Removing, Installing and Cleaning Filters..Winterizing Your Spa........Spa Cabinet Care..........Cleaning Your Spa Interior....... Cover Care............Chemical Treatment of Water......Water Chemistry............Water Treatment Glossary....... Spa Chemicals Glossary.......... Maintaining the Proper pH....... Artesian Spas Platinum Elite Warranty....Warranty Information..........Interior Spa Diagram..........
-
Page 7: Congratulations
CONGRATULATIONS! Congratulations on the purchase of your new Platinum Elite spa by Artesian. We know you will enjoy your spa. Although spas are relaxing and fun, we believe they can be an indispensable part of a healthy lifestyle. The spa lifestyle is one that encourages health and well-being. - Page 8 For your future reference and convenience, please record the Se- rial and Model number along with the installation date in the spaces provided below. STORE THIS MANUAL WHERE YOU CAN EAS- ILY FIND IT WHEN NEEDED. The serial and model numbers are mounted on the base of the equipment enclosure area, as shown below.
-
Page 9: Safety Warnings
SAFETY WARNINGS PLEASE TAKE THE TIME TO READ ALL OF THESE WARNINGS AND CAUTIONS PRIOR TO USING YOUR SPA PLEASE, be a responsible spa owner. When installing and using this spa, always adhere to basic safety precautions. Be sure to list emergency telephone numbers at the telephone nearest the spa, including physician, hospital, ambulance, police, and the fire department. - Page 10 SAFETY WARNINGS tures between 38ºC (100ºF) and 40ºC are considered safe for a healthy adult. Lower water temperatures are recommended for young children and when spa use exceeds 10 minutes. b) Since excessive water temperatures have a high potential for causing fetal damage during the early months of pregnancy, pregnant or possibly pregnant women should limit spa water temperatures to 38ºC (100ºF).
-
Page 11: Electrical Requirements And Installation
Failure to do so will terminate all warranties and all listings from the independent listing facility. 1) The Platinum Elite Class Spa requires a 240 VAC dedicated system. The spa must be hard wired to the power supply, with no plug-in connec- tions, extension cords, or sharing of service. -
Page 12: Picture Of System Box Terminal Connection 60Hz
ELECTRICAL REQUIREMENTS AND INSTALLATION ELECTRICAL WIRING 5) After your spa has been positioned, route lines through the knockout on the left or right front corner of the spa. 6) Connect the power to the spa. Connect each color to its respective terminal block location. The Ground (green) wire must be connected to the grounding terminal whic is outside of the System box. -
Page 13: 60 Hz Gfci Wiring Schematic
60 Hz GFCI WIRING SCHEMATIC... -
Page 14: 50 Hz Electrical Service Options
50 Hz ELECTRICAL SERVICE OPTIONS Single Service, 230 VAC, 50 Hz, 1 x 32A 3 Service, 400 VAC, 50 Hz, 3Np, 32A... -
Page 15: Spa Start Up
SPA START-UP Please read each step of the Start-up section prior to doing the step. SELECTING A LOCATION In preparation for installing your new Artesian spa, you should en- sure that your chosen location meets some minimum guidelines: 1) Place your spa on a surface that is large enough for the entire spa to fit. -
Page 16: Inspection
SPA START-UP 8). If the spa is placed on the ground, even for a short period of time, it must be supported by stones that are at least 2 inches thick and 12 inch- es square. A solid foundation is recommended as soon as possible. INSPECTION You will want to inspect your spa, prior to filling it up with water. - Page 17 SPA START-UP FILLING THE SPA WITH WATER 4) Fill the tub from the circulation pump line until water level is above the foot-well. NOTE: This will purge all the air out of the circulation pump. An air lock can cause damage to the circulation pump and is not covered under warranty.
-
Page 18: Turning The Power On
SPA START-UP TURNING THE POWER ON Turn the power to the spa on at the main circuit breaker. Verify that your spa has no messages. Verify that there is good water circulation in the spa. The pumps will come on in cycles, for 1 minute each cycle. TESTING THE GFCI BREAKER NOTE: The electrical service panel for your spa should be equipped with a GFCI breaker. -
Page 19: Priming The Pump
SPA START-UP PRIMING THE PUMP 1) Turn off power at electrical service panel. 2) Locate and loosen one of the pump union on each pump by turn- ing it counterclockwise one half of one turn. 3) Allow air to escape from fittings. When a steady stream of water flows from the pump union, close it by turning it clockwise until tight. -
Page 20: Topside Controller Instructions
TOPSIDE CONTROLLER INSTRUCTIONS TOPSIDE CONTROLLER SPEED CONTROL PUMP BUTTON AIR VENTURI DIRECT FLOW CONTROLLER... -
Page 21: The Main Screen
THE MAIN SCREEN Important information about spa operation can be seen quickly from the Main Screen. The actual water temperature can be seen in large text and the desired or set temperature is shown in smaller text. The time-of-day, ozone/uv, filter operation, messages, heat range, menu option and panel lock are also displayed on the main screen. -
Page 22: Spa Operation
SPA OPERATION There are three ways to operate the spa functions from the spa side. You can turn the spa pumps and lights from the topside though the buttons on the left hand side of the control panel, or you can use the spa menu using the navigation buttons or you can use the short cut setting. - Page 23 SPA OPERATION Jets 5/Select Button: The jets 5 button will operate pump number 5. First press of the Jets 5 button will activate pump 5. A second press of the Jets 5 button will deactivate pump5. If pump5 is not manually turned off by pressing the Jets 5 button it will automatically timeout after 15 min- utes.
- Page 24 SPA OPERATION Jet 5/Select Button: Press the select button when the SPA option is highlighted. The main screen will change to spa operation screen The main screen will change to spa operation screen Navigation Buttons Us the navigation buttons to highlight the operation you would like to per- form.
- Page 25 SPA OPERATION Jet 5/Select Button: Once the operation is highlighted press the Select button, to ingage the highlighted item. Icons and operation of the icons when highlighted and the select button is pressed. Back button: Will return you to the main menu Jets 1: First press of the Select button will activate pump 1 (if pump is not currently on).
-
Page 26: Temperature Operation
SPA/ TEMPERATURE OPERATION will deactivate pump 4. If pump 4 is not manually turned off by pressing the Select button it will automatically timeout after 15 minutes. Jets 5: First press of the Select button will activate pump 5 JETS 5 (if pump is not currently on). -
Page 27: Settings Screen
THE SETTINGS SCREEN High Range: Set point can be set between 80°F and 104°F Low Range: Set Point can be set between 50°F and 99°F THE SETTINGS SCREEN The Settings Screen is where all programming and other spa behaviors are controlled. Menu Button: Press the Menu Button to activate the menu. -
Page 28: Temp Range
THE SETTINGS SCREEN Temp Range The first setting available to change is Temp Range. This system incorpo- rates two temperature range settings. The specific range that is selected (High or Low) will be displayed in the upper right hand corner of the main screen. -
Page 29: Heat Mode
THE SETTINGS SCREEN Heat Mode Heat Mode indicates if the spa is Ready mode or Rest Mode. The heat mode will be displayed in the bottom right screen of the main screen dis- play. Ready Mode: In ready mode the heater will maintain the set temperature. If your Plati- num Elite spa is not programmed for 24 hours Filter it will turn on the circulation pump every half an hour to test the water temperature. -
Page 30: Time Of Day
THE SETTINGS SCREEN Jet 5/Select Button: Press the select button to return to the main Menu. -OR- Jet 3/Down navigation: Press the down button to go to Time of Day. Time of Day When the time of day is highlighted. Jets 2/Navigate right Button: Press the Right button to go to the Time of Day Menu. - Page 31 THE SETTINGS SCREEN THE SETTINGS SCREEN Jet 3/Down navigation: To decrease the hours. NOTE: To change from AM to PM you will need to adjust the hours past 12. Jets 2/Navigate right Button: Press the Right button to High Light the minutes. Jets 1/Navigate up Button: To increase the minutes.
-
Page 32: Setting Filter Cycle
THE SETTINGS SCREEN Jet 5/Select Button: Press the select Icon to save and return to the main Menu. -OR- Jet 3/Down navigation Press the down button to highlight Cancel Icon Cancel Jet 5/Select Button: Press the select button to cancel changes and return to the main Menu. - Page 33 THE SETTINGS SCREEN Jets 2/Navigate right Button: Press the Right button to high light Filter Cycle 1 Start time Hour. Jets 1/Navigate up Button: To increase the Filter Cycle 1 Start time hours. Jet 3/Down navigation: To decrease the Filter Cycle 1 Start time hours. (NOTE: To change AM and PM you will need to cycle the hours past 12).
- Page 34 THE SETTINGS SCREEN Jets 1/Navigate up Button: To increase the Run Time Hours. Jet 3/Down navigation: To decrease the Run Time Hours. Jets 2/Navigate right Button: Press the Right button to high light Run Time minutes (NOTE: Changing the minutes goes by 15 minute intervals). Jets 1/Navigate up Button: To increase the Run Time Minutes.
- Page 35 THE SETTINGS SCREEN Jets 1/Navigate up Button: To increase the Filter Cycle 2 Start time hours. Jet 3/Down navigation: To decrease the Filter Cycle 2 Start time hours. (NOTE: To change AM and PM you will need to cycle the hours past 12).
- Page 36 THE SETTINGS SCREEN Jets 2/Navigate right Button: Press the Right button to high light Run Time minutes. (Note: Changing the minutes goes by 15 minute intervals). Jets 1/Navigate up Button: To increase the Run Time Minutes. Jet 3/Down navigation: To decrease the Run Time Minutes. NOTE:The panel calculates the end time and displays it automati- cally.
-
Page 37: Invert Display
THE SETTINGS SCREEN Jet 5/Select Button: Press the select button to cancel changes and return to the Set- ting Menu. When you are back on the Setting Menu. Jet 3/ Down navigation: Press the down button until Invert display is highlighted. Invert Display Jet 5/Select Button: Press the select button to Change the display from Normal to Inverted. - Page 38 THE SETTINGS SCREEN Jet 5/Select Button: Press the select button to enter the lock menu. The screen will change to Lock Menu. Jets 2/Navigate right Button: Press the Right button to highlight Settings OFF/ON Jet 5/Select Button: Press the select button to turn Setting lock on. Jet 3/Down navigation Press the down button until Panel is highlighted.
- Page 39 THE SETTINGS SCREEN To unlock the system. Hit Menu Button et 5/Select Button: Press the select button to turn Panel lock on. Jets 2/Navigate right Button: Press the Right button to highlight Settings OFF/ON. Then press the following buttons. Jet 5/Select Button: Jet 5/Select Button: Jet 3/Down navigation: Follow the above steps to unlock the panel.
-
Page 40: Hold
THE SETTINGS SCREEN Jets 4/Navigate Left Button: Press the left button to highlight Back Icon Back Jet 5/Select Button: Press the select button to go back to the setting menu. Jet 3/Down navigation: Press the Down Button until Hold is highlighted. Hold Hold mode is used to disable the pump during service functions, cleaning or replacing the filters. -
Page 41: Utilities
THE SETTINGS SCREEN Utilities The Utilities menu is used for trouble shooting and for technicians. As this is for service personnel we will just explain what each subject is. We do not recommend to change anything unless walked through the setting with a technician. -
Page 42: Temp Display
THE SETTINGS SCREEN Temp Display Jets 2/Navigate right Button: Press the Right button to highlight Temp Display. Jet 5/Select Button: Press the select button to change from F° (Fahrenheit) to C° (Celsius) or from C° (Celsius) to F° (Fahrenheit). Jet 3/Down navigation. Press the Down Button until Time Display is highlighted. -
Page 43: Dolphin Not Used
THE SETTINGS SCREEN Dolphin (Not Used) Jet 3/Down navigation: Press the Down Button until Dolphin is highlighted. This option is not available. Color Jet 3/Down navigation: Press the Down Button until Color is highlighted. Jet 5/Select Button: Press the select button to change Back Ground color on the display. - Page 44 THE SETTINGS SCREEN Jet 5/Select Button: Press the select button to choose highlighted language. Jets 4/Navigate Left Button: Press the left button to highlight Back Icon Back Jet 5/Select Button: Press the select button to go back to the setting menu Jet 3/Down navigation Press the Down Button until the Information is highlighted.
-
Page 45: General Messages
GENERAL MESSAGES Most messages and alerts will appear at the bottom of the normally used screens. Several alerts and messages may be displayed in sequence Some messages can be reset from the panel. Message that can be reset will appear with a “right arrow” at the end of the message. This message can be selected by navigating to it and pressing the select button. -
Page 46: Heater Related Messages
HEATER-RELATED MESSAGES The water flow is low – M016 There may not be enough water flow through the heater to carry the heat away from the heating elements. Heater start up will begin again after about 1 minute. Flow-Related Checks Check for low water level, suction flow restriction (filters) closed valved, or trapped air. -
Page 47: Sensor-Related Messages
SENSOR-RELATED/MISC. MESSAG ES The heater is too hot* – M030 One of the water temperature has detected 118°F (47.8°C) in the heater and the spa is shut down. You must clear the message when water is below 108°F (42.2°C) Flow-Related Checks Check for low water level, suction flow restriction (filters) closed valved, or trapped air. -
Page 48: System Related Messages
SYSTEM-RELATED MESSAGES Program memory failure – M022 Call you dealer for service The settings have been reset– M021 Call you dealer for service if this message appears on more than one power-up The clock has failed –M020 Call you dealer for service Configuration error (Spa will not Start Up) Call you dealer for service The GFCI test failed (System Could Not Test the GFCI) –... -
Page 49: Reminder Messages
REMINDER MESSAGES Not all messages may be displayed. Check the pH May appear on a regular schedule, i.e. every 7 days. Check pH with a test kit and adjust pH with the appropriate chemicals. Check the sanitizer May appear on a regular schedule, i.e. every 7 days. Check sanitizer level and other water chemistry with a test kit and adjust with the appropriate chemicals. -
Page 50: Direct Flow Control Panel
DIRECT FLOW CONTROL PANEL SPEED CONTROL PUMP BUTTON AIR VENTURI The Direct Flow individual control panels let you control the spa from the seat. Speed Control: The speed control will change the water flow from the jets, from a vigorous massage to a softer massage. -
Page 51: Maintaining Your Spa
MAINTAINING YOUR SPA DRAINING YOUR SPA Your spa needs to be drained, cleaned, waxed, and refilled about every six months. More frequent water changes may be necessary if bather load is heavy. A hose bib has been provided below the left side of your front access panel, to assist you in draining your spa. -
Page 52: Jet Care
MAINTAINING YOUR SPA JET CARE We recommend that you clean your jets when you drain your spa. However, if you do need to clean your jets in between this can be ac- complished with a full spa. 1) To remove the jet inserts turn the jet counterclockwise until it stops. -
Page 53: Removing, Installing And Cleaning Filters
MAINTAINING YOUR SPA REMOVING, INSTALLING AND CLEANING FILTERS These are the steps needed to successfully replace your filters You should replace your disposable spa filters and clean your nondispos- able filters every four months. 1) Turn off all power to your spa and remove the filter lid by lifting it out towards you. -
Page 54: Winterizing Your Spa
MAINTAINING YOUR SPA WINTERIZING YOUR SPA It is not recommended that you drain your spa completely during freez- ing conditions. We recommend that you leave your spa full of water with the power on to keep the tub from freezing. If you decide to drain your spa during freezing conditions, contact your dealer for help. -
Page 55: Cover Care
MAINTAINING YOUR SPA COVER CARE Cleaning of your spa cover is an important part of routine maintenance. Dirt acts as an abrasive to the vinyl topcoat, and can also cause wear to folds, seams, and stitching. Mildew growing on damp, dirty vinyl will be- gin to actually root in the fabric, accelerating failure. -
Page 56: Chemical Treatment Of Water
MAINTAINING YOUR SPA CHEMICAL TREATMENT OF WATER Water from your tap is fine for showers, bathing and drinking. However, in a contained recirculating system such as in a spa, water must be treated with chemicals. The main purpose of chemical treatment is to keep the water sanitary and to maintain a specific balance of the water. -
Page 57: Water Chemistry
WATER CHEMISTRY CAUTION: The chemicals used to maintain the pH balance of the water and to sanitize the water can be dangerous. Always follow these basic guidelines when handling the chemicals: 1. Always read and follow the directions on the label, unless directed otherwise. - Page 58 WATER CHEMISTRY WATER TREATMENT GLOSSARY The effects of low PH can be rapid sanitizer loss, eye and skin irritation, expedited corrosion of metals, as well as staining throughout the spa. High PH can result in cloudy water, low sanitizer efficiency, as well as eye and skin irritation.
- Page 59 9 - Organic Matter: These are carbon-derived substances typically generated by living organisms. In a spa, they are most frequently intro- duced into the water by bathers. Enzyme products such as Spa Perfect by Natural Chemistry are most effective at eliminating organic matter from your body of water.
- Page 60 WATER TREATMENT GLOSSARY 17 - Chloramines: Irritating, odorous forms of combined chlorine, formed by the reaction of chlorine with nitrogen containing waste prod- ucts. Chloramines are ineffective as a pool or spa sanitizer. High lev- els of chloramines can cause the problems of “Red Eyes” or “Stinging Eyes.”...
- Page 61 24 - Biguanide: The generic name for a non-chlorine, non-bromine, sanitizer that utilizes the polymer PHMB (polyhexamethylene bigu- anide). It is used to totally eliminate the use of chlorine or bromine. 25 - Biofilm: A slippery coating of microorganisms that can develop in poorly sanitized pools and spas.
-
Page 62: Spa Chemicals Glossary
SPA CHEMICALS GLOSSARY 1 - Alkalinity Up: The total alkalinity of your spa water should be be- tween 80-140 PPM. A proper alkalinity will help buffer your spa water against sudden changes in pH. Every 2.5 tablespoons of Alkalinity Up will raise your alkalinity by 10 PPM in a spa holding 500 gallons of wa- ter. -
Page 63: Maintaining The Proper Ph
7 - pH Up: The effects of low pH can be rapid sanitizer loss, eye and skin irritation, expedited corrosion of metals, as well as staining through- out the spa. pH up can be purchased from your dealer in either liquid or solid granular form. -
Page 64: Artesian Spas Platinum Elite Warranty
Artesian Spas Platinum Elite Warranty This section is a description of your warranty. Here you will find de- scriptions of what is covered under your PLATINUM ELITE Class Spa warranty and what can void your warranty. PLEASE READ THE WAR- RANTY THOROUGHLY. - Page 65 THIS WARRANTY IS GIVEN ONLY TO THE ORIGINAL OWNER, AND TERMINATES UPON TRANSFER OF OWNERSHIP. COM- MERCIAL APPLICATIONS ARE EXCLUDED FROM THIS AND ALL WARRANTIES. The spa must be set on a level solid surface that is sufficient to support the entire length and width of the spa. Standard building practices must be followed.
-
Page 66: Warranty Information
WARRANTY Damage caused by weather, poor water chemistry, and/or improper maintenance will not be covered under this warranty. Alterations or re- placements of components installed in the spa that are not purchased and/or approved by the manufacturer including incorrect wiring, will ter- minate the spa warranty. - Page 67 Other Items Not Covered In This Warranty Some items are not covered in this warranty. These items either have a different warranty, or are warranted through the manufacturer of that item. Stereo and Stereo Components The stereo and stereo components, including speakers, sub woofer, power supply, wire harness, and remote control are covered for 30 days from the date of delivery.
- Page 68 Light Bulbs of Any Kind Removing a Spa from a Structure Pillows Filters Chemical Misuse / Damage Filter Lids Any Part not Purchased from Artesian Spas Jet Inserts Valve Handles Pump Seals Draining and filling the Spa Acts of Nature...
- Page 69 Cabinet Screws Incorrect Wiring Shipping Charges Microcrazing By Using Non-Artesian Parts Any alteration of the spa that has not been pre-authorized by the manufacturer will void all warranties. If the maunfacturer approves an alteration, verify that this alteration is covered under warranty. Dam- age caused by moving a spa that is blocked in or that has been re- cessed, along with additional charges for labor, is not covered by this warranty.
-
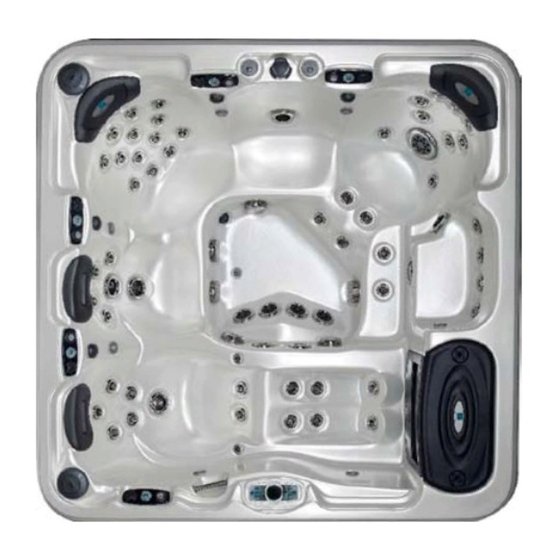
Page 70: Interior Spa Diagram
INTERIOR SPA DIAGRAM... - Page 71 1) Spa Pack 2) Heater 3) Therapy Pump 4) 24-hr Circulation Pump...
Need help?
Do you have a question about the PLATINUM ELITE CLASS and is the answer not in the manual?
Questions and answers