
Related Manuals for Clarke EASIARC 200


Summary of Contents for Clarke EASIARC 200
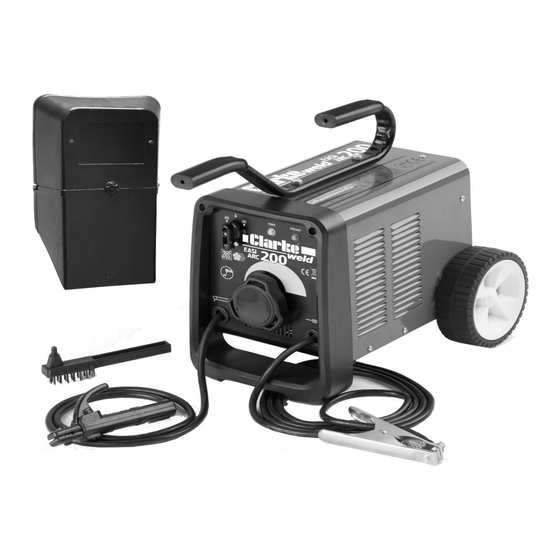
- Page 1 WARNING: A suitable welding headsheild must be worn during use WARNING: Read these instructions before using the machine 200 AMP ARC WELDER MODEL NO: EASIARC 200 PART NO: 6010980 OPERATION & MAINTENANCE INSTRUCTIONS LS0415...
-
Page 2: Environmental Protection
GUARANTEE This CLARKE product is guaranteed against faulty manufacture for a period of 12 months from the date of purchase. Please keep your receipt as proof of purchase. -
Page 3: General Safety Instructions
GENERAL SAFETY INSTRUCTIONS WARNING: WHEN USING ELECTRICAL TOOLS, BASIC SAFETY PRECAUTIONS SHOULD ALWAYS BE FOLLOWED TO REDUCE THE RISK OF FIRE, ELECTRIC SHOCK AND PERSONAL INJURY WARNING: READ ALL THESE INSTRUCTIONS BEFORE ATTEMPTING TO OPERATE THIS PRODUCT AND KEEP THESE INSTRUCTIONS IN A SAFE PLACE. ELECTRIC SHOCK insulated for safety. -
Page 4: Personal Protection
• The welding arc can cause serious • Do not weld in the vicinity of burns. Avoid contact with skin. children or animals and ensure no- one is looking before striking an • Sparks and molten metal are arc. ejected during welding. Take precautions to prevent fires. -
Page 5: Additional Safety Precautions For Arc Welders
If you have off toxic fumes. a problem with the machine contact your local CLARKE dealer. • ALWAYS ensure there is a fire extinguisher on hand. • NEVER use or store in a wet/damp environment. -
Page 6: Electrical Connections
ELECTRICAL CONNECTIONS WARNING: READ THESE ELECTRICAL SAFETY INSTRUCTIONS THOROUGHLY BEFORE CONNECTING THE PRODUCT TO THE SUPPLY. WARNING: NEVER FIT A STANDARD 230V, 13AMP (BS1363) PLUG TO THESE MACHINES 230V SUPPLY Connect the mains lead to a suitably fused 230 Volt (50Hz) electrical supply. The fuse rating should correspond to that shown on the data plate on the rear panel of the machine. - Page 7 UNPACKING Any damage or deficiency should be reported to your CLARKE dealer immediately. The components include the following: • 1 x 200 Amp AC Arc Welder • 1 x Combination Wire Brush & Hammer • 1 x Clarke Instruction Manual...
-
Page 8: Fitting The Handle
ASSEMBLY FITTING THE HANDLE 1. Remove the two bolts at the top of the welder. 2. Position the handle as shown and secure with the two bolts. FITTING THE WHEELS 1. Place a circlip on the inner groove on the axle. 2. - Page 9 4. Place the second circlip on the outer grove on the axle. 5. Replace the wheel cover 6. Slide the axle through the body of the welder as shown. 7. Fix the second wheel to the other end of the axle as described. DUAL SUPPLY This machine is capable of operating on 230V or 400V (single phase), the...
-
Page 10: The Welding Shield
When replacing the glass panels, only use parts supplied by Clarke International. The dark panel is a certified, specific optical class, and should not be exchanged for any other type. The clear glass panel should be replaced when it becomes badly pitted. -
Page 11: Thermal Cutout
FEATURES THERMAL CUTOUT If the machine stops at any time and the amber light on the front panel illuminates, the thermal cutout has activated. Wait until the transformer has cooled sufficiently (the amber light goes out) before restarting work. USING THE WELDER ATTACHING THE EARTH CLAMP Attach the earth clamp firmly to the workpiece as close as possible to the point of weld. -
Page 12: Striking An Arc
STRIKING AN ARC IMPORTANT: BEFORE YOU STRIKE AN ARC, BRING THE FACE SHIELD UP TO PROTECT YOUR EYES. 1. Switch ON the machine. 2. Line up the electrode exactly over the spot where you want to strike. 3. Position your shield in front of your face and tap down firmly with the electrode. -
Page 13: Welding Pitfalls
WELDING PITFALLS The arc welding technique is an acquired skill and requires considerable practice before perfect results are obtained. The diagrams below will help to explain the pitfalls in your technique and how to overcome them. ARC TOO SHORT This causes irregular masses of weld to be deposited, with slag contamination on an uneven surface. -
Page 14: Maintenance
As a general rule the power supply should be inspected at least annually. Consult your CLARKE dealer for advice if necessary. DUTY CYCLE This welder is covered by regulations... -
Page 15: Rating Plate
RATING PLATE Name and address of manufacturer Conventional Load Voltage Model number, part number Energy Input symbol Batch number Rated supply voltage Single phase transformer Rated maximum supply current British Standards applied Maximum effective supply current Manual metal arc welding with covered electrode This symbol indicates that the unit is suitable for carrying out welding... -
Page 16: Specifications
NOTE: The details and specifications contained herein, are correct at the time of going to print. However, CLARKE International reserve the right to change specifications at any time without prior notice. Parts & Service: 020 8988 7400 / E-mail: Parts@clarkeinternational.com or Service@clarkeinternational.com... -
Page 17: Declaration Of Conformity
DECLARATION OF CONFORMITY Parts & Service: 020 8988 7400 / E-mail: Parts@clarkeinternational.com or Service@clarkeinternational.com... - Page 18 NOTES Parts & Service: 020 8988 7400 / E-mail: Parts@clarkeinternational.com or Service@clarkeinternational.com...
- Page 19 NOTES Parts & Service: 020 8988 7400 / E-mail: Parts@clarkeinternational.com or Service@clarkeinternational.com...
Need help?
Do you have a question about the EASIARC 200 and is the answer not in the manual?
Questions and answers