Advertisement
Available languages
Available languages
Quick Links
Advertisement

Related Manuals for Thermalright MACHO 120 SBM


Summary of Contents for Thermalright MACHO 120 SBM
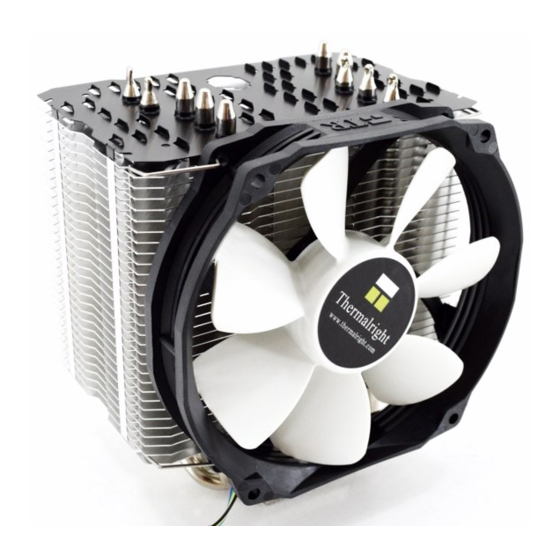
- Page 1 Thermalright MACHO 120 SBM...
- Page 3 Assembly package MACHO 120 SBM × 4 × 1 × 4 × 8 × 7 × 4 × 4 × 5 × 1 × 1 Chill Factor × 1 × 4 × 1 × 1...
- Page 4 MACHO 120 SBM Intel 775/1150/1151/1155/1156/1366 Exploded View Important! Before proceeding with installation, please check for the most up-to-date instructions at www.thermalright.com Heatsink Body Fan Clip Rubber Tubes TY-127 M3L6 Screw Anchoring Mount Mounting Plate Screw Nut Motherboard Intel Washer Mylar Film...
- Page 5 Component Chill Factor Macho 120 SBM Anchoring Mount ×1 Metal Back Plate ×1 Heatsink Body ×1 LGA2011 Type B Mounting Plate ×1 Screw Nut ×4 Screw Pillars x4 M3 L10 Screw ×5 M3 L6 Screw ×7 Intel Washer (small) ×4 AMD Washer (big) ×4...
- Page 6 Installation Instructions: Step 1: 1150 1366 1151 1155 1156 Step 1 : Backplate Installation Choose the platform (775/1150/1151/1155/1156/1366) you are in use. Make four M3L10 Screw Pillars go through the Metal Back Plate and the Mylar film from bottom towards top. And then place the Metal Back Plate on the table.
- Page 7 (bending part) fall into the gap between the first and second fin (as shown in the diagram).hNow do the same for the other fan clip on the other side of the TY-127 fan. The Ultimate Cooling Solutions! www.thermalright.com...
- Page 8 MACHO 120 SBM Intel 2011/2011-3/2066 Exploded View Important! Before proceeding with installation, please check for the most up-to-date instructions at www.thermalright.com Heatsink Body Fan Clip Rubber Tubes TY-127 M3L6 Screw Anchoring Mount Mounting Plate LGA2011 Type B Screw Pillars Motherboard...
- Page 9 Component Chill Factor Macho 120 SBM Anchoring Mount ×1 Metal Back Plate ×1 Heatsink Body ×1 LGA2011 Type B Mounting Plate ×1 Screw Nut ×4 Screw Pillars x4 M3 L10 Screw ×5 M3 L6 Screw ×7 Intel Washer (small) ×4 AMD Washer (big) ×4...
-
Page 10: Heatsink
Installation Instructions: Step 1: Step 1 : Screw Pillar Installation Place the motherboard (the processor installed) on top of the desk or a workbench. Fix the four included LGA2011 Type B Screw Pillars into the heat-sink studs on the Intel ILM Assembly Frame around the processor socket in a criss-cross pattern. -
Page 11: Rubber
(bending part) fall into the gap between the first and second fin (as shown in the diagram).hNow do the same for the other fan clip on the other side of the TY-127 fan. The Ultimate Cooling Solutions! www.thermalright.com... -
Page 12: Mylar
MACHO 120 SBM AM2/AM2+/AM3/AM3+/AM4/FM1/FM2/FM2+ Exploded View Important! Before proceeding with installation, please check for the most up-to-date instructions at www.thermalright.com Heatsink Body Fan Clip Rubber Tubes TY-127 M3L6 Screw Anchoring Mount Mounting Plate Screw Nut Motherboard AMD Washer (big) Back Plate Cap... -
Page 13: Backplate
Component Chill Factor Macho 120 SBM Anchoring Mount ×1 Metal Back Plate ×1 Heatsink Body ×1 LGA2011 Type B Mounting Plate ×1 Screw Nut ×4 Screw Pillars x4 M3 L10 Screw ×5 M3 L6 Screw ×7 Intel Washer (small) ×4 AMD Washer (big) ×4... - Page 14 Installation Instructions: Step 1: Step 1 : Backplate Installation Choose the platform AMD AM3/AM4 you are in use. Make four M3L10 Screw Pillars go through the Metal Back Plate and the Mylar film from bottom towards top. And then place the Metal Back Plate on the table.
- Page 15 (bending part) fall into the gap between the first and second fin (as shown in the diagram).hNow do the same for the other fan clip on the other side of the TY-127 fan. The Ultimate Cooling Solutions! www.thermalright.com...
- Page 16 MACHO 120 SBM Intel 775/1150/1151/1155/1156/1366 Explosionszeichnung Wichtig! Bitte prüfen Sie vor der Montage, ob für Ihren Kühler aktualisierte www.thermalright.com verfügbar sind. Montagehinweise auf der Webseite: Kühlkörper Lüfterklammer Rubber Tubes TY-127 M3L6 Schraube Montagerahmen Befestigungsplatte Rändelschraube Mainboard Intel Unterlegscheiben Leitschutzfolie (klein)
- Page 17 Komponenten Chill Factor Mulit Plattform Macho 120 SBM Montagerahmen ×1 Backplate ×1 Kühlkörper ×1 LGA2011 Type B Befestigungsplatte ×1 Rändelschrauben ×4 Adapterschrauben x4 Intel Unterlegscheibe M3 L10 Schraube ×5 M3 L6 Schraube ×7 (klein) ×4 AMD Unterlegscheibe Rubber Tubes ×8 Backplateeinsatz ×1...
- Page 18 Installationsanleitung: Schritt 1: 1150 1366 1151 1155 1156 Achten Sie auf die entsprechenden Intel Sockel (775/1150/1151/1155/1156/1366) vorgesehene Bohrungen in der Multi Plattform Backplate. Führen Sie die M3L10 Schrauben jeweils von unten durch die Backplate und die mitgelieferte Leitschutzfolie und legen dann die Backplate auf den Tisch.
- Page 19 Haken Sie nun die Lüfterklammer in den prüfen Sie die ordnungsgemäße Funktion vor Lüfterklammerschlitz des Kühlkörpers ein. Stellen Inbetriebnahme Ihres PC. Sie sicher, dass beide Enden der Lüfterklammer zwischen der ersten und zweiten Rippe des Kühlkörpers sitzen. The Ultimate Cooling Solutions! www.thermalright.com...
- Page 20 MACHO 120 SBM Intel 2011/2011-3/2066 Explosionszeichnung Wichtig! Bitte prüfen Sie vor der Montage, ob für Ihren Kühler aktualisierte www.thermalright.com verfügbar sind. Montagehinweise auf der Webseite: Kühlkörper Lüfterklammer Rubber Tubes TY-127 M3L6 Schraube Befestigungsplatte Montagerahmen LGA2011 Type B Adapterschraube Mainboard...
- Page 21 Komponenten Chill Factor Mulit Plattform Macho 120 SBM Montagerahmen ×1 Backplate ×1 Kühlkörper ×1 LGA2011 Type B Befestigungsplatte ×1 Rändelschrauben ×4 Adapterschrauben x4 Intel Unterlegscheibe M3 L10 Schraube ×5 M3 L6 Schraube ×7 (klein) ×4 AMD Unterlegscheibe Rubber Tubes ×8 Backplateeinsatz ×1...
- Page 22 Installationsanleitung: Schritt 1: Schrauben Sie die vier LGA2011 Type B Adapterschrauben in die Gewinde des Montagerahmens, der sich um den Prozessorsockel befindet. Schritt 2: Setzen Sie den Montagerahmen auf die Rändelschrauben. Verwenden Sie die vier M3L6 Schrauben, um den Montagerahmen auf den Rändelschrauben zu befestigen.
- Page 23 Lüfters. Haken Sie nun die Lüfterklammer in prüfen Sie die ordnungsgemäße Funktion vor den Lüfterklammerschlitz des Kühlkörpers ein. Inbetriebnahme Ihres PC. Stellen Sie sicher, dass beide Enden der Lüfterklammer zwischen der ersten und zweiten Rippe des Kühlkörpes sitzen. The Ultimate Cooling Solutions! www.thermalright.com...
- Page 24 MACHO 120 SBM AM2/AM2+/AM3/AM3+/AM4/FM1/FM2/FM2+ Explosionszeichnung Wichtig! Bitte prüfen Sie vor der Montage, ob für Ihren Kühler aktualisierte www.thermalright.com verfügbar sind. Montagehinweise auf der Webseite: Kühlkörper Lüfterklammer Rubber Tubes TY-127 M3L6 Schraube Montagerahmen Befestigungsplatte Rändelschraube Mainboard AMD Unterlegscheibe (groß) Leitschutzfolie Multi Platform Backplate...
- Page 25 Komponenten Chill Factor Mulit Plattform Macho 120 SBM Montagerahmen ×1 Backplate ×1 Kühlkörper ×1 LGA2011 Type B Befestigungsplatte ×1 Rändelschrauben ×4 Adapterschrauben x4 Intel Unterlegscheibe M3 L10 Schraube ×5 M3 L6 Schraube ×7 (klein) ×4 AMD Unterlegscheibe Rubber Tubes ×8 Backplateeinsatz ×1...
- Page 26 Installationsanleitung: Schritt 1: Achten Sie auf die für den AMD AM3/AM4 Sockel vorgesehene Bohrungen in der Multi Plattform Backplate. Führen Sie die vier M3L10 Schrauben jeweils von unten durch die Backplate und die mitgelieferte Leitschutzfolie und legen dann die Backplate auf den Tisch. Legen Sie die vier Unterlegscheiben (für AMD) über die hervorstehenden Gewinde.
- Page 27 Lüfters. Haken Sie nun die Lüfterklammer in prüfen Sie die ordnungsgemäße Funktion vor den Lüfterklammerschlitz des Kühlkörpers ein. Inbetriebnahme Ihres PC. Stellen Sie sicher, dass beide Enden der Lüfterklammer zwischen der ersten und zweiten Rippe des Kühlkörpers sitzen. The Ultimate Cooling Solutions! www.thermalright.com...
- Page 28 MACHO 120 SBM Intel 775/1150/1151/1155/1156/1366 爆炸圖 注意 ! 在您安裝前請先至官網首頁查看是否有更新版安裝指南 www.thermalright.com 散熱器本體 風扇線扣 橡膠管 TY-127 M3L6 螺絲 固定框 壓板 手轉螺絲 主機板 Intel 墊片 ( 小 ) 塑膠絕緣片 鐵背板 M3L10 螺絲 孔蓋...
- Page 29 手轉螺絲 x4 M3L10 螺絲 ×5 M3L6 螺絲 ×7 Intel 墊片 ( 小 ) x 4 AMD 墊片 ( 大 ) x4 橡膠管 x 8 孔蓋 x 1 風扇線扣 ×4 導熱膏 ×1 十字起子 ×1 塑膠絕緣片 ×1 TY-127×1 The Ultimate Cooling Solutions! www.thermalright.com...
- Page 30 安裝指南 : 步驟一 : 1150 1366 1151 1155 1156 步驟一 : 依照您的處理器類型 ( 775/1150/1151/1155/1156/1366 ) 選擇對應於背板的孔位,將四根 M3L10 螺絲穿 過背板及塑膠絕緣片後套上 Intel 墊圈 ( 小 )。 步驟二 : 步驟二 : 注意 ! 當您安裝於 775 主機板時,請先將 775 背蓋安裝於背板上。 步驟三 : 步驟三 : 將背板安裝於主機板背面,再依序將穿過主機板的四個螺絲套上手轉螺絲。...
- Page 31 步驟六 : 步驟七 : 將四個黑色橡膠管放入鰭片的四個凹痕裡,散 用附贈的長頸螺絲起子穿 熱器主體置放於中央處理器上,讓銅底完全覆 過散熱器中間的孔,可以 蓋中央處理器,再將壓板放置散熱器鋁蓋上, 更方便使 M3L6 螺絲安裝 最後將 M3L6 螺絲鎖上壓板兩端。 置壓板上。 步驟八 : 步驟九 : 步驟八 : 步驟九 : 將風扇線扣卡置散熱器主體兩側的凹痕裡,再 最後將風扇接頭插入主板上的 CPU FAN 插槽, 將風扇平貼於散熱器上,並將風扇線扣扣置風 安裝完成。 扇螺絲固定孔。 ( 線扣上下兩端需卡置於第一片與第二片的散熱 片之間,如上圖圖示 ) The Ultimate Cooling Solutions! www.thermalright.com...
- Page 32 MACHO 120 SBM Intel 2011/2011-3/2066 爆炸圖 注意 ! 在您安裝前請先至官網首頁查看是否有更新版安裝指南 www.thermalright.com 散熱器本體 風扇線扣 橡膠管 TY-127 M3L6 螺絲 壓板 固定框 LGA2011 手轉螺絲 主機板...
- Page 33 手轉螺絲 x4 M3L10 螺絲 ×5 M3L6 螺絲 ×7 Intel 墊片 ( 小 ) x 4 AMD 墊片 ( 大 ) x4 橡膠管 x 8 孔蓋 x 1 風扇線扣 ×4 導熱膏 ×1 十字起子 ×1 塑膠絕緣片 ×1 TY-127×1 The Ultimate Cooling Solutions! www.thermalright.com...
- Page 34 安裝指南 : 步驟一 : 步驟一 : 將 LGA2011 手轉螺絲依序轉上中央處理器周圍的四個螺絲孔位。 步驟二 : 步驟二 : 將固定框置於手轉螺絲上,再將 M3L6 螺絲穿過固定框,依序鎖入手轉螺絲上。 步驟三 : 步驟三 : 塗抹導熱膏於散熱器熱導管及中央處理器銅蓋上。...
- Page 35 步驟四 : 步驟五 : 將四個黑色橡膠管放入鰭片的四個凹痕裡,散 用附贈的長頸螺絲起子穿 熱器主體置放於中央處理器上,讓銅底完全覆 過散熱器中間的孔,可以 蓋中央處理器,再將壓板放置散熱器鋁蓋上, 更方便使 M3L6 螺絲安裝 最後將 M3L6 螺絲鎖上壓板兩端。 置壓板上。 步驟六 : 步驟七 : 步驟六 : 步驟七 : 將風扇線扣卡置散熱器主體兩側的凹痕裡,再 最後將風扇接頭插入主板上的 CPU FAN 插槽, 將風扇平貼於散熱器上,並將風扇線扣扣置風 安裝完成。 扇螺絲固定孔。 ( 線扣上下兩端需卡置於第一片與第二片的散熱 片之間,如上圖圖示 ) The Ultimate Cooling Solutions! www.thermalright.com...
- Page 36 MACHO 120 SBM AM2/AM2+/AM3/AM3+/AM4/FM1/FM2/FM2+ 爆炸圖 注意 ! 在您安裝前請先至官網首頁查看是否有更新版安裝指南 www.thermalright.com 散熱器本體 風扇線扣 橡膠管 TY-127 M3L6 螺絲 固定框 壓板 手轉螺絲 主機板 AMD 墊片 ( 大 ) 孔蓋 塑膠絕緣片 鐵背板 M3L10 螺絲...
- Page 37 手轉螺絲 x4 M3L10 螺絲 ×5 M3L6 螺絲 ×7 Intel 墊片 ( 小 ) x 4 AMD 墊片 ( 大 ) x4 橡膠管 x 8 孔蓋 x 1 風扇線扣 ×4 導熱膏 ×1 十字起子 ×1 塑膠絕緣片 ×1 TY-127×1 The Ultimate Cooling Solutions! www.thermalright.com...
- Page 38 安裝指南 : 步驟一 : 步驟一 : 依照您的處理器類型選擇對應於背板的孔位,將四根 M3L10 螺絲穿過背板及塑膠絕緣片後套上 AMD 墊圈 ( 大 )。 步驟二 : 步驟二 : 注意 ! 當您安裝於 939 主機板時,請先將 939 背蓋安裝於背板上。 步驟三 : 步驟三 : 將背板安裝於主機板背面,再依序將穿過主機板的四個螺絲套上手轉螺絲。...
- Page 39 步驟六 : 步驟七 : 將四個黑色橡膠管放入鰭片的四個凹痕裡,散 用附贈的長頸螺絲起子穿 熱器主體置放於中央處理器上,讓銅底完全覆 過散熱器中間的孔,可以 蓋中央處理器,再將壓板放置散熱器鋁蓋上, 更方便使 M3L6 螺絲安裝 最後將 M3L6 螺絲鎖上壓板兩端。 置壓板上。 步驟八 : 步驟九 : 步驟八 : 步驟九 : 將風扇線扣卡置散熱器主體兩側的凹痕裡,再 最後將風扇接頭插入主板上的 CPU FAN 插槽, 將風扇平貼於散熱器上,並將風扇線扣扣置風 安裝完成。 扇螺絲固定孔。 ( 線扣上下兩端需卡置於第一片與第二片的散熱 片之間,如上圖圖示 ) The Ultimate Cooling Solutions! www.thermalright.com...
- Page 40 MACHO 120 SBM Technical Spec Heatsink Specifications: Dimension: Length 130mm x Width 86mm x Height 150mm Weight: 560g (Heatsink only) Heatpipe: 6mm heatpipe*5 units Copper Base: C1100 Pure copper nickel plated Fan Specification: Dimension: L130mm x H120mm x W25mm Weight: 130g Fan speed: 300~1300RPM (PWM controlled) Fan noise: 21 ~ 33 dBA MAX (Test distance 1.0M)
- Page 41 MACHO 120 SBM Technische Spezifikationen Kühlkörper Spezifikationen: Maße: Länge 130 mm x Breite 86 mm x Höhe 150 mm Gewicht: 560 g Heatpipe: 6 mm Heatpipe*5 Stück Kupfergrundplatte: C1100 Reines Kupfer vernickelt Lüfter Spezifikationen: Maße (mm): L130 x H120 x B25...
- Page 42 MACHO 120 SBM 散熱器規格書 散熱器規格 : 尺寸 : 長 130mm x 寬 86mm x 高 150mm 重量 : 560 克 熱導管 : 6mm 熱導管 *5 支 銅底 :C1100 純銅底座鍍鎳處理 風扇規格 : 尺寸 : 長 130mm x 高 120mm x 寬 25mm 重量...
- Page 43 42.55 The Ultimate Cooling Solutions! www.thermalright.com...
- Page 45 The Ultimate Cooling Solutions! Thermalright Produkte werden in www.thermalright.com Europa importiert und vertrieben durch die: TEL: +886-2-2915-5005 PC-Cooling GmbH FAX: +886-2-2915-5123 Eichenallee 3 EMAIL: sales@thermalright.com 24589 Nortorf 170612...
Need help?
Do you have a question about the MACHO 120 SBM and is the answer not in the manual?
Questions and answers