
Related Manuals for Avipas AV-3104IP


Summary of Contents for Avipas AV-3104IP
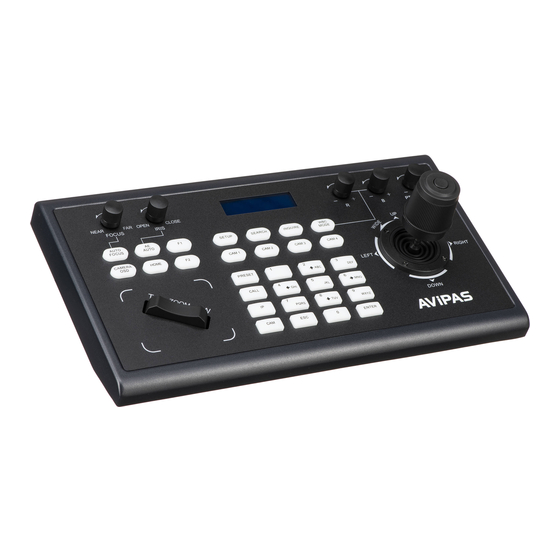
- Page 1 Model: AV-3104IP IP Joystick Keyboard Controller User Manual V1.0 (English) Please read this user manual thoroughly before using. www.avipas.com...
-
Page 2: Table Of Contents
Contents 1. Brief Introduction……………………………………………………………………………………………..…2 1.1 Notice…………………………………...…………………………...……………………………….……..….2 1.2 Functions and Features…………………………………….………………....……………………….…2 1.3 Items Included…………………………………...……...…………...……………………………….……..….2 1.4 Wiring Diagram…………………………………...……...…………...…………..………………….……..….2 1.5 Technical Specifications………….……………...……...…………...……………………………….……..….3 2. Interface Illustrations…………………………………………………………….……………………….…….…4 2.1 Keyboard Buttons…………………………………………………………….……………………….….….…4 2.2 Rocker Switch and Knobs…………………………………………………….……………………….….….…5 2.3 Joystick Control……………………………………………………………….……………………….….….…5 2.4 Back Panel Interfaces…………………………………………………….…………………………….….….…5 3. Controller Settings………………………….………………………..………..………………………..……..…….6 3.1 Basic Setups…………………..………………………………………………..……………………….……..6 3.2 VISCA &... -
Page 3: Brief Introduction
1.1 Notice Please read this manual thoroughly before use, and keep it handy for future reference. ● Do not use or store AV-3104IP in an environment where the product is exposed to rainwater, ● moisture vapor, salty water, oil, etc. -
Page 4: Technical Specifications
For example: If your camera is set to 192.168.1.123, the keyboard should be set to 192.168.1.xxx. Keep the first 3 sections the same. The default setting of AV-3104IP controller is obtaining IP address dynamically. 1.5 Technical Specifications Joystick 3D 4-dimension joystick (up, down, left, right, zoom) control... -
Page 5: Interface Illustrations
2. Interface Illustrations 2.1 Keyboard Buttons 【AUTO FOCUS】 Set the camera to auto focus mode with this button. It will light up when camera is in manual focus mode. 【AE AUTO】 Set the camera to auto aperture mode with this button. It will light up when camera is in manual aperture mode. -
Page 6: Rocker Switch And Knobs
2.2 Rocker Switch and Knob 【NEAR】 【FAR】Manually adjust the focal length. 【OPEN】 【CLOSE】Manually adjust the aperture, OPEN(Aperture +)/CLOSE(Aperture -) 【R-】 【R+】Manually adjust the Red Gain 【B-】 【B+】Manually adjust the Blue Gain 【PTZ SPEED-】 【PTZ SPEED+】Adjust PTZ Speed, 1 (Slow)- 8(Fast) 【T-ZOOM-W】Zoom Tele and Zoom Wide. -
Page 7: Controller Settings
Controller Setup 3.1 Basic Settings Move the joystick up and down for 1, 2, and 3 settings; Move the joystick left and right to turn on and off the button sound; Confirm with ENTER button. (1) Network type: dynamic and static (2) Button sound prompt: on and off (3) Language setting: Chinese and English (4) Mode: VISCA, IP VISCA, ONVIF, PELCO... -
Page 8: Connections And Control
4. Connections and Control 4.1 ONVIF Mode To add a new network (LAN) device to the PTZ controller: • After the controller obtains its IP address, press【SEARCH】button; • All available ONVIF devices within the LAN will be displayed on the screen when search process is complete;... -
Page 9: Lan Settings
There’re 3 sections on the Home page: Search Device List (green); Added Device List (blue) or Manually Add (yellow); Device Details (orange). • Click【Search】button to find ONVIF devices within the LAN, which will appear in the green area automatically. • To add a device, select the device in the "Search Device List", and click 【Add】. -
Page 10: Upgrade
Static address: When users need to manually set the network, change the Network Type to Static Address. Input the network segment information. Dynamic address (default): the controller will automatically acquire IP address from the router. 5.3 Upgrade The upgrade function is applied when maintenance or update is needed. Choose the upgrade file and click【Start】to initial the process. -
Page 11: Range Of Warranty
6.2 Range of Warranty AViPAS warrants its new product against defects in materials and workmanship for a period of ONE (1) YEAR ● from the date of original invoice. Within three months after the 1-year warranty, if the product is noticed to have the same malfunction as before ●... - Page 12 Product specifications and information which were referred to in this document are for reference only. We may alter the content at any time and without prior notice. Ver 2019-7-11 (EN) Contact Details: AViPAS, Inc. Address: 4320 Stevens Creek Blvd. Suite 227 San Jose, CA 95129 Phone: 1-844-228-4727...
Need help?
Do you have a question about the AV-3104IP and is the answer not in the manual?
Questions and answers