Roksan Audio Caspian Manual
Hide thumbs
Also See for Caspian:
- User manual ,
- Set up manual and product manual (20 pages) ,
- Manual (17 pages)

Related Manuals for Roksan Audio Caspian


Summary of Contents for Roksan Audio Caspian
- Page 1 Caspian Integrated Amplifier MANUAL...
- Page 2 This amplifier is designed and manufactured to the highest specification and rigorously tested to offer you many years of trouble-free pleasure. Your Caspian Integrated Amplifier is the heart of your hi-fi system. Its correct installation, set-up and operation will have a profound influence on the sonic performance of the entire hi-fi instal- lation.
-
Page 3: Maintenance
Caspian Integrated Amplifier Manual UNPACKING Included in the packing of your Caspian Integrated Amplifier you will find: One mains lead fitted with the correct mains power plug for your country One Roksan CR7 system remote handset and CR2032 battery One information pack and warranty card After removing these items please retain all packing materials. -
Page 4: Ac Mains Supply
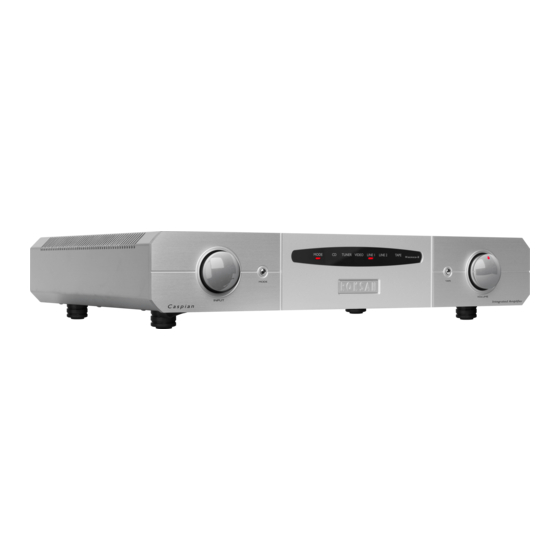
Manual AC MAINS SUPPLY Your Caspian Integrated Amplifier is set to operate from a fixed supply voltage which is marked on a label next to the mains input plug. Before connecting the mains lead please check that your mains supply corresponds to this label as below:... - Page 5 Caspian Integrated Amplifier Manual CASPIAN INTEGRATED AMPLIFIER - FRONT PANEL VIEW 3 4 5 6 7 8 9 1. Input Selector 7. Line 1 Input Indicator 2. Mode Button 8. Line 2 Input Indicator 3. Mode Indicator 9. Tape Monitor Indicator 4.
- Page 6 Caspian Integrated Amplifier Manual CASPIAN INTEGRATED AMPLIFIER - REAR PANEL VIEW 2 3 4 5 6 7 8 910 14 15 1. CD Input (RCA or balanced XLR; selectable 9. PRE 1 Output (Multi-Amping or Subwoofer) with Switch 1a) 10. POWER AMP Input (Requires internal work 2.
-
Page 7: Connecting Mains Power
SIGNAL CONNECTIONS Signal Input connections: There are five Inputs (1 – 5) on your Caspian Integrated Amplifier in addition to the Tape Input (6). All these inputs are line level inputs and will accept virtually all currently available source compo- nents. -
Page 8: Loudspeaker Connections
Caspian Integrated Amplifier Manual LOUDSPEAKER CONNECTIONS The right and left loudspeakers are connected to the amplifier via the rear panel binding posts (11) and (12) respectively. There are two basic types of cable – Figure 8 cable has two insulated conductors which lie parallel, either side by side, or spaced by insulation. - Page 9 Caspian Integrated Amplifier Manual MULTI-WIRING AND MULTI-AMPING If the Loudspeakers utilise more than one drive unit with individual input terminals, for example a Tweeter and a Woofer, then the loudspeaker performance will benefit from Bi-Amping. Dedicat- ing one amplifier to the Tweeter and another to the Woofer isolates them from each other reduc- ing distortion and increasing reserved power.
- Page 10 Please note the remote handset MODE button only activates/de-activates -20dB Mute (see be- low) Once the Caspian is On the MODE indicator light (3) will glow RED. The amplifier will automati- cally select the CD input and the CD input indicator light (4) will glow.
-
Page 11: Using The Controls
When you select an input source, the INPUT Selector connects the selected source to the ampli- fier and connects this source to the Tape Output Sockets of the Caspian thus enabling you to record. -
Page 12: Remote Handset
Caspian Integrated Amplifier Manual REMOTE HANDSET The Caspian Integrated Amplifier is supplied with Roksan’s CR7 remote control handset. Carefully remove the battery compartment cover which is secured with a small screw and insert the battery in place observing polarity. Replace the cover and screw. -
Page 13: Troubleshooting
Manual TROUBLESHOOTING If you suspect that your ROKSAN Caspian Integrated Amplifier is not operating properly, you should check all the connections carefully. Pay particular attention to speaker phasing and chan- nel connections. Phono plugs should be fully inserted- a frequent cause of problems is that Phono plug surrounds do not make proper contact. - Page 14 Caspian Integrated Amplifier Manual GUARANTEE There are no user-serviceable parts inside your Caspian M2 Integrated Amplifier. If a fault should develope, refer any servicing to your appointed ROKSAN dealer, distributor or ROKSAN ap- proved service agent. Your ROKSAN Caspian Integrated Amplifier is guaranteed against any defect in materials and workmanship for a period of five years from the date of purchase.
-
Page 15: Specifications
Caspian Integrated Amplifier Manual SPECIFICATIONS Inputs 5 Line & Tape RCA Gold plated CD Input also switchable to XLR Balanced Gold plated Input Impedance 47 kΩ Input Sensitivity (85W) Line 240mV Outputs Gold plated RCA Tape & 2 Preamplifier Output Voltage... - Page 16 Roksan Audio Monitor Audio Limited 24 Brook Road Rayleigh Essex SS6 7XJ +44 (0)1268 740580 info@roksan.co.uk www.roksan.co.uk V2.05, May 2018...
Need help?
Do you have a question about the Caspian and is the answer not in the manual?
Questions and answers