
Subscribe to Our Youtube Channel
Related Manuals for DI BLASI R30


Summary of Contents for DI BLASI R30
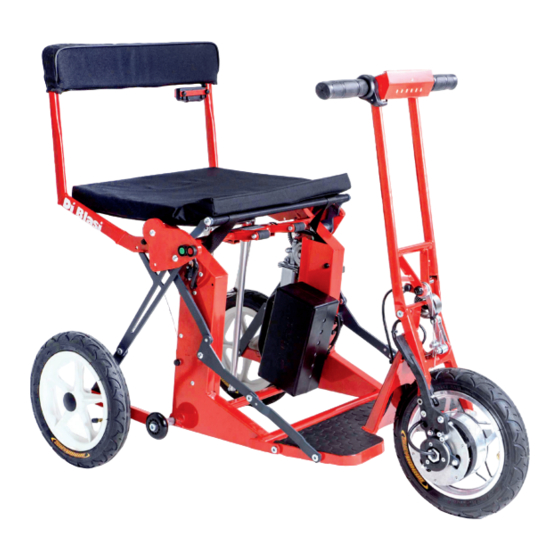
- Page 1 SCOOTER PIEGHEVOLE Mod. R30 Manuale per l’uso FOLDING SCOOTER Owner’s manual KLAPPROLLER Bedienungshandbuch SCOOTER PLIABLE Manuel d’utilisation SCOOTER PLEGABLE Manual de uso OPKLAPBARE SCOOTMOBIEL Gebruikshandleiding...
-
Page 2: Caratteristiche Tecniche
AVERTISSEMENTS GENERALS POUR LA SEGURIDAD SICUREZZA SECURITE • Antes de conducir el scooter DI BLASI, lea • Prima di condurre lo scooter DI BLASI, leg- • Avant de conduire le scooter DI BLASI, li- atentamente las instrucciones que se dan gete attentamente le istruzioni contenute in sez avec attention ce Manuel d’Utilisation de... - Page 3 GENERAL SAFETY WARNINGS ALLGEMEINE SICHERHEITSHINWEISE ALGEMENE WAARSCHUWINGEN VOOR • Before operating the Di Blasi scooter, care- • Vor Gebrauch des Rollers DI BLASI lesen Sie DE VEILIGHEID fully read this manual in order to avoid any bitte dieses Bedienungshandbuch sorgfäl- • Lees de aanwijzingen in deze handleiding...
- Page 4 • Cuando envíe o transporte el scooter en otro • Per spedire o trasportare lo scooter su altro • Pour expédier ou transporter le scooter sur vehículo, quite siempre la batería y cubra las mezzo, rimuovete sempre la batteria e coprite autres véhicules, enlevez la batterie et pro- terminales de la misma [indicadas con (C) en i terminali della stessa [indicati con (C) in tégez les bornes [indiqués comme (C) in (F.40) para evitar el peligro de cortocircuito (F.40)] per evitare il pericolo di cortocircuito (F.40)] pour éviter des court circuits. accidental. accidentale. Contactez votre transporteur pour connaître Contacte al transportista para informarse de Contattate il trasportatore per conoscere mo- modalités et éventuelles limitations pour ex- los modos y posibles limitaciones para la ex- dalità ed eventuali limitazioni per la spedi- pédier la batterie lithium-fer montée sur le pedición de la batería de litio-hierro con que zione della batteria al litio-ferro che equipag-...
- Page 5 • When shipping or carrying the scooter on • Bei Versand oder Transport des Rollers auf • Om de scootmobiel te verzenden of op een other vehicles, remove the battery and pro- anderen Fahrzeugen entfernen Sie die Bat- ander vervoersmiddel te transporteren, moet tect the terminals [marked (C) in (F.40)] terie vom Roller und schützen Sie die An- de accu worden verwijderd en moeten de against short circuits. To clarify any procedu-...
- Page 6 AVVERTENZE PER LA SICUREZZA NELLA AVERTISSEMENTS POUR CONDUIRE EN ADVERTENCIAS PARA LA SEGURIDAD EN GUIDA SECURITE CONDUCCIÓN • Rispettate scrupolosamente le norme di cir- • Respectez scrupuleusement les règles de la • Respetar escrupulosamente las normas de colazione stradale e le norme di prudenza. circulation routière et des piétons et les no- circulación por carretera y las normas de Fate attenzione ai veicoli motorizzati.
- Page 7 HINWEISE ZUR FAHRSICHERHEIT WAARSCHUWINGEN VOOR DE DRIVING SAFETY WARNINGS • Halten Sie sich an alle Verkehrsregeln und VEILIGHEID BIJ HET RIJDEN • Obey all traffic rules and drive with caution, fahren Sie umsichtig. Achten Sie insbesonde- • Neem de verkeersregels en de veiligheidsbe- paying attention to other vehicles and pede- re auf Kraftfahrzeuge.
- Page 8 SUGGERIMENTI CONSEILS SUGERENCIAS • Conservate l’imballaggio dello scooter: esso • Conservez l’ e mballage du scooter: il pourra • Conserve el embalaje del scooter: podrá ser potrà esse utile per spedire lo scooter, per vous être utile pour expédier le scooter, par útil, por ejemplo, para enviarlo a los centros esempio a centri di servizio. exemple au centre de service. de servicio. • Nelle comunicazioni al venditore riguardanti • Dans toute communication au vendeur à • En las comunicaciones al vendedor acerca lo scooter, precisate il numero di telaio, mar- l’...
- Page 9 EMPFEHLUNGEN ADVIEZEN SUGGESTIONS • Bewahren Sie die Verpackung für spätere • Bewaar de verpakking van de scootmobiel: • Save the packaging/box in case it is required Transporte des Rollers zu Inspektionen oder deze kan nuttig zijn om de scootmobiel te for any future shipments of the scooter, for zur Werkstatt auf.
- Page 10 INDICE INDEX ÍNDICE Avvisatore acustico 4.3 (k) Avertisseur sonore 4.3 (k) Señalizador acústic 4.3 (k) Batteria: caricare 4.5.2 Batterie : charge 4.5.2 Batería: cargar 4.5.2 Batteria: avvertenze importanti 4.5.3 Batterie : avertissements 4.5.3 Batería: advertencias importantes 4.5.3 Caricabatteria: avvertenze per l’uso 4.5.4 Chargeur : avertissements pour l’usage 4.5.4 Características técnicas...
- Page 11 INDEX INDEX INHOUD Automatic brake 4.3 (g) Aufklappen des Rollers Claxon 4.3 (k) Battery & charger (automatisch oder manuell) Accu: opladen 4.5.2 Battery & charger description 4.5.1 Batterie: Aufladen 4.5.2 Accu: belangrijke waarschuwingen 4.5.3 Battery: cautions 4.5.3 Batterie : Vorsichtshinweise 4.5.3 Technische kenmerken Battery: charging...
-
Page 12: Commandes Du Scooter
1. DISPOSITIVOS DE MANDO DEL 1. DISPOSITIVI DI COMANDO DELLO 1. DISPOSITIFS DE COMMANDE DU SCOOTER SCOOTER SCOOTER • Dispositivos en el manillar (F.20) • Dispositivi al manubrio (F.20) • Dispositifs au guidon (F.20) * (A) Palanca acelerador * (A) Leva acceleratore * (A) Levier accélérateur * (B) Botón para accionar el freno eléctrico * (B) Pulsante per azionare il freno elettrico * (B) Touche pour actionner le frein électri- de emergencia... - Page 13 1. DEVICES FOR CONTROLLING 1. VORRISCHTUNGEN ZUR BEDIENUNG 1. BEDIENINGSELEMENTEN VAN THE SCOOTER DES ROLLERS DE SCOOTMOBIEL • Handlebar devices (F.20) • Vorrichtungen an der Lenkstange (F.20) • Elementen op het stuur (F.20) * (A) Speed control lever * (A) Gashebel * (A) Snelheidshendel * (B) Button for activating the emergency * (B) Knopf zur Aktivierung der Notbremse * (B) Drukknop voor elektrische noodrem electric brake...
- Page 14 2. PER APRIRE LO SCOOTER 2. POUR DEPLIER LE SCOOTER 2. PARA ABRIR EL SCOOTER • Accertarsi che la maniglia per il trascina- • Assurez vous que la poignée pour traîner le • Asegurarse de que la manija para arrastrar el mento dello scooter sia totalmente abbassata scooter soit bien enfoncé vers le bas (F.02) scooter esté completamente baja (F.02). (F.02). • Insérez la batterie et assurez vous qu’ e lle reste • Colocar la batería y asegurarse de que quede • Inserire la batteria e assicurarsi che essa resti bloquée par le crochet (A) (F.03). Un court sujeta con el gancho (A) (F.03). Una breve bloccata dal gancio (A) (F.03). Un breve se- signale sonore (bip) averti que la batterie a...
- Page 15 2. UNFOLDING THE SCOOTER 2. AUFKLAPPEN DES ROLLERS 2. DE SCOOTMOBIEL OPENKLAPPEN • Stellen Sie sicher, dass der Griff zum Ziehen • Controleer of de handgreep voor het slepen AUTOMATICALLY • Check that the handle for pulling the scooter des Rollers vollständig gesenkt wurde (F.02). van de scootmobiel helemaal omlaag staat is fully lowered (F.02). • Installieren Sie die Batterie und stellen Sie (F.02). • Insert the battery and make sure that it re- sicher, dass sie durch den Haken gesichert • Plaats de accu en ga na of deze geblokkeerd mains locked by the hook (A) (F.03). A short...
- Page 16 Para abrir manualmente el scooter Pour déplier manuellement le scooter Per aprire manualmente lo scooter En caso de que el sistema de plegado y apertura Au cas de mauvais fonctionnement du système Nel caso di malfunzionamento del sistema di automáticos del scooter no funcione correcta- de pliage et dépliage automatiques, pliez ou ripiegamento e apertura automatici, ripiegare mente, plegar el scooter o abrirlo manualmente...
- Page 17 Manuelles aufklappen des Rollers Unfolding the scooter manually De scootmobiel met de hand Openklappen Wenn der automatische Klappmechanismus If the automatic folding unfolding mechanism Bij een storing in het automatische in- en des Rollers nicht ordnungsgemäß funktioniert, does not work properly, fold or unfold the sco- openklapsysteem kan de scootmobiel met de klappen Sie den Roller manuell wie folgt auf oter manually, as follows(F.26):...
- Page 18 3. PARA PLEGAR EL SCOOTER 3. PER RIPIEGARE LO SCOOTER 3. POUR PLIER LE SCOOTER • Comprobar que el manillar esté derecho. • Verificare che il manubrio sia dritto. • Vérifiez que le guidon soit droit. • Pulsar el botón rojo en el lado derecho del • Premere il pulsante rosso sul lato destro del • Appuyez sur la touche rouge sur le coté droit asiento hasta escuchar una breve señal sedile finché non si sente un breve segna- du siège jusqu’à ce que un court signal sono- acústica (bip) que indica que el scooter está...
- Page 19 3. FOLDING THE SCOOTER AUTOMATICALLY 3. ZUSAMMENKLAPPEN DES ROLLERS 3. DE SCOOTMOBIEL INKLAPPEN • Ensure the handle bar is straight. • Stellen Sie sicher, dass die Lenkstange gerade • Controleer of het stuur recht is. • Press the red button on the right side of the ist. • Druk op de rode knop aan de rechterkant seat until you hear a short tone (beep) indi- • Halten Sie den roten Knopf auf der rechten van de zitting totdat u een kort geluidssignaal cating that the scooter is fully folded (F10). Seite des Sitzes so lange gedrückt, bis Sie ei- hoort (piep) dat aangeeft dat de scootmobiel WARNING nen kurzen Ton (ein Piepen) hören, womit helemaal dichtgeklapt is (F10).
- Page 20 ATENCIÓN ATTENZIONE ATTENTION • Una vez plegado, el scooter puede ser levan- • Una volta ripiegato lo scooter può essere sol- • Une fois replié le scooter peut être soulevé tado a mano únicamente por personas físi- levato a mano solo da persona o persone che à la main seulement par une personne ou camente capaces de soportar su peso. Para siano fisicamente in grado di sollevare il suo par des personnes qui soient en conditions reducir dicho peso, quitar la batería.
- Page 21 WARNING ACHTUNG LET OP • Once folded, the scooter can be lifted by tho- • Im zusammengeklappten Zustand kann der • Nadat de scootmobiel is ingeklapt kan hij se physically capable of holding its weight. Roller nur von Personen angehoben werden, met de hand door een of meer personen, die In order to reduce this weight, remove the die körperlich zum Heben eines solchen fysiek in staat zijn om het gewicht ervan te battery.
- Page 22 4. MODALITA’ D’USO 4. MODE D’EMPLOI 4. USO DEL SCOOTER 4.1 Prima presa di contatto 4.1 Premier contact 4.1 Primera toma de contacto Prima di condurre lo scooter per la prima Avant de conduire pour la première fois le sco- Antes de conducir el scooter por primera vez volta in una area aperta al traffico pedonale e oter dans une aire publique, mettez vous y en...
- Page 23 4. BEDIENUNGSANLEITUNG 4. GEBRUIKSWIJZE 4. OPERATING INSTRUCTIONS 4.1 Erstes Fahren 4.1 Voordat u gaat rijden 4.1 First riding Bevor Sie sich auf Ihre erste Fahrt in einem für Voordat u de scootmobiel voor het eerst gaat Before taking your first ride in an area where Fußgänger und Fahrzeuge zugänglichen Be- gebruiken op een plaats waar gemotoriseerd there are vehicles and pedestrians, become fa-...
- Page 24 c) Asegurarse de que el conmutador (C) (F.20) c) Assurez vous que le dispositif (C) (F.20) soit esté en posición “adelante”, de modo que el basculé en avant da façon que le scooter soit scooter esté listo para la marcha hacia ade- préparé...
- Page 25 c) Check that the rocker switch (C) (F.20) is c) Controleer of de tuimelschakelaar (C) (F.20) c) Überprüfen Sie, ob der Kipphebel (C) (F.20) pushed upwards so that the scooter is set for naar voren is gezet waardoor de scootmobiel nach vorne zeigt, so dass der Roller auf running forward.
- Page 26 h) Freno di emergenza h) Frein d’urgence h) Freno de emergencia In caso di malfunzionamento del freno En cas de mauvais fonctionnement du frein En caso de problemas de funcionamiento automatico (H) (F.22), premere il pulsante automatique (H) (F.22), appuyez sur le tou- del freno automático (H) (F.22), pulsar el rosso (B) (F.20) che aziona un freno elettri- che rouge (B) (F.20) qui actionne un frein...
- Page 27 h)Emergency brake h) Notbremse h) Noodrem In the case of automatic brake failure (H) Im Falle eines Versagens der automati- In het geval dat de automatische rem (H) (F.22) press the red button (B) (F.20), which schen Bremse (H) (F.22) drücken Sie den niet goed functioneert (F.22), drukt u op will activate an emergency electric brake.
- Page 28 m) Il livello della carica della batteria è indica- m)Le niveau de charge de la batterie est indi- m) El testigo luminoso (LED) del indicador de to dalla posizione della spia luminosa (LED) qué par la position du voyant (LED) allumé carga (G) (F.20) muestra el nivel de carga de nell’indicatore di carica (G) (F.20): se la spia dans l’indicateur de charge (G) (F.20): si le...
- Page 29 m)The level of battery charge is shown by the m) Der Ladezustand der Batterie wird durch m) Het oplaadniveau van de accu wordt aange- position of the lit light (LED) in the charge die Position des Lichtes (LED) an der Lade- geven door het lampje (led) in de oplaadindi- indicator (G) (F.20).
- Page 30 o) Modalità Ruota Libera o) Mode Roue Libre o) Modo rueda libre Per spingere lo scooter a mano, é necessario disin- Pour pousser le scooter à la main, il est nécessai- Para arrastrar el scooter a mano, es necesario desa- serire il freno automatico (H) (F.22) spingendo la re de débrayer le frein automatique (H) (F.22) en coplar el freno automático (H) (F.22) empujando la...
- Page 31 o) Freewheel mode o) Freilaufmodus o) Vrijwielstand To push the scooter by hand, disengage the auto- Zum manuellen Schieben des Rollers muss Om de scootmobiel met de hand te duwen, moet matic brake (H) (F.22) by pushing the lever (M) die automatische Bremse (H) (F.22) durch de automatische rem (H) worden uitgeschakeld back until it is locked in position (m2) by the hook...
- Page 32 4.5 Batteria e Caricabatteria 4.5 Batterie et Chargeur 4.5 Batería y Cargador de baterías 4.5.1 Descrizioni 4.5.1 Description 4.5.1 Descripciones • Contenitore batteria (F.40) • Boite batterie (F.40) • Contenedor de la batería (F.40) * (A) Spina per la carica * (A) Fiche de prise pour la charge * (A) Clavija de carga * (B) Tappo della spina della carica * (B) Bouchon de protection de la prise * (B) Tapón de la clavija de carga * (C) Terminali (+) e (-) della batteria * (C) Terminaux (+) e (-) de la batterie * (C) Terminales (+) y (-) de la batería • Caricabatteria (F. 42)
- Page 33 4.5 Battery & Charger 4.5 Batterie & Ladegerät 4.5 Accu en accuoplader 4.5.1 Description 4.5.1 Beschreibung 4.5.1 Beschrijvingen • Battery box (F.40) • Batteriebox (F.40) • Accuhouder (F.40) * (A) Charging plug * (A) Ladebuchse * (A) Aansluiting voor opladen * (B) Plug protection cap * (B) Schutzkappe des Steckers * (B) Dop van de oplaadaansluiting * (C) Terminals (+) and (-) of the battery * (C) Klemmen (+) und (-) der Batterie * (C) Accuklemmen (+) en (-) • Charger (F.42) • Ladegerät (F.42)
- Page 34 4.5.3 Avvertenze riguardanti la batteria 4.5.3 Avertissementss concernants la batterie 4.5.3 Advertencias en relación con la batería • La batteria è alloggiata nel contenitore mo- • La batterie est logée dans la boite montrée en • La batería se aloja en el contenedor que se strato in F.40 Non aprire mai il contenitore e F.4.5.1. N’ o uvrez jamais la boite et ne démon- muestra en la F.40. No abrir nunca el conte- non manomettere mai la batteria.
- Page 35 4.5.3 Cautions concerning the battery 4.5.3 Vorsichtshinweise zur Batterie 4.5.3 Aanwijzingen met betrekking tot de accu • The battery is stored in the box shown in • Die Batterie befindet sich in der in F.40 abge- • De accu zit in de houder die staat afgebeeld F.40. Never open this box or tamper with the bildeten Box. Öffnen Sie nie die Box und op F.40. Open de houder nooit en maak de battery.
- Page 36 4.5.4 Avvertenze per l’uso del caricabatteria 4.5.4 Avertissements pour l’usage du chargeur 4.5.4 Advertencias para el uso del cargador de baterías • Non utilizzare il caricabatteria per caricare • N’utilisez pas le chargeur pour charger des • No utilizar el cargador para baterías que no sean la montada en el scooter. batterie diverse di quella montata sullo sco- batteries différentes de celle montée dans le • No cubrir el cargador de baterías cuando está fun- oter.
- Page 37 4.5.4 Cautions concerning the use of the charger 4.5.4 Vorsichtshinweise zum Ladegerät 4.5.4 Waarschuwingen voor het gebruik • Do not use the charger to charge batteries • Benutzen Sie das Ladegerät ausschließlich van de accuoplader • Gebruik de accuoplader niet om andere accu’s op other than those fitted in the scooter. zum Laden der zum Roller gehörenden Bat- te laden dan die op de scootmobiel zijn gemonte- • To avoid overheating, do not cover the char- terie.
- Page 38 5. CONTROLLI E REGOLAZIONI 5. CONTROLES ET REGLAGES 5. CONTROLES Y REGULACIONES 5.1 Pneumatici 5.1 Pneus 5.1 Neumáticos La pressione di gonfiaggio dei pneumatici è: La pression de gonflage des pneus est: La presión de inflado de los neumáticos es: • 240 Kpa (2,4 bar) (2,4 atm) (34,8 psi) • 240 Kpa (2,4 bar) (2,4 atm) (34,8 psi) • 240 Kpa (2,4 bar) (2,4 atm) (34,8 psi)
- Page 39 5. CHECKS AND ADJUSTMENTS 5. ÜBERPRÜFUNGEN UND EINSTELLUNGEN 5. CONTROLE EN REGELINGEN 5.1 Tyres 5.1 Reifen 5.1 Banden Tyres inflating pressure is: Die Reifen sollten mit folgendem Druck aufge- De bandenspanning is als volgt: • 240 Kpa (2,4 bar) (2,4 atm) (34,8 psi) pumpt sein: • 240 Kpa (2,4 bar) (2,4 atm) (34,8 psi) While inflating be sure that the rim line of the...
-
Page 40: Mantenimient
(controdado, dadi autobloccanti, blocage (contre-écrou, écrous autobloquants, de bloqueo (contratuerca, tuercas autoblo- liquido frenafiletti...): controllarne il serrag- liquide freinfilets…): contrôlez les et serrez queantes, líquido sellador de roscas...): con- gio. les fermement si nécessaire trolar el apriete. 6.2 Impianto elettrico 6.2 Faisceau éléctrique 6.2 Sistema eléctrico Ved Voir Ver http://diblasi.it/service/R30 http://diblasi.it/service/R30 http://diblasi.it/service/R30... -
Page 41: Maintenance & Repairs
• Alle schroeven hebben een blokkeervoor- devices (lock nuts, self locking nuts, lock wa- vorrichtungen ausgestattet (Kontermuttern, ziening (borgmoer, zelfblokkerende moer, shers, threadlocker liquid, etc), nevertheless selbstsichernde Muttern, Sicherungsschei- schroefdraadborgvloeistof...): controleer of check their tightening periodically. ben, Gewindekleber, usw.), dennoch sollten deze goed zijn aangehaald. sie periodisch überprüft und gegebenenfalls 6.2 Wiring harness nachgezogen werden. 6,2 Elektrisch systeem See Zie 6.2 Kabelbaum http://diblasi.it/service/R30 http://diblasi.it/service/R30 Siehe http://diblasi.it/service/R30... - Page 42 7. CARATTERISTICHE TECNICHE 7. CARACTERISTIQUES TECNIQUES 7. CARACTERÍSTICAS TÉCNICAS • Dimensioni • Dimensions • Medidas * Scooter aperto (F.71) * Scooter déplié (F.71) * Scooter abierto (F.71) - Carreggiata: 55 cm - Voie: 55 cm - Rodada: 55 cm - Larghezza massima: 61,5 cm - Largeur maximum: 61,5 cm - Anchura máxima: 61,5 cm - Passo: 77,5 cm...
-
Page 43: Specifications
7. SPECIFICATIONS 7. TECHNISCHE DATEN 7. TECHNISCHE KENMERKEN • Dimensions • Abmessungen • Afmetingen * Unfolded scooter (F.71) * Aufgeklappter Roller (F.71) * Scootmobiel geopend (F.71) - Wheelbase: 55 cm (21.7 in) - Spurbreite: 55 cm - Spoorbreedte: 55 cm - Maximum width: 61,5 cm (24.2 in) - Maximale Breite: 61,5 cm - Max. - Page 44 F.71 F.74 F.72...
- Page 45 F.75 F.76...
- Page 48 Cod.3037 - Ed. 05.16...
Need help?
Do you have a question about the R30 and is the answer not in the manual?
Questions and answers
have older version scooter and it will not fold down. how to manualyy fold down buggy