Table of Contents
Advertisement
UHD
4 K
A C T I O N
C A M E R A
User Manual
All trademarks are acknowledged as the property of their respective owners. Unless otherwise stated
their use does not imply that the trademark owner is affiliated with Kit or endorses the products herein.
JB. 5257 / KVESUHD / Made in China. © Kitvision 2016
Christchurch, Dorset, BH23 4FL, UK
Advertisement
Table of Contents

Subscribe to Our Youtube Channel
Related Manuals for Kitvision escape


Summary of Contents for Kitvision escape
- Page 1 All trademarks are acknowledged as the property of their respective owners. Unless otherwise stated their use does not imply that the trademark owner is affiliated with Kit or endorses the products herein. JB. 5257 / KVESUHD / Made in China. © Kitvision 2016 Christchurch, Dorset, BH23 4FL, UK...
-
Page 2: Table Of Contents
Be extremely careful since it may result in malfunction. If foreign objects adhere to the inner side of 22 Waterproof case the side door, wipe them off with a dry, lint-free cloth. If any liquid adheres to the camera or inner side 23 Mount accessories of the side door, wipe off with a soft dry cloth. Do not open or close the side door near the water, 28 Specification when underwater, using wet hands, or when the camera is wet, as this may cause water leakage. 30 Care for your Escape UHD Action Camera 31 Troubleshooting... -
Page 3: Box Contents
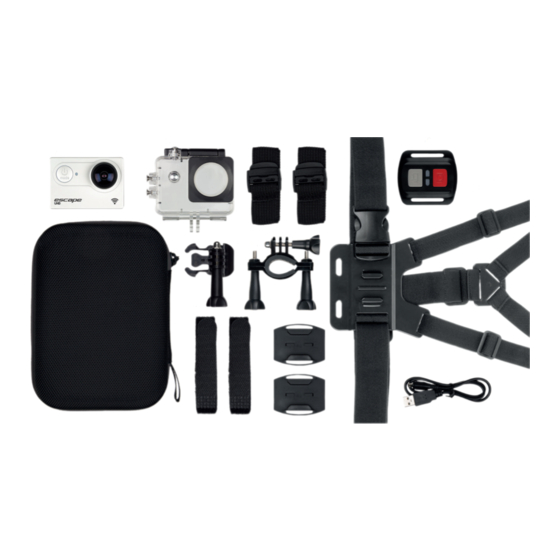
Box contents 1. Kitvision UHD Action Camera Additional accessories: − Action camera to ¼" tripod screw adaptor 2. 30 m waterproof case − Action camera to ¼" tripod thread adaptor 3. Bicycle mount − 90 degree adaptor 4. Mount connector clip − 2 x 3M adhesive pads 5. Mount connector − Remote control strap 6. -
Page 4: Functions
Functions Instructions for use 1. Shutter/Ok Button 9. Charging Indicator Turning power on and off 2. Top Operation Indicator 10. Built-in LCD 1. Long press the Power/Mode Button (3) to turn on the camera. The Top Operation Indicator (2) will illuminate red. 3. - Page 5 Inserting the memory card Changing the mode of the camera The Escape Action Camera doesn’t have any internal memory. To be able to record video or capture The camera has 8 different modes: Video Mode, Photo Mode, Burst Mode, Timed Photo Mode, photos using the camera, you must have your micro SD card inserted. We recommend using a Time Lapse Mode, Video Playback, Photo Viewer and Settings Mode.
- Page 6 Using video mode Using photo mode 1. Turn on the camera and it will start in Video Mode. If in another mode, press the Power/Mode 1. Turn on the camera and press the Power/Mode Button (3) once to select Photo Mode. Button (3) until you reach Video Mode.
- Page 7 Using time lapse mode Using playback mode 1. Turn on the camera and press the Power/Mode Button (3) to enter the Settings Mode. 1. Turn on the camera and press the Up Button (11) and choose Video Playback or Photo Viewer. 2.
-
Page 8: Changing The Camera Settings
Using the remote control Changing the camera settings Controlling video mode General settings Red photo button 1. Make sure the camera is in Video Mode 1. To enter the general settings menu, turn on the camera and press the Power/Mode Button (3) Grey video button 4 times to enter the Settings mode. - Page 9 Time Stamp This function can be used to add a date and time to your videos as you take them Date and Time When Date Stamp is activated you should ensure the date and time are correct. Use the [Off] / [Date] / [Date & Time] Up and Down buttons to select a value and press the Shutter/Ok Button (1) to proceed Exposure Change the exposure of the Video Mode...
-
Page 10: Using Wi-Fi
A ndroid users: Enter the Google Play store™, search for “Ez iCam”, download and install, following • this user manual to connect the Wi-Fi and operate. 5. Open the ‘Ez iCam’ application, the app home screen will open and ‘iCam-Escape UHD’ will i Phone users: Enter the Apple App store™, search for “Ez iCam”, download and install, following • appear in the device list. Press on the device to enter the camera dashboard. If the camera this user manual to connect the Wi-Fi and operate. -
Page 11: Connecting Your Camera
Connecting your camera Connecting the camera to a PC with the USB cable 1. Connect one end of the supplied USB cable to the camera’s micro USB input (6), and the other Connecting the camera to an HDTV end to the PC’s USB port and turn the camera on. 1. -
Page 12: Waterproof Case
Waterproof case Mount accessories The Escape UHD Action Camera includes a case that is waterproof up to 30 metres. When using the In order to use the camera for various outdoor activities, we have provided three different mounts. camera in a wet environment, always use the waterproof case. It is recommended that the case be Mount (A) is used to fix the camera to the handlebars on a bike: •... - Page 13 Mount Assembly (B) uses an adhesive mount to hold the camera and the provided straps • to fix it to a vented helmet Adhesive Mounts (C) are used to mount the camera to flat/curved, smooth surfaces • Fixing the camera to a bike 1. Unscrew both screws (i) and place both halves (ii) of the Bicycle Mount (A) around the desired position of the pole with the rubber grip in between the pole.
- Page 14 Fixing the camera to a vented helmet Fixing the camera to a board/flat surface 1. Fix the camera to the Mount Clip (i). 1. Ensure the surface is clean and dry before applying the adhesive mount. 2. T hread the supplied straps through the slots in a flat or curved Adhesive Mount (don’t remove the 2. Peel off adhesive paper and stick the mount in the desired position.
-
Page 15: Specification
Specification Display 2" Input Ports Micro HDMI, Micro USB 140° ultra wide-angle lens 1050 mAh Lens Battery Capacity [English]/ [Chinese traditional] / [Italian] / [Spanish] / [Portuguese] / 650 mA @ 3.7 V Language Options Power Consumption [German] / [Dutch] / [French] / [Czech] / [Polish] / [Turkish] / Recording Time per Charge up to 90 minutes (based on highest settings) [Russian] / [Japanese] / [Korean]... -
Page 16: Care For Your Escape Uhd Action Camera
Care for your Escape UHD Action Camera Troubleshooting We hope you’ve now got all the information you need to get started, but if you’re having problems Please DON’T: with anything, please feel free to contact us at: support@kitvision.co.uk Get the camera wet, unless sealed in the included waterproof case •...
Need help?
Do you have a question about the escape and is the answer not in the manual?
Questions and answers