
Related Manuals for Cosori C2126-PC


Summary of Contents for Cosori C2126-PC
- Page 1 Electric Pressure Cooker Model No.: C2126-PC COSORI SUPPORT: Mon - Fri 9:00 AM - 5:00 PM PST (888) 402-1684 | support@cosori.com...
- Page 2 THANK YOU. Thank you for purchasing the C2126-PC Electric Pressure Cooker by Cosori. We are dedicated to providing our customers with quality products to live life tastefully. Should you have any questions or concerns about using your new product, feel free to reach out to our helpful Customer Support Team at support@cosori.com.
-
Page 3: Table Of Contents
Table of Contents Safety Information Care And Maintenance Product Diagram Sealing Ring Installation Pressure Cooker Troubleshooting Control Panel Warranty Information Button Controls Customer Support Before First Use Setup Water Test Safely Releasing Pressure Operation Preparing To Cook Preset Cooking Programs Cooking Times Glass Lid Manual Cooking Programs... -
Page 4: Safety Information
Safety Information IMPORTANT SAFEGUARDS Please read, understand, and comply with all the instructions provided in this manual before using the device. Failure to comply with the instructions given in this manual and/or using the device in ways other than the ones mentioned in this manual may result in serious injury and/or damage to the product. - Page 5 • The sealing ring creates a pressure seal between the lid and the pot. Keep the sealing ring completely clean and free from any cracks or deterioration. • DO NOT break the sealing ring. Do not replace it with other sealing rings or use a tension belt to make the pressure cooker seal.
- Page 6 • DO NOT let power cord hang over the edges of tables or counters, or touch hot surfaces. • A short power supply cord is provided to reduce injuries resulting from entanglement and tripping. If an extension cord is used, the electrical rating of the cord must be at least 120V/20A.
-
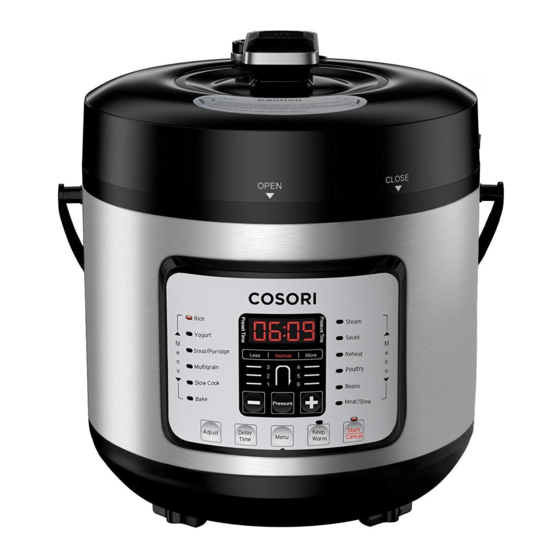
Page 7: Product Diagram
Product Diagram Rice Steam Yogurt Saute Less Normal More Canning Soup/Congee Multigrain Poultry Slow cook Beans Bake Meat/Stew Pressure TasteP re-Set Menu Warm Start/stop CUPm Float valve Sealing ring Pressure release valve 10. Anti-clog filter Pressure release button 11. Measuring cup Inner pot 12. -
Page 8: Control Panel
Control Panel Digital display Adjust button Adjust indicator Delay Time button Pressure level indicator Menu button Pressure button 10. Keep Warm button Decrease value 11. Start/Cancel button Increase value 12. Cooking programs... -
Page 9: Button Controls
Button Controls Starts or cancels any cooking process; also cancels any Start selections that are made. Cancel The warming function keeps food warm for up to 24 hours when the unit is finished cooking. Press the ‘Keep Warm’ button, Keep then the ‘Start/Cancel’... -
Page 10: Before First Use
Button Controls (cont.) The cooking program selected will determine the amount of pressure used when cooking food. You can press the ‘Pressure’ button to cycle through the different pressure levels (1-6) for Pressure your recipe. Some preset cooking programs already have a default pressure level, but can be adjusted to meet your needs. -
Page 11: Safely Releasing Pressure
To close the lid, place it back down onto the pressure cooker housing. Grip the lid handle and twist it clockwise so that is aligned with at the top of the control panel. Plug in the pressure cooker and press ‘Menu’ until the Steam program has been selected. -
Page 12: Operation
Operation Preparing to Cook NOTE : • Thoroughly wash the inner pot before each use. • The minimum amount of ingredients needed to cook in the pressure cooker is ⅕ of the capacity of the inner pot. • The minimum amount of liquid needed for cooking is 1 cup (250 mL). This may vary depending on the recipe you are following. -
Page 13: Cooking Times
Press the ‘Start/Cancel’ button to start cooking. The unit will beep when it reaches the optimal cooking pressure and the display will read “P0” along with the programmed cooking time. NOTE: Some steam may come out of the pressure release valve along with occasional sputtering;... -
Page 14: Glass Lid
Operation (cont.) Glass Lid The professional grade tempered glass lid is specifically designed for use with the Cosori Electric Pressure Cooker. Use the lid for cooking while using the Sauté program to prevent any oil from splattering, or place the lid on the pressure cooker while using the Slow Cook program. - Page 15 Reheat: This program allows you to reheat food inside the pressure cooker. Connect the pressure cooker to a power source. Press the ‘Menu’ button until you reach Reheat. Press the ‘Adjust’ to select a preset cooking time and temperature (see table below).
-
Page 16: Care And Maintenance
Care & Maintenance 1. Unplug the pressure cooker and allow it to completely cool before cleaning. 2. DO NOT immerse the base in water or spray any water in it. If necessary, wipe the inside and outside of the base with a clean, damp cloth. 3. -
Page 17: Sealing Ring Installation
Sealing Ring Installation NOTE: Make sure the sealing ring is not cracked or damaged in any way. Removal Rotate lid counterclockwise as shown on page 10 to detach lid from pressure cooker. While holding the lid in place, gently pull out the sealing ring. Installation Line up sealing ring on top of metal ring. -
Page 18: Troubleshooting
Sealing ring may be Replace the sealing ring. broken. If necessary, purchase additional sealing rings from Amazon.com (search for “Cosori 6 Quart Sealing Ring”) Steam leaking from float Some ingredients may Clean the anti -clog filter. valve sealing ring. stick to the anti -clog filter. -
Page 19: Warranty Information
Unsupervised use by children under 18 years of age. Cosori and its subsidiaries assume no liability for damage caused by the use of the product other than for its intended use or as instructed in the user manual. Some states do not allow this exclusion or limitation of incidental or consequential losses so the foregoing disclaimer may not apply to you. - Page 20 Additional 1-Year Warranty You can extend your one-year warranty by an additional year. Log onto www.cosori.com/warranty and enter your order number (e.g., from Amazon or Houzz) to register your new product for the extended warranty. If you are unable to provide the order number for your product, please email a copy of your invoice to Customer Support at support@cosori.com.
-
Page 21: Customer Support
#iCookCosori Cosori Appliances @cosoricooks Considering what to cook? Many recipe ideas are available, both from us and the Cosori community. More Cosori Products Lastly, if you’re happy with this pressure cooker, the fun doesn’t stop here. Check out www.cosori.com for a line of all our beautiful and thoughtfully designed cookware. They... - Page 22 COSORI SUPPORT: Mon - Fri 9:00 AM - 5:00 PM PST (888) 402-1684 | support@cosori.com MC0508BFV3.4US...
Need help?
Do you have a question about the C2126-PC and is the answer not in the manual?
Questions and answers