Table of Contents
Advertisement
Quick Links
ELECTRIC
PRESSURE
COOKER
Questions or Concerns?
Mon - Fri 9:00 AM - 5:00 PM PST
Please contact us
(888) 402-1684
at
or email
Rice
Yogurt
M
Soup/Congee
e
n
Multigrain
u
Slow cook
Bake
Taste
support@cosori.com
CLOSE
Steam
Saute
Less
Normal
More
Canning
3
4
Poultry
2
5
1
6
Beans
Meat/Stew
Pressure
Pre-Set
Menu
Warm
Start/stop
Model No.: C2126 PC
M
e
n
u
Advertisement
Table of Contents

Related Manuals for Cosori C2126PC


Summary of Contents for Cosori C2126PC
- Page 1 More Canning Soup/Congee Multigrain Poultry Slow cook Beans Bake Meat/Stew Pressure Taste Pre-Set Menu Warm Start/stop Questions or Concerns? Mon - Fri 9:00 AM - 5:00 PM PST Please contact us (888) 402-1684 support@cosori.com or email Model No.: C2126 PC...
- Page 3 THANK YOU Thank you for purchasing the Electric Pressure Cooker by Cosori. Prepare fresh meals with minimal operation or effort. Should you have any questions or concerns while using your new pressure cooker, feel free to reach out to our helpful customer support team at 888.402.1684 or by email at support@cosori.com.
-
Page 4: Table Of Contents
TABLE OF CONTENTS Safety Information Product Diagram Pressure Cooker Control Panel Button Controls Operation Preparing To Cook Glass Lid Preset Cooking Modes Safely Removing The Lid Care And Maintenance Sillicone Gasket Installation Troubleshooting Warranty Information Customer Suppoer... -
Page 5: Safety Information
SAFETY INFORMATION IMPORTANT SAFEGUARDS Please read, understand, and comply with all the instructions provided in this manual before using the device. Failure to comply with the instructions given in this manual and/or using the device in ways other than the ones mentioned in this manual may result in serious injury and/or damage to the product. - Page 6 • DO NOT environments. • blocked. • DO NOT • DO NOT put anything on or use other objects to replace the pressure release valve. • Never use a towel to clog the gap between the lid and edge of the Housing. •...
-
Page 7: Product Diagram
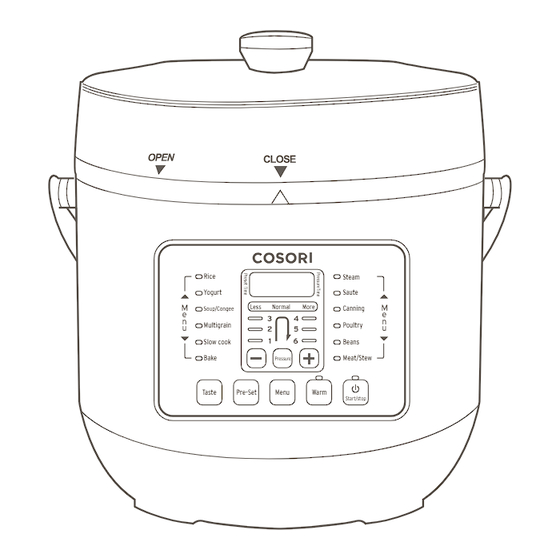
PRODUCT DIAGRAM CLOSE Rice Steam Yogurt Saute Less Normal More Canning Soup/Congee Multigrain Poultry Slow cook Beans Bake Meat/Stew Pressure TasteP re-Set Menu Warm Start/stop Floater valve Housing Pressure release valve Inner lid Pressure release 10. Silicone gasket button Steamer rack 12. -
Page 8: Control Panel
Control Panel Main Display Interface Rice Steam Yogurt Saute Less Normal More Canning Soup/Congee Multigrain Poultry Slow cook Beans Bake Meat/Stew Pressure Taste Pre-Set Menu Warm Start/stop Digital display Menu button Taste indicator 10. Warm button Pressure level 11. Start/Stop button indicator 12. -
Page 9: Button Controls
Button Controls START/STOP: Use this button to start or stop any cooking function on the pressure cooker. WARM : This function allows you to keep your food warm after cooking. Press the “Warm” button, display will show “bb”. The “warm” light will be Press the “Start/Stop”... - Page 10 PRESSURE : The function selected will determine the amount of pressure used when cooking food. You can press the “Pressure” button to cycle through the pressure levels (1-6) for your recipe. Some preset cooking functions already have a default pressure level, but can be adjusted to meet your needs.
-
Page 11: Operation
OPERATION Preparing to Cook NOTE : • Thoroughly wash the inner pot before each use. • The minimum amount of ingredients needed to cook in the pressure cooker is 1/5 of the capacity of the inner pot, which is roughly 4 cups. Open lid by holding the handle and turning the lid counterclockwise to open position, then lift the handle to open the pot. -
Page 12: Preset Cooking Modes
Canning 00:20 00:01 01:40 Poulty 00:15 00:20 00:25 00:01 01:40 Beans 00:15 00:20 00:25 00:01 01:40 Meat/Stew 00:20 00:40 00:50 00:01 01:40 Preset note: The Cosori Electric Pressure Cooker is programmed to a set pressure of 70 kPa (10 PSI). - Page 13 Note:Below cooking functions have no pressure applied when selected. SLOW COOK : This function allows you to cook various recipes slowly at low temperatures. Open the pressure cooker and detach the lid. Only use the glass lid for this feature. Connect the pressure cooker to a power source.
-
Page 14: Safely Removing The Lid
Safely Removing the Lid NOTE: For your safety, open the lid slowly. Do not open the lid before all pressure has escaped the lid. Once cooking is complete, turn off the pressure cooker’s power by unplugging the power cable. You can safely remove the lid following either of the two methods described below: Let the cooker cool down on its own. -
Page 15: Care And Maintenance
CARE & MAINTENANCE • Unplug the pressure cooker and allow it to completely cool before cleaning. • DO NOT immerse the base in water or spray any water in it. If necessary, wipe the inside and outside of the base with a clean, damp cloth. •... -
Page 16: Sillicone Gasket Installation
Silicone Gasket Installation NOTE: Make sure silicone gasket has no cracks or is in anyway damaged. Removal Rotate lid counterclockwise as shown on page 9 to detach lid from pressure cooker. While holding the lid in place, gently pull out the silicone gasket. Installation Line up silicone gasket on top of metal ring. -
Page 17: Troubleshooting
TROUBLESHOOTING Problem Cause Solution Difficulty closing lid. Silicone gasket may not be Place silicone gasket placed correctly correctly Pressure release valve Make sure the push rod may be blocking the push at the side of the lid is rod. aligned correctly to the base. - Page 18 SPECIFICATIONS Capacity: Power Supply: AC 120 V/60 Hz Rated Power: 1000 W Working Pressure: 70 kPa (10 PSI) Keep Warm Temperature: 60° C-80° C (140° F - 176° F) Packaging Contents 1 x Electric Pressure Cooker 1 x Spoon 1 x Ladle 1 x Measuring Cup 1 x Glass Lid 1 x Sealing Ring...
-
Page 19: Warranty Information
Cosori warrants all products to be of the highest quality in material, craftsmanship and service for a minimum of 1 year, effective from the date of purchase. Under the limited warranty, Cosori will replace or refund any product found to be defective due to manufacturer flaws based on eligibility. -
Page 20: Customer Suppoer
Should you encounter any issues or have any questions regarding your new product, feel free to contact our helpful Customer Support Team. Your satisfaction is ours. CUSTOMER SUPPORT Cosori Corporation 1202 N Miller St. Suite A Anaheim, CA 92806 Phone: (888) 402-1684 Email: support@cosori.com... - Page 22 Questions or Concerns? Please contact us Mon - Fri 9:00 AM - 5:00 PM PST at (888) 402-1684 or email support@cosori.com...
Need help?
Do you have a question about the C2126PC and is the answer not in the manual?
Questions and answers