Table of Contents
Advertisement
Available languages
Available languages
Quick Links
Advertisement
Chapters
Table of Contents

Related Manuals for Megasat 3419 Scart Receiver


Summary of Contents for Megasat 3419 Scart Receiver
-
Page 3: Table Of Contents
Inhaltsangabe Sicherheitshinweise Recycling Informationen Zubehör und Eigenschaften Bedienelemente Vorderseite Rückseite Fernbedienung Einlegen der Batterie und Operationsradius Tasten Verbindung TV / Antenne Externer Audio-Dekoder oder Verstärker Erstinstallation Erstinstallation Funktionen Wichtige Tasten und deren Funktionen Rekorder (OPTIONAL) Aufnahme Zeitversetztes Fernsehen (Time Shift) Aufnahmeliste Multimedia-Player USB Anschluss... -
Page 4: Sicherheitshinweise
SICHERHEITSHINWEISE RISK OF ELECTRIC SHOCK DO NOT OPEN Das Blitzsymbol im Dreieck weist den Benutzer auf gefährliche Spannungen" an einigen freiliegenden Bauteilen im Inneren des Gerätes hin. Das Ausrufezeichen im Dreieck weist den Benutzer auf wichtige Bedienungs- und Wartungsanweisungen (Service) in diesem Handbuch hin, die unbedingt befolgt werden sollten. - Page 5 SICHERHEITSHINWEISE Stromversorgung Fassen Sie das Gerät niemals mit feuchten oder nassen Händen an. Das Gerät kann nur mit der auf der Rückseite beschriebenen Voltzahl betrieben werden. Sollten Sie die Stromstärke nicht kennen, fragen Sie bitte einen Elektriker. Dieses Gerät darf nicht in der Nähe von Feuchtigkeit und Wasser positioniert wer- den.
- Page 6 SICHERHEITSHINWEISE Betrieb und Aufstellung Empfang von digitalen Programmen via Satellit (DVB-S). Jede andere Verwendung ist nicht gestattet. Schließen Sie keine Zusatzgeräte an, die nicht vom Hersteller empfohlen sind. Stellen Sie das Gerät nicht auf eine instabile Fläche. Das Gerät könnte beschädigt oder Personen verletzt werden.
- Page 7 SICHERHEITSHINWEISE Der DVB-S Empfänger wird an einer Satellitenschüssel angeschlossen. Wenn Sie die Verbindung erstellen oder entfernen möchten, bitte schalten Sie das Gerät vorher aus und ziehen Sie die Stecker aus der Steckdose. Andernfalls könnte es zu Rückkoppelungen und Schädigungen der angeschlossen Geräte kommen. Wenn Sie das Gerät mit einer Satellitenschüssel nutzen, vergewissern Sie sich, dass diese geerdet ist.
-
Page 8: Recycling Informationen
Recycling Informationen Wiederverwertung von Elektrogeräte Das Produkt wurde mit hochwertigen Materialien und Komponenten entwickelt und hergestellt, die recylingfähig sind und wieder verwendet werden können. Diese durchkreuzte Mülltonne auf dem Produkt oder auf der Verpackung bedeutet, dass das Produkt der Europäischen Richtlinie 2002/96/EC entspricht. Informieren Sie sich über die vor Ort geltende Bestimmungen zur separaten Entsor- gung elektronischer Geräte. -
Page 9: Zubehör Und Eigenschaften
Zubehör / Eigenschaften Lieferinhalt Bitte vergewissern Sie sich, dass folgende Zubehörteile in der Verpackung enthalten sind: Megasat receiver • • Fernbedienung • Bedienungsanleitung Batterie 2xAAA • Hinweise: • Veränderungen oder Modifizierungen der Bestandteile des Lieferumfangs führen zum Erlöschen der Garantie. -
Page 10: Bedienelemente
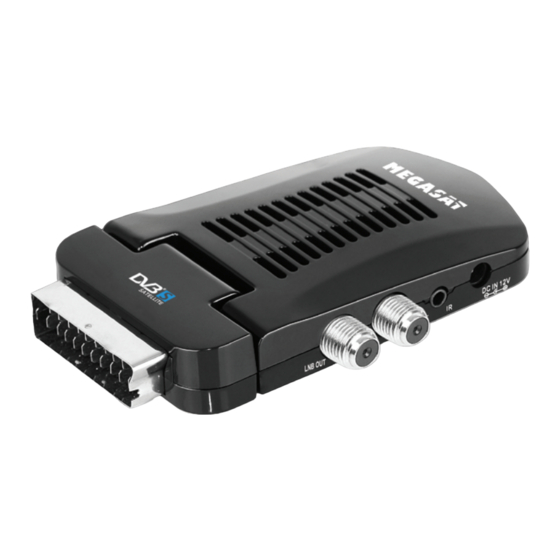
Bedienelemente Vorsderseite DC IN 12V LNB OUT LNB IN SCART Ausgang TV USB 2.0 Anschluss Stromkabel Infrarotempfänger ZF Antenneneingang - IEC 60196-24 (F Typ) ZF Ausgang (Loop through) -
Page 11: Fernbedienung
Meter betragen und der Operati- onswinkel nicht größer als 60° sein. Entfernen Sie die Batterien aus der Fernbedienung, wenn Sie den Megasat 3400 eine längere Zeit nicht benutzen. Hinweise: Entfernen und erneuern Sie alte Batterien. Sie können auslaufen und die Fernbedienung beschädigen. -
Page 12: Tasten
Fernbedienung Tasten der Fernbedienung 1.Informationstaste (INFO) 2.PLAY/Pause Taste 3.Beenden Taste (EXIT) 4.EPG Taste 5.Kanal+ (CH+) Taste bzw. Navigation Oben 6.Lautstärke+ Taste bzw. Navigation Rechts 7.Bestätigen (OK) 8.Favoritentaste (FAV) 9.GAME Taste 10.Letzter TV-Kanal Taste (RECALL) 11.Untertitel Taste (SUBTITLE) 12.Videotext Taste (TETX) 13.Farbe Taste 14.Schneller Vorlauf Taste bei Timeshift oder Wiedergabe... -
Page 13: Verbindung
SCART RGB-fähig ist, bitte wählen Sie bei die Option CVBS/RGB bei den Einstellungen: “Setup -> TV-System -> Videoausgang”. Verbinden zu einem TV Fernsehgerät und zu der Satellitenschüssel Die schematische Zeichnung zeigt die Verbindungen des Megasat receiver zu der Antenne und zu dem Fernsehgerät. DC IN 12V... - Page 14 Schalten Sie den DVB-S Empfänger und Ihr Fernsehgerät ein. Wählen Sie am Fernsehgerät den entsprechenden SCART-Eingang. Hinweis: Der Megasat receiver enthält einen so genannten „Loop through“ Antennenausgang (LNB OUT). Damit können Sie von dem DVB-S Empfänger weitere DVB-S Empfangsgeräte anschließen.
-
Page 15: Usb
Verbindung USB Anschluss Schließen Sie den USB-Stick vorsichtig an dem USB Anschluss an. In der Regel sollte die Be- schriftung des USB-Sticks nach oben zeigen. Entnehmen Sie den USB Stick erst dann, wenn Sie wieder im Live DVB-S Programm sind, andern- falls könnte der Stick beschädigt werden. -
Page 16: Erstinstallation
Einstellung Installieren Sie vor dem Anschalten des Gerätes alle notwendigen Kabelverbindungen. Die nachfolgenden Einstellungen werden nur für Änderungen der Grundeinstellungen benötigt. Bei der Inbetriebnahme des Megasat 3400 sind bereits alle Grundeinstellungen und Sender für Astra/Hotbird programmiert. Änderungen werden unter Menü-Einstellung-Installation vorgenommen. - Page 17 Erstinstallation Empfang Auto Zeitzone (Auto Time Zone) Mit dieser Option aktivieren Sie die automatische Einstellung der Zeitzone. Die Informationen wer- den dann aus dem EPG Datenstrom entnommen. Sie haben auch die Möglichkeit die Zeitzone manuell einzustellen. Schalten Sie die automatische Auswahl mit der Option AUS ab und dann wird der letzte Menüpunkt Zeitzone aktiv.
- Page 18 Erstinstallation Empfang (MY DISH) — Einfache Verbindung Satellit-Empfänger Jetzt erscheint auf dem Bildschirm die Parameter des ausgewählten Satelliten. Achten Sie darauf, dass der LNB Typ die Einstellung Digital (Universal) hat, denn Sie möchten ja digitale TV Programme anschauen. LNB Typ Die Optionen sind hier: Normal C Suchlauf im Frequenzbereich analoger Programme...
- Page 19 Erstinstallation Empfang (MY DISH) — Einfache Verbindung Satellit-Empfänger Stärke Hier wird die Signalstärke in Prozent und in einem Balken angezeigt. Qualität Hier wird die Signalqualität in Prozent und in einem Balken angezeigt. Je kleiner der Wert ist, des- to mehr Artefakte oder Bildstörungen hat das übertragene Signal. Drücken Sie die OK Taste und Sie können dann die weiteren Parameter des Suchlaufs einstellen.
- Page 20 Erstinstallation Empfang - Einfache Verbindung Satellit-Empfänger mit Toneburst Nun sind alle Suchparameter eingestellt und der Suchlauf kann starten. Drücken Sie die OK Taste und der Suchlauf beginnt. Alle empfangenen TV und Radio Sender werden in den beiden Listen angezeigt. Nach dem Suchlauf werden die TV und Radio Sender in den beiden Listen abgespeichert und das Gerät wechselt in das Livebild des ersten TV Senders.
- Page 21 Erstinstallation Empfang - Verbindung Satellit-Empfänger via DiSEqC 1.0/1.1 Drücken Sie die ROTE oder BLAUE Taste und Sie können den Suchlauf und die gefundenen TV Sen- der damit beeinflussen, in dem Sie die entweder bei Scan-Mod. (Scan Mode) einen Standard- Suchlauf oder ein „blindes“ Suchen ausführen (ausführlicher auf Seite 19 erklärt).
- Page 22 Erstinstallation Empfang - Verbindung Satellit-Empfänger via DiSEqC 1.0/1.1 Weitere Tasten zum Bearbeiten der Liste sind: GRÜNE Taste Löschen des ausgewählten Satelliten GELBE Taste Löschen aller ausgewählten Satelliten Drücken Sie die ROTE oder BLAUE Taste und Sie können den Suchlauf und die gefundenen TV Sen- der damit beeinflussen, in dem Sie die entweder bei Scan-Mod.
- Page 23 Erstinstallation Nun sind alle Suchparameter eingestellt und der Suchlauf kann starten. Drücken Sie die OK Taste und der Suchlauf beginnt. Alle empfangenen TV und Radio Sender werden in den beiden Listen angezeigt. Nach dem Such- lauf werden die TV und Radio Sender in den beiden Listen abgespeichert und das Gerät wechselt in das Livebild des ersten TV Senders.
-
Page 24: Funktionen
Funktionen Wichtige Tasten und deren Funktionen Kanalliste Rufen Sie die Kanalliste durch das Drücken der OK Taste auf. Bedienung der Kanalliste: ▲/▼ Vorheriger bzw. nächster Sender ◄/► Vorherige bzw. nächste Seite der Senderliste GELB Wechsel zu Favoriten BLAU Wechsel des Satelliten Umschalten zu dem ausge- wählten TV Sender EXIT... - Page 25 Funktionen Wichtige Tasten und deren Funktionen Information Wenn Sie die INFO Taste drücken, dann erhal- ten Sie eine Vielzahl von Information. Bei dem ersten Drücken der INFO Taste gelangen Sie zu der Übersicht: TV Sendername, aktive TV Pro- gramm, nächstes TV Programm, ob Teletext verfügbar ist usw..
- Page 26 Funktionen Wichtige Tasten und deren Funktionen Drücken Sie die EPG Taste und dann wird der elektronische Programmführer aktiviert. Folgen- des Abbildung erscheint auf dem Bildschirm. Das EPG Fenster ist wie folgt aufgeteilt: Rechts Oben Aktuelles Datum und aktuelle Uhrzeit Links Senderliste Mitte Wochentag und Datum...
- Page 27 Funktionen Wichtige Tasten und deren Funktionen Timerprogrammierung Wenn Sie aus der 7-Tage Übersicht die ROTE Taste bei einer markierten Sendung gedrückt haben, dann wird diese Sendung in die Timer- programmierung übernommen. Die Informatio- nen wie Sender, Datum und Uhrzeit werden automatisch aus dem EPG übernommen.
-
Page 28: Rekorder (Optional)
Rekorder (Optional) Aufnahme (Die Aufnahmefunktion ist nur bei dem Modell Megasat 3400PVR möglich) Wenn Sie das aktuelle TV Programm einfach und schnell aufnehmen möchten, schließen zuerst ein Speichermedium (Stick) an und drücken Sie dann die RECORD Taste. Die Aufnahme startet dann sofort. Beenden können Sie die Aufnahme durch das Drücken der STOP Taste. -
Page 29: Aufnahmeliste
Rekorder (Optional) Aufnahmeliste Die aufgenommenen Sendungen können Sie über die RECLIST Taste direkt erreichen. Alle bisherigen Aufnahmen werden dort angezeigt. Die Bedienung in der Aufnahmeliste erfolgt über die Tasten: ▲/▼ Wechsel zur vorherigen bzw. nächsten Aufnahme ◄/► Blättern zur vorherigen oder nächsten Seite der Liste Startet die Wiedergabe im Vorschaufenster (ohne Ton) Die markierte Aufnahme wird gelöscht... -
Page 30: Multimediaplayer
Multimediaplayer USB Anschluss Wenn Sie den USB Anschluss benutzen möchten, stecken Sie einen USB Flashspeicher in den USB Anschluss ein. Unterstützte Formate Dies wären zum Beispiel Bilder (JPEG, GIF), Musikdateien (MP3, WMA) oder Videodateien (MPEG-1, MPEG-2 oder MPEG-4 Format). Unterstützte Medien Der USB-Anschluss unterstützt eine Reihe von unterschiedlichen Größen. -
Page 31: Meine Bilder
Multimediaplayer Meine Bilder Wenn Sie Bilder, Musik oder Videos von Speicher abspielen möchten, rufen Sie dazu den Me- dienplayer des Gerätes auf. Schließen Sie zuerst den USB Speicher (Stick/Platte) an und drücken Sie während des Livebildes die MENU Taste. Drücken Sie solange die ◄/► Tasten bis Multimedia angezeigt wird. Die vier Untermenüs sind: •... - Page 32 Multimediaplayer Meine Bilder In der Thumbnailübersicht haben Sie eine ähnliche Funktionsweise wie in dem Dateibrowser: ▲/▼ Wechsel zum oberen bzw. unteren Bild ◄/► Wechsel zum vorherigen bzw. nächsten Bild Startet die Wiedergabe des Bildes BLAU Zurück zu dem Dateibrowser EXIT Beendet die Thumbnailanzeige und wechselt direkt ins Hauptmenü...
-
Page 33: Meine Musik
Lautstärke ändern Während der Musikwiedergabe können Sie die Lautstärke mit den ◄/► Tasten ändern. Unterstützte Formate Der Megasat 3400 unterstützt folgende Parameter bei den Musikdateien: Format: MP3 und WMA Sampling Frequenz: 8 - 48 kHz (MP3) oder 32 - 48 kHz (WMA) Bitrate: 8 bis 320 kbps (MP3) oder 32—192 kbps (WMA) -
Page 34: Meine Filme
Multimediaplayer Meine Filme Wenn Sie Filmdateien mit dem Megasat abspielen möchten, schließen Sie einen USB Speicher (Stick/Platte) an und rufen Sie den Menüpunkt Meine Filme mit der OK Taste auf. Bitte beachten Sie die folgenden Regeln: Die Auflösung der Filmdateien sollten maximal 720x576 Pixel betragen. - Page 35 Multimediaplayer Meine Filme Wählen Sie einen Film aus und starten diesen mit der OK Taste. Oben Links wird der Dateiname, die bisher abgespielte Zeit und die Gesamtzeit angezeigt. Unter werden die Navigationshilfen eingeblendet. Sie können diese immer wieder mit der INFO Taste einblenden. Nach 10 Sekunden schaltet diese automatisch wieder ab.
-
Page 36: Hauptmenü
Einstellungen Hauptmenü Das Hauptmenü des Satellitenempfängers rufen Sie über die MENU Taste auf. Die Untermenü sind: • TV mit TV Liste und EPG • Radio mit Radio Liste und Radio EPG • Multimedia mit Meine Bilder, Meine Musik, Meine Filme und Meine Aufnah- •... - Page 37 Einstellungen Mit den folgenden Tasten können Sie die TV Liste bedienen: ▲/▼ Vorheriger bzw. nächster Sender ◄/► Wechsel der Tools EXIT Beenden GELB Speichern der Änderungen BLAU Wechsel der Satelliten Favoriten definieren Wählen Sie den TV Sender aus, den Sie in die Favoritenliste ablegen möchten. Mit den ▲/▼ Tas- ten können Sie den TV Sender auswählen.
- Page 38 Einstellungen TV Sender bearbeiten Möchten Sie einzelne TV Sender bearbeiten, so wählen Sie in der TV Liste das Tool Bearbeiten, in dem Sie ► Taste drücken, bis unten Links Bearbeiten erscheint. Wählen Sie mit den ▲/▼ Tasten den entsprechenden TV Sender aus und drücken Sie die OK Taste. Jetzt können Sie den TV Sendernamen, die Untere Frequenz und die Symbolrate verändern.
- Page 39 Einstellungen TV Sender Sortieren Möchten Sie die TV Senderliste neu sortieren, so wählen Sie in der TV Liste das Tool Sortie- ren, in dem Sie ► Taste drücken, bis unten Links Sortieren erscheint. Zwei mögliche Sortier- optionen sind vorhanden: • Alphanumerisch (von A bis Z) •...
- Page 40 Einstellungen TV Sender suchen Möchten Sie einzelne TV Sender suchen, so wählen Sie in der TV Liste das Tool Suchen, in dem Sie ► Taste drücken, bis unten Links Suchen erscheint. Wählen Sie mit den ▲/▼ Tasten den entsprechenden TV Sender aus und drücken Sie die OK Taste. Geben Sie im SMS-Stil den Sendername ein, den Sie in der TV Liste suchen möchten.
- Page 41 Einstellungen Einstellungsmenü Das Einstellungsmenü enthält die Untermenüs: • Installation • TV Einstellungen • Passwort • Timer Einstellen • Werkseinstellungen • SW-Update Installation Die Installation enthält drei weitere Untermenüs: • Einstellung • Empfang • Transponder Verwaltung Die Installation wurde eingehend zwischen den Seiten 16 bis 27 beschrieben. Bitte lesen Sie die Seiten.
- Page 42 Einstellungen TV Einstellungen TV Format Mit diesem Menü geben Sie die Art Ihres TV Fernsehers ein. Bitte achten Sie auf das Seitenver- hältnis Ihres TV Gerätes und wählen Sie diese aus der Liste aus. Falls Sie einen 16:9 TV Gerät haben, dann sollten Sie die Option 16:9 AUTO auswählen. Falls Sie einen 4:3 TV Gerät haben, dann können Sie die Option 4:3 LB wählen.
- Page 43 Einstellungen Kennwort Menü Sperre Mit dieser Option können Sie die Menüs und Einstellungen sperren. Möchten Sie darauf zugreifen, so müssen Sie immer das entsprechende Passwort eingeben. Das Standardpasswort ist 6 6 6 6. Die Option An aktiviert die Menüsperre. Die Option Aus schaltet die Menüsperre ab. Kanalsperre Mit dieser Option schalten Sie die Kanalsperre an oder aus.
- Page 44 Einstellungen Timer Programmierung Folgende Einstellungen können Sie bearbeiten: • Kanaltyp • Kanal-Nr. • Kanalname • Startdatum • Startzeit • Stoppzeit • Modus • Timer Modus Kanal Typ Hier können Sie zwischen TV und Radio wählen Kanal-Nr. Wählen Sie hier die Kanal-Nr. des TV Senders, den Sie programmieren möchten. Kanalname Der Kanalname ist in der Regel durch die Kanal-Nr.
- Page 45 Einstellungen Timer Programmierung Modus Hiermit definieren Sie den Aufnahmemodus. Die Optionen sind: • Einmal • Täglich • Wöchentlich • Monatlich Timer Modus Hiermit definieren Sie den Timer Modus. Die Optionen sind Timer oder Aufnahme. Wenn Sie Auf- nahme auswählen, dann startet zu den vorherigen Einstellung die Aufnahme. Hinweis: Wenn Sie eine Aufnahme ausführen möchten, dann muss dazu ein USB Speicher angeschlossen sein.
-
Page 46: Extras
Einstellungen SW Update Das Menü SW update enthält zwei Optionen: • Update über Speicher • Sicherung über Speicher Sie haben die Möglichkeit die Software über USB oder Speicherkarte zu aktualisieren. Starten Sie diese Funktion mit der OK Taste. Hinweis: Der USB Speicher (USB Stick) sollte nur ausschließlich die Updatedatei enthalten. Wenn die Datei gefunden wird, dann startet die Vorgang automatisch. - Page 47 Einstellungen Meine Aufnahmen Wählen Sie im Hauptmenü die Option Multime- dia und bestätigen Sie mit der OK Taste. Wäh- len Sie danach die Option Meine Aufnahmen aus und starten Sie diese ebenfalls mit der OK Taste. Es folgenden jetzt drei weitere Optionen: •...
- Page 48 Tasten zu dem Verändern der Optionen und zum Formatieren des Speichers. Gerät Wenn ein USB Speicher am Megasat receiver angeschlossen ist, dann kön- nen Sie zwischen den Geräte mit den ◄/► Pfeiltasten wechseln. Slot (Optional) Wenn ein USB Speicher und eine Speicherkarte an dem Receiver angeschlossen ist, dann kön- nen Sie zwischen den Geräte mit den ◄/►...
- Page 49 Einstellungen Meine Aufnahmen Aufnahme Liste Mit diesen Menü können Sie die aufgenomme- nen TV Sendungen in einer Liste anzeigen. Neben dem Weg über das Hauptmenü können Sie auch direkt über die RECLIST Taste im Livebild starten. In dieser Liste werden alle Aufnahmen ange- zeigt.
- Page 50 Problembehebung Symptom Ursache und Lösung Kein DVB-S Empfang / • Kein DVB-S Empfang in Ihrer Gegend. Bildstörungen mit star- • Richten Sie die Satellitenschüssel richtig aus ken Mosaiken oder • Wählen Sie einen Satelliten aus, den Sie empfangen können Artefakten / Eingefro- •...
-
Page 51: Spezifikation
Spezifikationen Frequenzbereich Eingangswiderstand Symbolrate: 13 / 18 V mit 350 mA Wellenform Video Auflösung:... - Page 53 Table of Content Safety information Recycling Information Accessories / Features Control Element Front Panel Remote Control Insert battery and operation Buttons Connection TV / Aerial USB port First Time Installation First Time Installation Operation Important buttons and there functions Recorder (optional) Recording Time Shift Recording List...
-
Page 54: Safety Information
SAFETY INFORMATION RISK OF ELECTRIC SHOCK DO NOT OPEN The lightning flash with an arrowhead symbol within an equilateral triangle is intended to alert the user of the presence of un-insulated "dangerous voltage" within the product's enclosure that may be of sufficient magnitude to constitute a risk of electric shock to persons. - Page 55 Power Supply Never touch the plug with wet hands. If you want to pull the plug out of the plug socket, always pull directly on the plug. Never pull on the cable as it could tear. Make sure that the power cable is not bent, caught or run over and that it does not come into contact with heat sources.
- Page 56 SAFETY INFORMATION Operation and Position Reception of digital satellite channels (DVB-S). Do not connect accessories on the box which are not defined by the manufacture. Do not place this product on an unstable cart, stand, tripod, bracket, or table. The product may fall, causing serious injury to a child or adult, and serious damage to the product.
- Page 57 SAFETY INFORMATION Defect Servicing - Do not attempt to service this product yourself as opening or removing covers may expose you to dangerous voltage or other hazards. Refer all servicing to qualified service personnel. Damage Requiring Service - Unplug this product from the wall outlet and refer ser- vicing to qualified service personnel under the following conditions: When the power-supply cord or plug is damaged.
-
Page 58: Recycling Information
Recycling Information Recycling of electronic devices This product is designed and manufactured with high quality materials and components which can be recycled and reused. This symbol means that electrical and electronic equipment, at their end-of-life, should be disposed of separately from your household waste. Please, dispose of this equipment at your local community waste collection/recycling centre. - Page 59 ACCESSORIES Package Contents When opening the package of this DVB-S receiver please make sure that the following accessories are included: Megasat receiver • • Remote control • User manual Battery • Notes: • If any item should be damaged or missing, please contact your dealer without delay.
-
Page 60: Control Element
CONTROL ELEMENTS Front Panel DC IN 12V LNB OUT LNB IN 1.Scart interface: connect to the TV'scart interface directly or through a scart cable if it is necessary. 2.USB Jack: Used to connect to an external USB 2.0 device. 3.DC IN 12V:Used to connect the 12V DC adapter. 4.Remote control: Used to connect the remote Sensor. -
Page 61: Remote Control
Remote Control Insert batteries and operationradius • Open the battery cover • Insert the battery into the receptacle and insert the receptacle into the remote. • Please uses only AAA batteries. • Close the battery cover. • For the best results, aim the remote towards IR window. -
Page 62: Buttons
Remote Control Buttons of the remote control 1.Information Button (INFO) 2.PLAY/PAUSE Button 3.Exit Button 4.EPG Button 5.Channel up (CH+) or navigation up 6.Volume + button or navigation right 7.OK Button 8.Favorite Button (FAV) 9.GAME Button 10.RECALL Button 11.Subtitle Button 12.Videotext (TTX) 13.Color buttons 14.Fast Forward ( >>) by playback or Time Shift 15.Fast Rewind button by playback or... -
Page 63: Connection
Connection To TV Set and Aerial Basic connection: • Ensure that the power switches of this unit and other equipment to be connected, are turned off before commencing connection • Read attentively the instructions before connecting other equipments • Ensure that you observe the color-coding when connecting audio and video cords •... - Page 64 Connection How to connect: Plug a SCART cable to the SCART TV connector of the DVB-S receiver and the other end to the TV set. Plug the antenna cable to the input, called LNB In. Screw the connector tightly. Please pay attention that all plugs are connected correctly. Connect the power cable and the plug to the wall outlet.
-
Page 65: Usb Port
Connection USB port Connect the USB flash drive carefully on to the USB port. In general the label should show the USB stick to the top. Remove the USB stick only when you are back in Live DVB-S program, otherwise the drive could be damaged. -
Page 66: First Time Installation
First Time Installation Settings Please install before starting the device all cable connections to the satellite dish and to the TV set. (Only for changes) By the first time using of the Receiver the First Time Installation appears on the screen. This menu includes two options: •... - Page 67 First Time Installation Settings Auto Time Zone Here you can set the Time Zone setting automatically. The information will be taken from the EPG information. You can set also the Time Zone manually. Here for choose the setting OFF and than the next option is active.
- Page 68 First Time Installation My Dish - Single Connection A new window appears on the screen with the parameters and settings of the satellite. Please pay attention that the LNB Type is made on Universal. LNB Type The options are: Normal C Searching by analogue TV channels in low frequencies Normal Cu...
- Page 69 First Time Installation My Dish—Single Connection Strength The received signal strength is shown in percentage and in the bar. Quality The received signal quality is shown in percentage and in the bar. Lower values are an indication for more artifacts, freeze pictures and other picture distortions. Press the OK button and you can then adjust the other parameters of the scan.
- Page 70 First Time Installation My Dish—Single Connection with Toneburst Now, all search parameters are set and the scan can run. Press the OK button and the scan begins. All received TV and radio stations are displayed in the two lists. After the scan, the TV and radio stations are stored in the two lists and the unit goes into the live image of the first TV station.
- Page 71 First Time Installation My Dish—Using DiSEqC 1.0/1.1 Press the RED or BLUE button and you can influence the search and found the TV to where you are either with Scan Mode, a standard search or perform a "blind" search (explained in detail on page 19).
- Page 72 First Time Installation My Dish—Using DiSEqC 1.0/1.1 Press the RED or BLUE button and you can influence the search and found the TV to where you are either with Scan Mode, a standard search or perform a "blind" search (explained in detail on page 19).
- Page 73 First Time Installation My Dish—Using DiSEqC 1.2/USALS Using more than two satellite by DiSEqC 1.2 / USALS DiSEqC 1.2 provides additional control of three plants by DiSEqC commands, via a single coaxial cable. Of the motor's staff was also a record producer (rod USALS) defined which is to find the satellite position is particularly simple.
-
Page 74: Operation
Operation Important buttons and there functions Channel List You can access to the channel list by pressing the OK button. The operation in the channel list is done by following buttons: ▲/▼ Previous or Next TV channel ◄/► Previous or Next page of the channel list YELLOW Change to Favourite... - Page 75 Operation Important buttons and there functions Information When you press the INFO button, then you get a variety of Information. The first pressing the INFO button will take you to the overview: TV station names, active TV program, the next TV program whether Videotext is available and so Pressing the INFO button displays the EPG information of the active television program.
- Page 76 Operation Important buttons and there functions Press the EPG button to start the EPG Guide. Following picture appears on the screen. The EPG window is organizes into: RIGHT TOP Actually date and Time LEFT TV channel list MIDDLE Day of the Week and date RIGHT BOTTOM 7-days EPG overview...
- Page 77 Operation Important buttons and there functions Timer Programming If you have pressed in the 7-day overview the RED button on a highlighted item, then the information will be transferred to the timer. The information such as sender, date and time are automatically taken from the EPG.
-
Page 78: Recorder (Optional)
Recorder (optional) Recording (optional Megast 3400pvr) If you want to record the current TV program simply and quickly, first connect a USB memory to the USB portr and then press the REC button. The recording starts immediately. You can stop the recording by pressing the STOP button. -
Page 79: Recording List
Recorder Important buttons and there functions Recording List The recorded program can be reached directly via the RECLIST button. All previous recordings will be displayed there. The operation in the list of recordings is via the keypad: ▲/▼ Previous or next recording ◄/►... -
Page 80: Multimedia Player
Multimedia Player USB Port If you want to uses the USB port, please connect an USB storage to the USB plug. Supported File Formats From USB port you can playback picture in JEPG or GIF file format. You can playback music file with MP3 or WMA file format. -
Page 81: My Album
My Recorder My Album If you want to display images with the Megasat 3400, connect a storage and access to the My Pictures menu by pressing the OK button. Please organize your storage so far that there are all the pictures in a folder. - Page 82 Multimedia Player My Album By the Thumbnail Overview you have similar operation like in the file browser: ▲/▼ Changes to the above or bottom picture ◄/► Changes to previous or next pictures Starts the playback of the picture BLUE Back to the file browser view EXIT Quits of the Thumbnail display and changes directly into the main menu If many image files in the folder, it can take a bit more time until all the images are displayed.
-
Page 83: My Music
Multimedia Player My Music If you want to play music files with the Megasat receiver, connect a USB and access to the My Music menu by pressing the OK button. After successful reading of the memory, you will be prompted for the folder. -
Page 84: My Movies
Multimedia Player My Movies If you want to play movie files with the Receiver, connect a USB and access to the My Movies menu by pressing the OK button. MPEG-4 disc compatibility with this player is limited as follows: Available resolution size of the MPEG-4 file is under 720x576 (W x H) pixel. The file name of the MPEG-4 subtitle is available by 15 characters. - Page 85 Multimedia Player My Movies Select a movie and start it with the OK button. Top Left is the file name, which has played time and elapsed time. Among the aids to navigation will be displayed. You can always show with the INFO button.
-
Page 86: Settings
Settings The main menu of the DVB-S receiver can be open by pressing the MENU button. The sub- menus are: • TV with TV list and EPG • Radio with Radio list and Information • Multimedia with My Album, My Music, My Movies and My Recorder •... - Page 87 Settings TV List With the following buttons you can operate the TV list: ▲/▼ Change to the previous or next TV channel ◄/► Changes the tool EXIT Quits YELLOW Save the changes BLUE Change the satellite displaying Define Favourite Select the TV channel you want to put in the Favourites list. Using the ▲ / ▼ buttons to select the TV channel.
- Page 88 Settings TV List Edit a TV channel Do you want to edit individual TV stations, says in the TV list and select the Edit tool by pressing the ► button below to edit links appear. Select using the ▲ / ▼ buttons to select the appropriate TV and press the OK button.
- Page 89 Settings TV List Sort the TV channels Do you want to rearrange the TV channel list, then select the TV button, the tool list sorting, in which you ► button to bottom links appear sorting. Two possible sort options are available: •...
- Page 90 Settings TV List Search a TV channel Want to search some TV, then choose in the list, press the TV search tool, where you ► button to bottom links appear searches. Select using the ▲ / ▼ buttons to select the appropriate TV and press the OK button.
- Page 91 Settings Setup Setup The Setup Menu includes following sub-menus: • Installation • TV Setup • Password • Advance Timer • Set Default • SW-Update Installation The Installation menu includes following sub-menus: • Settings • My Dish • Transponder Please refer the description in this manual on pages 14 to 21. All settings and parameters are described.
- Page 92 Settings Setup TV Format With this menu, enter the type of your TV television. Please pay attention to the aspect ratio of your TV device and select it from the list. If you have a 16:9 TV device, then you should select the option 16:9 CAR. If you have a 4:3 TV device, then you can select 4:3 LB.
- Page 93 Settings Setup Menu Lock With this option you can lock the menus and settings. Do you want to access it, you must always enter the password. The default password is 6 6 6 6. The option to the menu lock is on. The Off option turns off the menu lock. Channel Lock Use this option to switch the channel lock on or off.
- Page 94 Settings Setup Following option you can edit: • Channel Type • Channel No. • Channel Name • Start Date • Start Time • Stop Time • Mode • Timer Mode Channel Type Here you can choose between TV or Radio. Channel No.
- Page 95 Settings Setup Mode Here you can define the recording mode. The options are: • Single • Daily • Weekly • Monthly Timer Mode Lets you define the timer mode. The options are timer or recording. If you select recording, then start with the previous setting the recording.
-
Page 96: Accessories
Settings Setup SW-Update The menu SW update contains two options: • Update via USB • Backup via USB You have the opportunity to update the software via USB memory. Start this feature with the OK button. Note: The memory should only contain only the update file. -
Page 97: My Recorder
Settings My Recorder Select Multimedia from the main menu and press the OK button. Then select the option My recordings and start it also with the OK button. It is now following three options: • Recorded List • Recording Device •... - Page 98 Settings My Recorder Recording Device With this menu you can format the USB memory. The window consists of the sub- menus: • Device • Slot • Partition And an information display via the USB memory. In the lower part of the window you will find the keys to changing the options and format the memory.
- Page 99 Settings My Recorder Recorded List With this menu you can view the recorded TV shows in a list. Walking along the road from the main menu you can also jump on the REC LIST button to start the live image. This list contains all of the images are displayed.
-
Page 100: Troubleshooting
Troubleshooting Symptom Correction No DVB-S reception / • No DVB-S reception in your region. serious distortion by • Realign the dish. Please pay attention to the direction of the mosaics or artefacts/ satellite. freeze pictures • Please use a bigger dish. •... -
Page 101: Specification
Specification...
Need help?
Do you have a question about the 3419 Scart Receiver and is the answer not in the manual?
Questions and answers