Abus PPIC90520 Quick Manual
Hide thumbs
Also See for PPIC90520:
- Instruction manual (88 pages) ,
- Quick manual (21 pages) ,
- Manual (21 pages)

Related Manuals for Abus PPIC90520


Summary of Contents for Abus PPIC90520
- Page 1 P P I C 9 0 5 2 0 Q U I C K G U I D E ABUS Security Center • Linker Kreuthweg 5 86444 Affing • Germany • abus.com...
-
Page 2: Lieferumfang / Scope Of Delivery
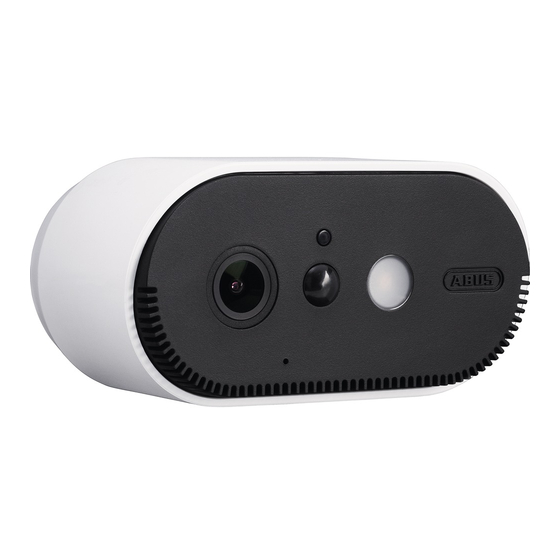
Lieferumfang / Scope of delivery USB auf micro Akku Cam USB Kabel USB to micro Battery Cam USB cable Reset - Tool, Halterung Montage material Bracket Reset - Tool, Mounting material... - Page 3 Lichtsensor Light sensor innenliegende Antenne* Internal Antenna* Mikrofon Weißlicht LED Microphone White light LED Lautsprecher Speaker PIR Sensor Objektiv Lens * Funk-Frequenz: 2,4Ghz (802.11 b/g/n) Max. Sendeleistung: 20dBm * R adio-Frequency: 2,4Ghz (802.11 b/g/n) Max. Transmission power: 20dBm...
- Page 4 Pairing Taste (1x kurz drücken, die Kamera wird eingeschalten, 3x kurz drücken, bereit für das Einlernen, 5 Sekunden gedrückt halten, Ausschalten der Kamera) Pairing button (Press shortly 1x , Camera power on, press 1/4“ Gewinde für Halterung shortly 3 x, ready for pairing, 5 seconds 1/4“ screw thread for bracket continous pressing, Power off camera) Micro-USB Anschluss Micro-USB Connection Status LED für Ladevorgang (blinkt während des Ladevorgangs, bei voller Ladung und Kabelbetrieb leuchtet diese dauerhaft) Status LED for Charging (Flashes during charging, stays on perma-...
- Page 5 Kugelgelenk Rückplatte Ball Joint Back Plate Fixierring Abdeckung Top Cover Fixing ring...
- Page 6 Drücken Sie 3 x kurz auf das Einschaltzeichen um die Kamera einzulernen. Bei erfolgreicher Verbindung wird der Sprachbefehl „Kameraverbindung erfolgreich abgeschlossen“ wiedergegeben. Drücken Sie die Pairing Taste für Press 3 times shortly on the Power icon to power on the camera. mindestens 3 Sekunden bis die LED blau blinkt. Der Sprachbefehl The camera pairing is successful if the voice command „ Camera „Bereit für Kameraverbindung“...
- Page 7 Schrauben Sie die Kamera auf das Gewinde. Schrauben Sie den Fixierring auf das Gewinde. Please screw the camera onto the thread. Please screw the fixing ring onto the thread. Richten Sie die Kamera mithilfe ihres Smartphones aus und schrauben Sie die Abdeckung der Halterung fest. Please align the camera with your smartphone and tighten the top cover of the bracket.
- Page 8 Per informazioni su una messa in funzione alternativa o sui dettagli del prodotto, consultare le istruzioni per l‘uso disponibili all‘indirizzo: abus.com/products/PPIC90520 An alternative installation as well as detailed information can be found in the user manual which is available on the website: abus.com/product/PPIC90520 A lternativ idrifttagning samt detaljerede oplysninger findes i betjeningsvejledningen, som findes på hjemmesiden: abus.com/product/PPIC90520 I nformacje dotyczące alternatywnych sposobów uruchomienia oraz dodatkowe...
Need help?
Do you have a question about the PPIC90520 and is the answer not in the manual?
Questions and answers