Abus PPIC91000 Quick Manual
Battery cam pro with base station
Hide thumbs
Also See for PPIC91000:
- Operating instructions manual (50 pages) ,
- Quick manual (21 pages) ,
- Quick manual (21 pages)

Subscribe to Our Youtube Channel
Related Manuals for Abus PPIC91000


Summary of Contents for Abus PPIC91000
- Page 1 B A T T E R Y C A M P R O W I T H B A S E S T A T I O N Q U I C K G U I D E PPIC91000, PPIC91520 V 1.0...
-
Page 2: System Requirements
S Y S T E M K R A V S Y S T E M R E Q U I R E M E N T S Placeringstjenesten på den mobile slutenhed skal være aktiveret. The location service of the mobile device must be activated. Maks. -
Page 3: Scope Of Delivery
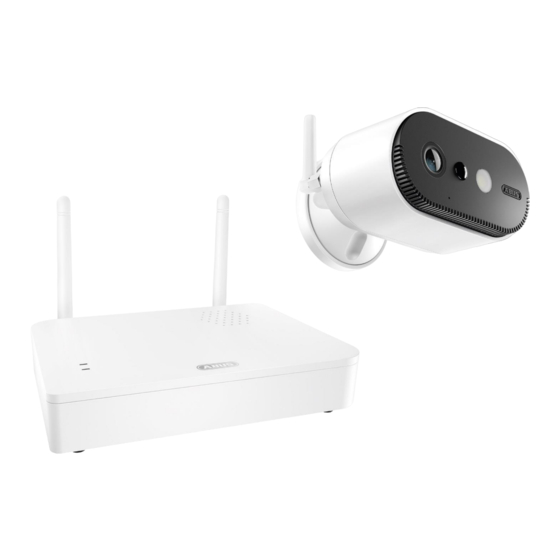
L E V E R I N G S O M F A N G S C O P E O F D E L I V E R Y ABUS batterikamera Pro med basisstation (PPIC91000) ABUS Battery-Cam Pro with Base Station (PPIC91000) Batterikamera Pro Antenne til Batterikamera Pro... - Page 4 L E V E R I N G S O M F A N G S C O P E O F D E L I V E R Y Ekstrakamera til ABUS batterikamera Pro (PPIC91520) Add-on camera for ABUS battery cam Pro (PPIC91520) Batterikamera Pro Antenne til Batterikamera Pro...
- Page 5 K A M E R A C A M E R A Forside Front Objektiv Lens Højtaler Loudspeaker Mikrofon Hvidlys-LED Microphone White light LED PIR-Sensor Bagside Rear ON/OFF-tast og PAIRING 1/4"-gevind til holder ON/OFF and PAIRING button 1/4” thread for bracket Antennetilslutning* (RP-SMA) Antenna connection*...
-
Page 6: Main Unit
B A S I S S T A T I O N M A I N U N I T Forside/bagside Front / Back USB-grænseflade til lagringsmedie (USB-nøgle) Strømforsyning (12 V DC / 1 A) USB interface for storage medium (USB stick) Power supply (12V DC / 1A) LAN-interface Reset-tast... -
Page 7: Be Tje Nings - Og V Isningse Leme Nt E R
BE TJE NINGS - OG V ISNINGSE LEME NT E R O P E R AT I O N A N D D I S P L AY E L E M E N T S Hvis det ikke allerede er sket, oplades kameraets integrerede batteri ved hjælp af USB-C-kablet og en almindelig 5 V USB-stikstrømforsyning, indtil den røde LED på... - Page 8 S E N S O R E N S R E G I S T R E R I N G S O M R Å D E C O V E R A G E A R E A O F T H E S E N S O R Registreringsområdet for den integrerede bevægelsessensor (passiv infrarød teknologi, forkortet PIR) erbegrænset til 8 meter.
-
Page 9: Installation
I N S T A L L A T I O N I N I T I A L S T A R T -U P Installation af App2Cam Plus og ibrugtagning Installation of App2Cam Plus and start-up Download App2Cam Plus til din smartphone eller tablet Download App2Cam Plus to your smartphone or tablet - App2Cam Plus - Android... - Page 10 Mulighed 1: Scan QR-koden, der er placeret under basisstationen. Option 1: Scan the QR code located under the base station. Mulighed 2: Tryk på knappen "Tilføj enhed manuelt" og vælg derefter din kameramodel fra listen. Option 2: Tap on the "Add device manually" button and then select your camera model from the list.
- Page 11 Vælg din basisstation ved hjælp af registreringsnummeret. Du finder registre- ringsnummeret (DID) vedlagt i emballagen. Alternativt på undersiden af basis- stationen. Tryk derefter på "Næste". Select your base station using the identification number. You will find the identification number (DID) enclosed in the packaging. Alternatively, this can be found on the underside of the base station.
- Page 12 Indtast nu en sikkerhedskode og en administratoradgangskode. Følgende specialtegn understøttes: Now enter a security code and an admin password. The following special characters are supported: For at få den bedst mulige kameraoplevelse anbefaler vi, at du altid bruger kameraet med den nyeste fi rmware. Bekræft beskeden med "OK".
- Page 13 The camera and base station are already paired/connected when delivered from the factory or in a common set package (PPIC91000, PPIC91520); in this case, skip steps 11 and 12. Steps 11 and 12 are only to be carried out if the items/components were purchased individually or independently of each other; i.e. usually aft er the purchase of an additional camera (PPIC91520).
- Page 14 Tænd kameraet ved at holde tænd/sluk-knappen nede i 3 sekunder, indtil du hører en signaltone, og status-LED'en (rød) på bagsiden af kameraet lyser. Kameraet er i pairing-tilstand fra fabrikken og opretter nu automatisk forbindelse til basisstationen. Så snart kameraet og basisstationen er forbundet, udløses talebeskeden af basisstationen: "Kameraforbindelsen er gennemført"...
- Page 15 Kameraet optager, når der registreres bevægelser, og sender beskeder (push eller e-mail), hvis funk- tionerne som udgangspunkt er aktiveret i kameraets indstillinger. Akku-Kamera Pro [PPIC91000] Alarm is active The camera records when movements are detected and sends notifications (push or email) if the func- tions are activated in the camera settings.
-
Page 16: Base Station Installation
M O N T E R I N G A F B A S I S S T A T I O N E B A S E S T A T I O N I N S T A L L A T I O N Vær opmærksom på... - Page 17 M O N T E R I N G A F B A S I S S T A T I O N B A S E S T A T I O N I N S T A L L A T I O N Mulighed B: Montering af basisstationen på...
-
Page 18: M O N T E R I N G A F K A M E R A
M O N T E R I N G A F K A M E R A C A M E R A I N S T A L L A T I O N Mulighed A: Placering af kameraet uden vægbeslag Option A: Placement of the camera without wall bracket Kameraet kan placeres på... - Page 19 M O N T E R I N G A F K A M E R A C A M E R A I N S T A L L A T I O N Mulighed B: Montering af kameraet med vægbeslag Option B: Installing the camera with a wall bracket Hvis det er nødvendigt, skal du først sætte kameraet og basisstationen i drift som beskrevet, og derefter teste modtagelsen på...
- Page 20 Le mode d'emploi complet ainsi que d'autres informations sont à votre disposition sur le site Internet d'ABUS : Il suffit de scanner le code QR ou d'entrer l'adresse web pour que la page du produit s'ouvre avec la section Téléchargements.
Need help?
Do you have a question about the PPIC91000 and is the answer not in the manual?
Questions and answers