Advertisement
Advertisement
Table of Contents

Related Manuals for OSD Audio SMP200


Summary of Contents for OSD Audio SMP200
- Page 1 SMP200 DIGITAL SUBWOOFER A M P L I F I E R O W N E R S M A N U A L...
-
Page 2: Important Safety Information
IMPOR TANT SAFETY INFORMATION RISK OF ELECTRIC SHOCK DO NOT OPEN APPLICABLE FOR USA, CANADA OR WHERE RISQUE DE CHOQUE ÉLECTRIQUE N'OUVREZ PAS APPROVED FOR USAGE CAUTION: TO PREVENT ELECTRIC SHOCK, CAUTION: To reduce the risk of electric shock, do not remove cover (or back). MATCH WIDE BLADE PLUG TO WIDE SLOT, No user-serviceable parts inside. - Page 3 INTROD UCTION Congratulations and thank you for purchasing the OSD AUDIO SMP200 Subwoofer Amplifier. The SMP200 may be small in physical appearance but its got all the muscle you need to drive even the most demanding subwoofers to house thumping levels.
-
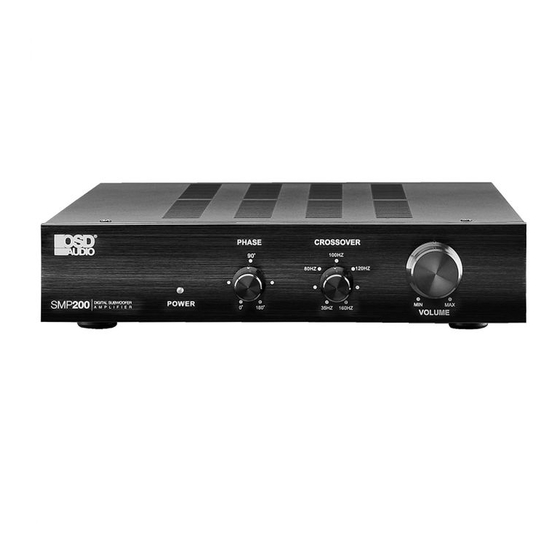
Page 4: Front Panel Features
4. VOL UME - Adjusts the SMP200 audio output level to the connected subwoofer. Set to an appropriate level for a smooth, natural sounding transition to extend and enhance the low frequency output of the full-range speakers connected to Speaker Level OUT. -
Page 5: Rear Panel Features
AC IN:115V/230V,60/50Hz 250W 1. INPUT - Two, RCA jacks. Stereo or mono audio sensing line level audio input. The SMP200 will turn ON when a line level audio signal is present on either jack. Amp will turn OFF after 15 minutes of no audio signal. -
Page 6: Installation
INSTALLATION SHELF MOUNT The SMP200 can be conveniently mounted on a shelf top as shown. Leave room for wires. allow adequate space for airflow. Do not set objects on top of the amp. SMP200 DIGITAL SUBWOOFER A M P L I F I E R... - Page 7 The Line Level Input Illustration shows the SMP200 connected to the Sub OUT on a stereo amplifier. You can also use the Sub OUT, LFE OUT or L&R Line Level OUT on just about any appropriately featured audio device.
- Page 8 3. While observing proper wire polarity, insert the stripped and twisted ends of the speaker wire into the appropriate + and - terminals on the SMP200. Be sure there are no loose strands that can cause shorts.
- Page 9 The signal also gets processed by the SMP200 and Phase settings before getting amplified to the level set by the SMP200 Volume Control. Once set, the volume control for the distribution amp zone will act as a master volume control for both the stereo speakers and sub.
- Page 10 3. While observing proper wire polarity, connect the SMP200 Speaker Level OUT of the SMP200 to the appropriate Left and Right Speaker + and - terminals. Be sure there are no loose strands that can cause shorts.
-
Page 11: Operation
The Crossover sets the frequency at which audio content will pass to the SMP200 Sub OUT. Adjust the crossover so there is a slight overlap with the main speakers low midrange cut-off to produce a natural sounding transition to low frequencies. -
Page 12: Specifications
For this warranty to apply, the unit must be installed and used according to its written instructions. If necessary, repairs must be performed by OSD AUDIO. The unit must be returned to OSD AUDIO at the owner’s expense and with prior written permission.
Need help?
Do you have a question about the SMP200 and is the answer not in the manual?
Questions and answers