Advertisement
Available languages
Available languages
Advertisement
Table of Contents

Related Manuals for Eurosystems La Zappa


Summary of Contents for Eurosystems La Zappa
- Page 1 Bedienungsanleitung für La Zappa Elektro Motorhacke Stand 01.06.2018 eurosystems Deutschland Motorgeräte Handelsgesellschaft mbH Im Fuchshau 14 D-73635 Rudersberg Tel: +49 7183 / 30 590-0 Fax: +49 7183 / 30 590-20 info@eurosystems.info www.eurosystems.info...
- Page 2 Non smaltire insieme ai rifiuti solidi urbani, ma raccogliere separatamente. Le sostanze ed i componenti elettrici contenuti nel presente apparecchio ,se abbandonati o utilizzati in modo improprio , potrebbero rivelarsi dannosi per l’ambiente. Il simbolo del “ bidone della spazzatura su ruote barrato con una barra nera raffigurata sotto il bidone”...
- Page 3 30.0010.900 30.0010.150 30.0010.095 86.2120.000 30.0010.094 81.7665.000 30.0010.242 84.3622.000 81.7640.000 30.0005.216 81.4548.000 86.1998.500 86.3983.000 81.4860.000 30.0010.096 30.0005.075 81.4535.050 86.2070.010 30.0010.057 30.0005.230 86.2210.000 85.1487.000 84.3605.010 30.0005.125 30.0010.056 30.0005.250 86.3085.000 86.2890.000 84.3685.000 30.0005.252 30.0010.243 81.4588.000 84.3667.000 30.0015.060 DX 26.0010.281 30.0015.061 SX 86.2845.000 30.0015.070 30.0020.114 86.2860.020 30.0020.112...
- Page 5 Marcia avanti Forward drive Fahrantrieb vorwärts Marche avant Μπροστινή κίνηση - Leggere attentamente il libretto uso e istruzione prima di usare la macchina - Read the instructions manual before operating on the machine - Lesen Sie die Gebrauchsanweisung vor der Inbetriebnahme - Lire le mode d'emploi avant l'usage - Διαβάστε τις οδηγίες χρήσης πριν θέσετε το...
-
Page 6: Dati Per L'identificazione
Istruzioni d’uso originali INTRODUZIONE Indice Gentile cliente, la ringraziamo per la fiducia accordata ai ns. prodotti e le auguriamo un piacevole utilizzo della sua macchina. Abbiamo creato queste istruzioni per I’uso allo scopo di assicurare, fin dall’inizio, un funzionamento privo Introduzione d’inconvenienti. - Page 7 4. Prima dell’uso controllare lo stato del cavo di alimentazione. Se dovesse essere danneggiato non usare la motozappa, ma verificare il danno e porvi rimedio senza inserire la spina nella presa di corrente. 5. La sezione del cavo di alimentazione deve essere uguale o superiore a quella della classe 05RN. 6.
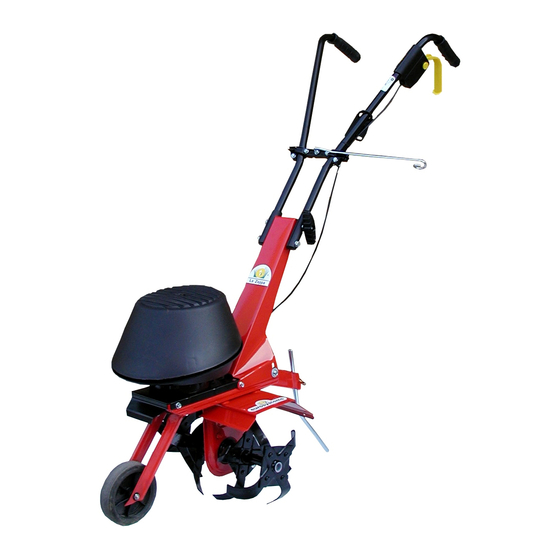
- Page 8 AVVIAMENTO DELLA MOTOZAPPA - Inserire la spina nella presa di corrente (230 volt). - Fare passare il cavo nell’aggancio ferma filo (13) poi nell’asta (10) in modo da allontanarlo dalle frese in movimento. (Fig.2) - Premere il pulsante giallo (1) e tirare la leva (2). (Fig.5) - Una volta avviato il motore, rilasciare il pulsante (1), mantenendo premuta la leva (2).
- Page 9 La fresa e l’arieggiatore si fissano sull’ albero porta frese con vite M8 e dado, dopo aver smontato la fresa standard (cm. 36). L'arieggiatore prato a molle va fissato all'albero porta frese con una spina elastica dopo aver smontato la fresa standard. Il rincalzatore, invece, si fissa alla macchina al posto dello sperone e si blocca con una spilla a “r”.
-
Page 10: Identification Data
Translation of original user instructions Introduction Index Dear Customer, Thank you for your confidence in purchasing our products. We wish you to enjoy using our machines. The following working instructions have been issued to ensure you a reliable running from the beginning. If you Introduction carefully follow such information the machine will operate with complete satisfaction and have a long service life. - Page 11 damaged do not use the tiller: verifiy first the damage, make up for it . Do not put the plug into the socket. 5. The section of the mains cable must be the same or higher if compared to class 05RN. 6.
-
Page 12: Technical Features
TILLER : HOW TO START - Insert the plug into the socket 230 volt, - Make the wire to pass into the wire-holder (13) then into the rod (10) in order to make it away from the rotating tines (fig. 2). - Press the yellow switch (1) and pull the lever (2) (fig. -
Page 13: Troubleshooting
standard pin (cm. 36). The de-thatcher has to be fixed on the hob spindle of the machine with an elastic plug, after the disassembling of the standard cutter. The ridging-plough , on the contrary can be assembled to the machine instead of the spur and can be fixed with a “r” pin. It is absolutely forbidden to use tools/equipment other than the above described ones. - Page 14 Übersetzung der originalen Betriebsanleitung Einleitung Inhaltsverzeichnis Verehrter Kunde, wir bedanken uns für Ihr Vertrauen, das Sie in unseren Qualitätsprodukten entgegebringen und wün- schen Ihnen viel Freude beim Arbeiten mit Ihrem neuen Gerät. Um eine zuverlässige Inbetriebnahme von Einleitung vornherein zu gewährleisten,haben wir diese Betriebsanleitung geschaffen. Wenn Sie die folgenden Hinweise genau beachten, wird Ihr Gerät stets zu Ihrer vollsten Zufriedenheit arbeiten und sich durch eine lange Le- Einsatzbedingungen bensdauer auszeichnen.
-
Page 15: Montage
6. Das Montieren und Abmontieren der Fräsen, deren Reinigung, sowie alle Wartungseingriffe dürfen nur bei abgeschaltetem Motor und ausgestecktem Stecker erfolgen. 7. Beim Anlassen der Motorhacke hinter den Sterzen bleiben. Auch beim Fräsen muß der Bediener diese Position beibehalten. 8. Nicht eigenmächtig an den Schutzverkleidungen und Sicherheitssystemen eingreifen. Beim Loslassen des Hebels müssen der Motor und die Fräse anhalten. -
Page 16: Technische Merkmale
befestigen. Den Schalter wieder schließen und durch die zwei in der Zubehörtüte vorhandenen selbstschneidenden Schrauben befestigen. STARTEN DER MOTORHACKE - Stecker in Steckdose (230 Volt) stecken. - Das Kabel in den Drahthalter (13) und dann in den Stab (10) einführen, um es von den sich bewegenden Fräsen fern zu halten (Abb.2). - Den gelben Knopf (1) drücken und den Hebel ziehen (2). - Page 17 Die Fräse und der Lüfter werden an der Fräsen-Welle durch eine Schraube M8 und eine Mutter angebracht, nachdem die Standardfräse abmontiert worden ist (cm. 36). Der Federrechen wird auf der Hackwellenachse montiert und durch einen Spannstift befestigt, aber nachdem die Hackwerkzeuge demontiert geworden sind.
-
Page 18: Données D'identification
Traduction du mode d’emploi original INTRODUCTION Table des matières Cher client, nous vous remercions de la confiance que vous nous témoignez et vous souhaitons beaucoup de sati- sfaction dans son utilisation. Introduction Afin de garantir d’emblée un fonctionnement sans accrocs nous avons créé cette notice d’utilisation. Si vous observez exactement les indications suivantes votre appareil fonctionnera toujours à... - Page 19 4. Avant l’utilisation , vérifier l’état du cable. Si celui est endommagé , ne pas employer la motobineuse , mais vérifier les dégats et rèparer les. Débrancher la fiche de la prise de courant avant d’effectuer les réparations. 5. La section du cable d’alimentation doît être égale ou supérieure à celle de la classe 05RN. 6.
-
Page 20: Caracteristiques Techniques
MONTAGE DE L’INTERRUPTEUR (FIG. 4) fixer l’interrupteur et insèrer les 2 pivots en plastique dans les trous des mancherons , comme montrè dans la figure . Serrer l’interrupteur et fixer le avec les 2 vis autotaradeuses qui se trouvent dans la pochette visserie. MISE EN MARCHE DE LA MOTOBINEUSE ... - Page 21 très bien pour éliminer la mousse dans le gazon - Scarificateur de gazon : il est bien pour l’entretien du gazon, car les lames pratiquent des sillons dans le terrain qui en permettent l’aération - Bouttoir ou charrue : on l’employe pour faire des petits sillons dans le terrain avant les semailles. La fraise et le scarificateur de gazon se fixent à...
- Page 22 ΕΙΣΑΓΩΓΗ Περιεχόμενα Αγαπητέ πελάτη, Ευχαριστούμε για την εμπιστοσύνη σας στην αγορά των προϊόντων μας. Σας ευχόμαστε να ευχαριστηθείτε την χρήση των μηχανημάτων μας. ΕΙΣΑΓΩΓΗ Οι παρακάτω οδηγίες χρήσης εχουν εκδοθεί για να διασφαλίσουν την αξιόπιστη λειτουργία του μηχανήματός σας απο την αρχή. Αν τις ακολουθήσετε προσεκτικά, το μηχάνημά σας θα λειτουργήσει πλήρως ικανοποιητικά και θα Συνθήκες...
- Page 23 Μην χρησιμοποιείτε το μηχάνημα σε έδαφος με μεγάλες πέτρες. Πριν ξεκινήσετε λειτουργία του μηχ/τος, ελέγξτε προσεκτικά το καλώδιο τροφοδοσίας. Σε περίπτωση που το καλώδιο δείχνει να έχει ελάττωμα /ζημιά, μην χρησιμοποιήσετε το μηχάνημα: ελέγξτε και διορθώστε. Μη βάλετε το καλώδιο στη πρίζα. Η...
-
Page 24: Τεχνικα Χαρακτηριστικα
και τα παξιμάδια (6). Βιδώστε τη βέργα στήριγμα καλωδίου (10) τοποθετώντας τη σπειρωτή άκρη στη μεσαία οπή των πλαστικών συνδέσμων τιμονιού (sleepers) χρησιμοποιώντας τις ροδέλες (12) και τα παξιμάδια (6-9). Η βέργα μπορεί να γυρίσει 180 σε σχέση με τη θέση του καλωδίου, ΠΡΟΣΑΡΜΟΓΗ ο... - Page 25 ΑΞΕΣΟΥΑΡ ΑΦΟΥ ΖΗΤΗΘΟΥΝ Μαχαιρια cm 16: Ευκολο στη χρήση ιδίως για σκάψιμο σε στενές σειρές. – Καταστροφέας: είναι καλό για να εξαλείφει τα μπερδεμένα χόρτα και μίσχους από τα χωράφια και κήπους – Εξαερωτήρας: είναι καλό εργαλείο για τον κήπο σας καθώς οι λεπίδες μπορούν να κάνουν μικρά αυλάκια στο έδαφος για...
Need help?
Do you have a question about the La Zappa and is the answer not in the manual?
Questions and answers