Table of Contents
Advertisement
Advertisement
Table of Contents

Related Manuals for Nolan N-Com MCS III R Series


Summary of Contents for Nolan N-Com MCS III R Series
- Page 3 The MCS III system can only be assembled on Nolan helmets pre-set for N-Com. The MCS III system allows you to listen to audio devices installed on the motorcycles; it CANNOT be used in conjunction with other audio systems for helmets.
-
Page 4: Table Of Contents
Table of contents WARNINGS AND SAFETY ....................5 1.1. Reference standards ........................5 1.2. Road safety ............................5 1.3. Interferences ............................5 1.4. Appropriate use ..........................5 1.5. Qualified personnel .......................... 6 1.6. Disposal ..............................6 CONTENTS OF THE PACKAGING ..................7 INSTALLATION ........................ -
Page 5: Warnings And Safety
MCS III WARNINGS AND SAFETY Read this User Manual carefully, as well as the simple rules listed below. Failure to comply with these rules may lead to dangerous situations. Caution: The product cannot be used in official or non-official competitions, motordromes, circuits, racing tracks and the like. -
Page 6: Qualified Personnel
Caution: Adjust the volume of the N-Com system (where provided) and of the audio sources connected to it so as to avoid audio reproduction at high volumes. Constant exposure to high audio volumes may damage your hearing. Caution: An incorrect installation of the system in the helmet may alter the aerodynamic and safety characteristics of the helmet itself, thus creating dangerous conditions. -
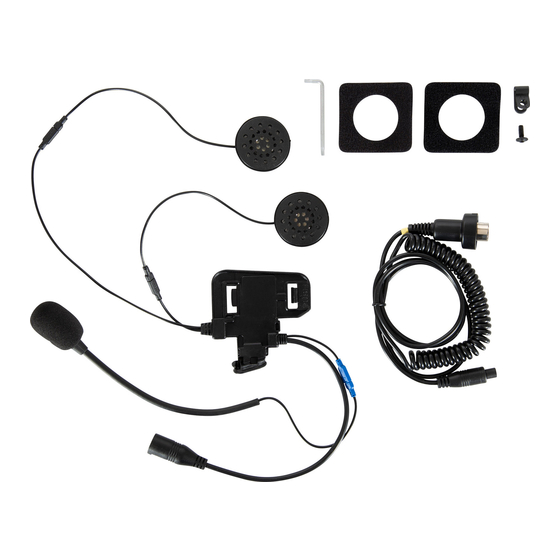
Page 7: Contents Of The Packaging
MCS III CONTENTS OF THE PACKAGING The N-Com MCS III package contains: MCS III system Honda Goldwing Harley Davidson connection cable connection cable Adhesive strips for loudspeakers Microphone with clip... -
Page 8: Installation
INSTALLATION Important: Prior to installing the N-Com system, it is recommended to write down the identification code affixed to the product (see chapter 6.5). Remove the cheek padding (see helmet instructions). Remove the helmet edge gasket using the special tool (Fig. 1). ... -
Page 9: Installing The Mcs Iii System On The Helmet
MCS III 3.1. Installing the MCS III system on the helmet Hook up the microphone connector to the other end, following the directions of the arrows (Fig. 2). N.B.: You can adjust the position of the microphone. For instructions on how to do this, please see chapter. - Page 10 N.B.: For positioning of the wiring and of the microphone in the N100-5 helmet, follow the instructions provided in the dedicated box. Fix the cable inside the helmet and make sure the right fixing clip snaps into its housing (Fig. 4). Fig.
- Page 11 MCS III ONLY FOR HELMET N100-5 – positioning of wiring and microphone Positioning the right side wiring and the microphone: Lift up the plastic lining of the cheek padding (Fig. 6). Insert the microphone into the eyelet (Fig. 7) and position it in the special housing, then inserting the metal boom in the groove found in the chin guard coupling frame (Fig.
- Page 12 ONLY FOR HELMET N100-5 – positioning of wiring and microphone Positioning the left side wiring: Lift up the plastic lining of the cheek padding (Fig. 11). Fix the cable inside the helmet and make sure the left fixing clip snaps into its housing (Fig. 12). ...
-
Page 13: Adjusting The Microphone
MCS III 3.2. Adjusting the microphone The MCS III system makes it possible to adjust the position of the microphone in order to facilitate its positioning in the different helmet models. Proceed as follows: Open the clip positioned on the microphone boom, operating as indicated in Fig. 15. ... -
Page 14: Removing The Mcs Iii System From The Helmet
3.3. Removing the MCS III system from the helmet Proceed as follows to remove the MCS III system from the helmet: Remove the cheek padding and the shell gasket. Unhook the right and the left clips from the shell, levering upward using a flat head screw (or a similar tool), as shown in figure 18. -
Page 15: Operation Of The Mcs Iii System
MCS III OPERATION OF THE MCS III SYSTEM Hook up the cable to the motorcycle, then to the MCS III system. The audio of the system installed on the motorcycle is now transferred to the helmet. You can use the interphone system on the motorcycle by connecting both the pilot’s helmet and the passenger’s to the motorcycle. -
Page 16: Limited Warranty
LIMITED WARRANTY With this LIMITED WARRANTY CERTIFICATE, Nolangroup warrants this Product to be free from defects in material and workmanship at the time of its original purchase by the buyer. We invite you to: Read the cautions pertaining to safety and proper use. ... -
Page 17: Validity Of This Limited Warranty
MCS III This warranty does not include those parts subject to wear and tear such as, for example, the rechargeable battery and the cables used for connection between the various N-Com systems or between the N-Com systems and other devices. ... -
Page 18: Product Identification
AFTER 2 (TWO) YEARS FROM THE DATE OF PURCHASE, THIS LIMITED WARRANTY IS VOID FOR ALL EFFECTS AND PURPOSES. Repairs or maintenance under warranty do not extend the period of the warranty itself. Therefore, in case the product or one of its components is replaced, this does not initiate a new warranty period, as the purchase date of the original product shall be taken into account for warranty purposes. -
Page 19: Warranty Registration Form
WARRANTY REGISTRATION FORM Product name MCS III Identification code Buyer’s Information Name Last name Address Phone e-mail Dealer’s stamp Date of purchase... - Page 20 www.n-com.it...
Need help?
Do you have a question about the N-Com MCS III R Series and is the answer not in the manual?
Questions and answers