Table of Contents
Advertisement
Advertisement
Table of Contents

Related Manuals for Huvitz HRM-300


Summary of Contents for Huvitz HRM-300
- Page 1 HRM-300 Upright Microscope 표지그림 변경 부탁합니다.
- Page 2 HUVITZ reserves the right to make changes in its products or product specifications at any time and without prior notice, and is not required to update this documentation to reflect such changes.
-
Page 3: Table Of Contents
CONTENTS 1. Safety Information ....................5 1-1. Introduction....................5 1-2. Safety Symbols ..................... 6 1-3. Environmental factors ................... 7 1-4. Safety Precautions ..................8 2. Introduction......................10 2-1. Introduction for use (Intended use) .............. 10 2-2. Classification ....................10 3. Operating Condition ..................... 11 4. - Page 4 HRM-300 Upright Microscope 8-4. Observation tube ................... 24 8-4-1. Adjusting the Interpupillary distance ............. 24 8-4-2. Adjusting the Diopter ................24 8-4-3. Using the Eye shades ................25 8-4-4. Selecting the Light path of the Trinocular Tube ........25 8-5. Condenser [TRF. TRF-P]................26 8-5-1.
-
Page 5: Safety Information
1. Safety Information 1-1. Introduction Safety is everyone’s responsibility. The safe use of this equipment is largely dependent upon the installer, user, operator, and maintainer. It is imperative that personnel study and become familiar with this entire manual before attempting to install, use, clean, service or adjust this equipment and any associated accessories. It is paramount that the instructions contained in this manual are fully understood and followed to enhance safety to the patient and the user/operator. -
Page 6: Safety Symbols
HRM-300 Upright Microscope 1-2. Safety Symbols The International Electrotechnical Commission (IEC) has established a set of symbols. The symbols are shown as below. This applies only to the instrument that has the certification symbol printed explicitly on the product label or sticker. -
Page 7: Environmental Factors
1-3. Environment factors Avoid the following environments for operation or storage: Where the equipment is exposed to water vapor. Don’t operate an equipment with a wet hand. For indoor use only Where the equipment is exposed to direct sunlight. Where the temperature changes extremely Normal operating temperature range is from 10C to 40C, Humidity is below 85%. -
Page 8: Safety Precautions
The equipment must be operated only by, or under direct supervision of a properly trained and qualified person. Modifications of this equipment may only be carried out by Huvitz’s service technicians or other authorized persons. Customer maintenance of this equipment may only be performed as stated in the User’s Manual and Service Manual. - Page 9 Huvitz or the manufacturer of the accessory. Keep the User’s Manual and Service Manual in a place easily accessible at all times for persons operating and maintaining the equipment. 10. Do not force cable connections. If a cable does not connect easily, be sure that the connector (plug) is appropriate for the receptacle (socket).
-
Page 10: Introduction
HRM-300 Upright Microscope 2. Introduction 2-1. Indication for use (Intended use) This instrument has been designed to be used to observe magnified images of specimens in routine and research applications. Do not use this instrument for any purpose other than its intended use. -
Page 11: Operating Condition
3. Operating Condition As long as the device is in its original package it can be exposed to the following environmental conditions for up to 15 weeks for shipping and storage without risk of damage: - Temperature range : from –40℃ to +70℃; - Relative humidity range: below 100%;... -
Page 12: Maintenance And Storage
HRM-300 Upright Microscope 5. Maintenance and Storage To clean the lenses and other glass components, simply blow dirty away using a commercially available blower and wipe gently using a piece of cleaning paper (or clean gauze). lf a lens is stained with fingerprints or oil smudges, wipe it gauze slightly moistened with commercially available absolute alcohol. -
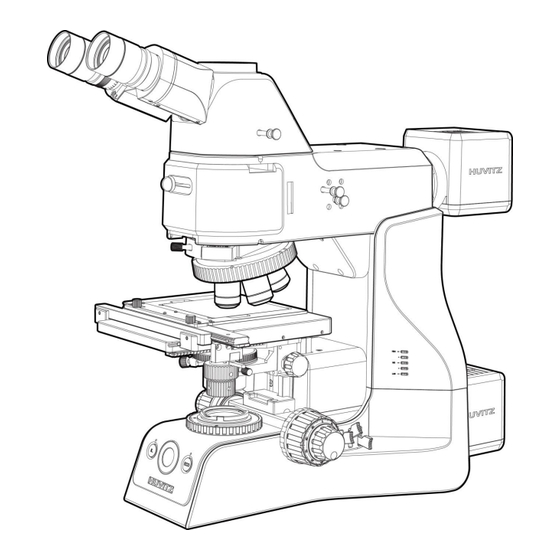
Page 13: Nomenclature
6. Nomenclature Light path selector knob Height indicator XY stage knob [RF-P, TRF-P] ECO button (18 page) Condenser height adjustment knob [TRF, TRF-P] (26 page) Filter switch [TRF, TRF-P] (19 page) Focus tension Voltage indicator adjustment ring (18 page) Intelligent light (21 page) Button (19 page) Field iris diaphragm ring... - Page 14 HRM-300 Upright Microscope Interpupillary distance adjustment scale (24 page) Control box connector [RF-P. TRF-P] (39 page) Diopter adjustment ring (24 page) Pre-focusing Lever (22page) Brightness adjustment knob (18 page) Panasis port (39 page) Power switch...
- Page 15 (Control box and control pad are provided RF-P, TRF-P only.) Main body Control pad connector connector (39 page) (39 page) Power switch Panasis Port (39 page) Fine focus adjustment knob Focus adjustment (28 page) Emergency stop button (29 page) (28 page) Display window (28 page) Origin display...
-
Page 16: Observation Procedure [Transmitted Bf; Trf, Trf-P]
HRM-300 Upright Microscope 7. Observation Procedure [Transmitted BF; TRF, TRF-P) 7-1. Preparation lf you have not assembled the microscope yet, please read “Chapter 11.Assembly". For the reflected light observation, please refer its operation manual. 7-2. Procedure Set the main switch to “I”(ON). - Page 17 ➎ ➊ ➍ ➏ ➐ ➒ ➋ ➓ ➌ ➑...
-
Page 18: Operation
HRM-300 Upright Microscope 8. Operation 8-1. Base 8-1-1. Voltage Indication and Switch Push the brightness adjustment knob ① to switch transmitted / reflected light illumination. Turn the brightness adjustment knob ① counter-clockwise to increase the voltage and make ... -
Page 19: Turn On/Off Intelligent Light Function
8-1-3. Turn ON/OFF Intelligent Light function Push IL button ① to toggle intelligent light function on and off. The IL indicator LED ② turns on when the intelligent light function turns on. If the intelligent light function turns on, the brightness (lamp voltage) automatically changed preset value ... -
Page 20: Focusing Block
HRM-300 Upright Microscope 8-2. Focusing Block 8-2-1. Replacing the Fine Adjustment Knob The fine adjustment knob is designed detachable to prevent interference with hand during manipulation of the fine adjustment knob or XY-axis knob. Usually attach the knob on the opposite side to the XY-axis knob. -
Page 21: Adjusting The Coarse Adjustment Knob Tension
8-2-2. Adjusting the Coarse Adjustment Knob Tension If desired, you can change the coarse adjustment tension using the tension adjustment ring ①. Turing the ring clockwise increase tension, and vice versa. If the tension is too low, the stage drops by itself and focus is quickly lost after adjustment with the fine adjustment knob. -
Page 22: Pre-Focusing Lever
HRM-300 Upright Microscope 8-2-3. Pre-focusing Lever The pre-focusing lever ① ensures that the objectives does not come in contact with the specimen and simplifies focusing. After focusing on the specimen with the coarse adjustment knob, turn this lever clockwise and lock. The ... -
Page 23: Stage
8-3. Stage 8-3-1. Rotating the Stage Slightly loosen the stage clamping screw ①. The stage can be rotated both direction by the stage clamping screw. ➊ Fig.8... -
Page 24: Observation Tube
HRM-300 Upright Microscope 8-4. Observation Tube 8-4-1. Adjusting the Interpupillar Distance While looking through the eyepieces, adjust for binocular vision until the left and right fields of view coincide completely. The Index dot ①indicates the interpupillary distance. ➊... -
Page 25: Using The Eye Shades
8-4-3. Using the Eye Shades When wearing eyeglasses, use with the eyeshades ① in the normal, folded-down position. This will prevent the eyeglasses from being scratched. When not wearing eyeglasses, extend the folded eye shades in direction of the arrow to prevent ... -
Page 26: Condenser [Trf. Trf-P]
HRM-300 Upright Microscope 8-5. Condenser [TRF, TRF-P] 8-5-1. Centering the Condenser Turn the condenser height adjustment knob ① to raise the condenser to its upper limit. Focus on the specimen using the 10x objectives. Rotate the field iris diaphragm ring ② in the direction of the clockwise so that the diaphragm image comes inside the field of view. -
Page 27: Setting The Aperture Diaphragm
8-5-2. Setting the Aperture Iris Diaphragm The aperture iris diaphragm determines the numerical aperture of the illumination system. It has an effect of adjusting image resolution and contrast. Since the contrast of microscope specimens is ordinarily low, setting the condenser aperture ... -
Page 28: Control Pad [Rf-P, Trf-P]
HRM-300 Upright Microscope 8-6. Control pad [RF-P, TRF-P] 8-6-1. General function Push the focus adjustment button ① to control height of stage. Rotate the fine focus adjustment knob ② to control height of stage precisely. Push the focus adjustment knob ② to change precision of control. -
Page 29: Safety Function
Some parameter can be controlled by using Panasis program. Run Panasis program in computer. Select ‘Microscope – Huvitz Upright’ in menubar. Parameter of IL and ECO function can be changed in ‘microscope control’ window. For the precise setting, please refer program manual. -
Page 30: Troubleshooting Guide
Under certain conditions, performance of the microscope may be adversely affected by factors other than defects. If problems occur, Please review the following list and take remedial action as needed. If you cannot solve the problem after checking the entire list, please contact Huvitz Problem... - Page 31 Dirt or dust exists on the eyepiece. 3. Dirt or dust is Dirt or dust exists on the visible in the field Clean it. condenser. of view. Dirt or dust exists on the specimen. Nosepiece is not attached Push the slide dovetail until it is properly.
-
Page 32: Specifications
HRM-300 Upright Microscope 10. Specifications Body unit Item HRM-300 (TRF, TRF-P) HRM-300M (RF, RF-P) Infinity-corrected 1.Optical System optical system 2.Illumination Reflected / Transmitted Reflected Stroke range: 29.5 mm Focus Coarse and Fine focusing knob. Coarse: 17.7 mm/revolution, Fine: 0.1 mm/revolution (1㎛ scale) Upper limit stopper, Torque adjustment ring 3.Base unit... - Page 33 3D module of HRM-300A Item HRM-300A (TRF-P, RF-P) High-resolution 5-phases stepping motor 1. mechanism Long cross-roller guide system 2. Stroke Distance 30mm 3. Resolution 0.01㎛ 4. Repeatability 0.5㎛ 5. Max Speed 1.4mm/sec 6. Dimension 240(W) x 157(D) x 202.5 (H) 7.
-
Page 34: Assembly
HRM-300 Upright Microscope 11. Assembly 11-1. Assembly Diagram The diagram below shows the sequence of assembly of the various modules. When assembling the microscope, make sure that all parts are free of dust and dirt, and avoid scratching any parts or touching glass surfaces. -
Page 35: Detailed Assembly Procedure
11-2. Detailed Assembly Procedures 11-2-1. Installing the Bulb [TRF, TRF-P] The bulb, the lamp socket and areas near these will be extremely hot during and right after use. Set the main switch off, disconnect the power cord from the wall outlet, then wait until lamp housing has cooled down before replacing the bulb with a new of the designated type. -
Page 36: Attaching The Lamp Housing [Trf, Trf-P]
HRM-300 Upright Microscope 11-2-2. Attaching the Lamp housing [TRF, TRF-P] The bulb, the lamp socket and areas near these will be extremely hot during and right after use. Set the main switch off, disconnect the power cord from the wall outlet, then wait until lamp housing has cooled down before removing the Lamp housing. -
Page 37: Attaching The Condenser
11-2-3. Attaching the Condenser [TRF, TRF-P] Turn the coarse adjustment knob ① to raise the stage to its upper limit. Turn the condenser height adjustment knob ② to lower the condenser holder to its lowest position. Fully loosen the condenser clamping knob ③. Position the condenser so that the aperture scale ④... -
Page 38: Attaching The Observation Tube
HRM-300 Upright Microscope 11-2-5. Attaching the Observation Tube Fully loosen the observation tube clamp screw ① with provided Allen screwdriver. Place the observation tube on the top of illuminator and tighten the observation tube clamp screw ①. ➊ Fig.26 11-2-6. Attaching the Eyepiece Attach eyepieces of the same magnification and of the same field number to the left and the right eyes. -
Page 39: Attaching The Control Box And Pad [Rf-P, Trf-P]
11-2-7. Attaching the Control Box and Control Pad [RF-P, TRF-P] Connect control box connecter ① with provided 12pin cable and fasten it Connect main body connector ② with another end of 12pin cable and fasten it. Connect control pad connecter ③ with provided 6pin cable and fasten it Connect control box connector ④... -
Page 40: Service Information
Dealer’s Name Dealer Address: Dealer Phone No.: Version No.: Serial No.: ( Huvitz recommends customers to fill up the above form after purchase and retain this manual as a permanent record of purchase.) Write us at: Tel: +82-31-428-9100 HUVITZ Co., Ltd.
Need help?
Do you have a question about the HRM-300 and is the answer not in the manual?
Questions and answers