Table of Contents
Advertisement
Advertisement
Table of Contents

Subscribe to Our Youtube Channel
Related Manuals for Matrox QuadHead2Go Series


Summary of Contents for Matrox QuadHead2Go Series
- Page 1 ® ™ Matrox QuadHead2Go Series User Guide 20278-301-0100 October 18, 2019...
-
Page 2: Table Of Contents
Description of supported connectors ....................12 Step-by-step connection setup ......................13 Connecting your QuadHead2Go unit ..............15 Before you begin ............................15 Connection overview ..........................15 QuadHead2Go – Back ......................15 Description of connectors ........................16 Step-by-step connection setup ......................16 Matrox QuadHead2Go Series – User Guide... - Page 3 Specifications ............................28 QuadHead2Go card ........................28 QuadHead2Go unit ........................29 External power supply ...........................30 Environmental ............................30 Appendix A – Matrox Secure Cable Solution ............31 QuadHead2Go card ..........................31 Mini DisplayPort™ .........................31 Mini HDMI® ...........................32 QuadHead2Go unit ..........................33 Appendix B – Mounting your Matrox unit ............35 Mounting guidelines ..........................35...
- Page 4 Matrox web ............................38 Technical support ..........................38 Information we need ......................38 Program specific problems .....................39 Software package download ........................39 View your warranty information ......................39 View the third party software notices ....................39 Register your Matrox product .......................39 Matrox QuadHead2Go Series – User Guide...
-
Page 5: Matrox Safety Information
Don’t place the external power supply directly on top of the device. Only use power supplies originally supplied with the product or use a replacement that’s approved by Matrox. Don’t use the power supply if it appears to be defective or has a damaged chassis. -
Page 6: If Your Product Includes Laser-Based Technology
Don’t attempt to open or repair a power supply unit (if one was supplied). Don’t attempt to open or repair your Matrox product. If there’s a fault with your Matrox product, review your Matrox warranty for more information. Matrox QuadHead2Go Series – User Guide... -
Page 7: Overview
Matrox angled brackets To purchase optional hardware, contact your Matrox representative. * The hardware supplied with your Matrox product may vary depending on the SKU or part number of your product. For more information, contact your Matrox representative. † Only active adapters (sold separately) are supported. Passive adapters aren’t supported. -
Page 8: Installation Overview
For information on how to use and configure Matrox PowerWall software, see the PowerWall help file. Be sure to check for any last-minute release notes included with your product. Also, check the Matrox web site (www.matrox.com/graphics) for the latest Matrox software, technical support, and product information. -
Page 9: Getting Started
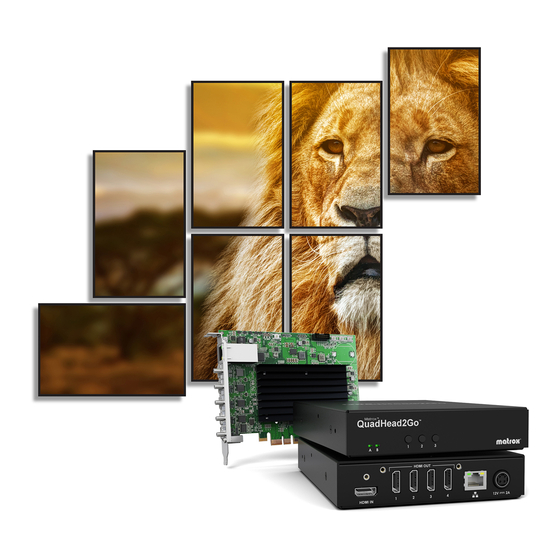
8K by 8K and output on up to four (4) HD HDMI monitors. Configuration guide For information on the possible display wall setups, see the Matrox QuadHead2Go Configuration Guide (www.matrox.com/quadhead2go/support). Before you begin... -
Page 10: Installing Your Quadhead2Go Card
Installing your QuadHead2Go card This section describes how to install your Matrox card. If your Matrox card is already installed in your system, skip to “Connecting your QuadHead2Go card”, page 12. For information specific to your system, like how to remove its cover, see your system manual. -
Page 11: Installing Multiple Cards
Secure the bracket of your Matrox card to the frame of your system. Your Matrox card is now installed. If you’re installing more than one card, see “Installing multiple cards”, page 11. Before restarting your system, connect your devices (see “Connecting your... -
Page 12: Connecting Your Quadhead2Go Card
This section describes how to connect your Matrox QuadHead2Go card. Before you begin To avoid possible problems that could damage your monitors or prevent you from using your Matrox product, read the following guidelines before connecting your devices. Whenever you change your connection setup, make sure you’re using the correct connectors and that all connectors are properly fastened. -
Page 13: Step-By-Step Connection Setup
Connect a network cable to this connector. Note: To connect to the bracket of your Matrox product, the overmold (or boot) of the mini HDMI connectors must respect the maximum width (0.551 inches/14 mm) and thickness (0.331 inches/8.4 mm) stated in the HDMI specifications. - Page 14 Connect to your network Connect a network cable to the RJ-45 connector on your QuadHead2Go card. After connecting your QuadHead2Go card, validate your connection setup (see “Validating your QuadHead2Go setup”, page 19). 14 Matrox QuadHead2Go Series – User Guide...
-
Page 15: Connecting Your Quadhead2Go Unit
This section describes how to connect your Matrox QuadHead2Go unit. Before you begin To avoid possible problems that could damage your monitors or prevent you from using your Matrox product, read the following guidelines before connecting your devices. Whenever you change your connection setup, make sure you’re using the correct connectors and that all connectors are properly fastened. -
Page 16: Description Of Connectors
For more information on LEDs, see “Description of status LEDs”, page DisplayPort IN Connect your DisplayPort cable to your Matrox unit. Connect the other end of the cable to your audio/video source. HDMI OUT Connect a digital monitor to this connector. - Page 17 To connect your monitors, the overmold (or boot) of the HDMI connectors must respect the maximum width (0.823 inches/20.9 mm) and thickness (0.452 inches/11.5 mm) stated in the HDMI specifications. Connect to your network Connect a network cable to the connector on your QuadHead2Go unit. Matrox QuadHead2Go Series – User Guide 17...
- Page 18 After connecting your QuadHead2Go unit, validate your connection setup (see “Validating your QuadHead2Go setup”, page 19). 18 Matrox QuadHead2Go Series – User Guide...
-
Page 19: Validating Your Quadhead2Go Setup
Validating your QuadHead2Go setup After connecting your QuadHead2Go Series products, we recommend you validate your connection setup and network discovery before you continue. Connection checklist After connecting your QuadHead2Go Series products, we recommend you validate your video connections before you continue:... -
Page 20: Network Connector
For more information, contact your network administrator. Multiple subnet support QuadHead2Go Series devices that are in the same subnet are detected through the UPnP (Universal Plug and Play) protocol. If your devices are in different network subnets, you need to validate network discovery in each subnet separately. -
Page 21: Updating Your Matrox Quadhead2Go Firmware
Updating your Matrox QuadHead2Go firmware The Matrox QuadHead2Go Firmware Updater enables you to update the firmware and install the default layouts of your Matrox QuadHead2Go products. Note: Your Matrox QuadHead2Go product may ship with an older firmware version. Before using your QuadHead2Go product, you must update the firmware version installed on your devices to use the version of your deployed release. -
Page 22: Step-By-Step Instructions
QuadHead2Go devices using their IP address. To manually locate the devices, select , and Manual detection under enter the IP address Address or URL of each QuadHead2Go device you want to locate. 22 Matrox QuadHead2Go Series – User Guide... - Page 23 Update the firmware When you’re done adding QuadHead2Go devices to the list of devices you want to update, click Update Wait while the devices are being updated. Updating devices may take up to 10 minutes. Matrox QuadHead2Go Series – User Guide 23...
-
Page 24: Matrox Powerwall Software
Control and fine-tune bezels using pre-set images to ensure seamless image displays. Optimize visuals by cropping, upscaling, or downscaling the content as desired. This section describes how to install and use Matrox PowerWall software for Windows® Server® 2016, Windows® 10 Standard (64-bit), Windows® 10 Professional (64-bit), Windows® 10 Enterprise (64-bit), and Windows®... -
Page 25: Running Matrox Powerwall
Define the network settings of your device. Upload the configurations of the devices in your design to your physical QuadHead2Go devices. More information For more information on PowerWall software, see the help file included with your PowerWall software. Matrox QuadHead2Go Series – User Guide 25... -
Page 26: Using Control Buttons On Your Quadhead2Go Device
Stop pressing the button to apply the current selection. Note: If LED B (right) turns to red when a button is pressed on your QuadHead2Go unit, the buttons on your unit are disabled. For more information, see “Description of status LEDs”. 26 Matrox QuadHead2Go Series – User Guide... - Page 27 Gray gradient Select your layout. The selected layout is highlighted in the list. The available layouts depend on your firmware package and can be modified through Matrox PowerWall or the QuadHead2Go REST (Layout configuration) API. Shows the device information such as: Output ID (1, 2, 3, or 4).
-
Page 28: Product Information
Regulatory compliance Class A: RCM, CE, FCC, KC * Custom resolutions are also supported. Please contact Matrox for more details. † When using a display resolution equal to or higher than 1280×720p60, we recommend you use certified high-speed HDMI cables. -
Page 29: Quadhead2Go Unit
† When using a display resolution equal to or higher than 1280×720p60, we recommend you use certified high-speed HDMI cables. ‡ Unless specified, modes are p60 (progressive 60 Hz). § Only use the power supply originally supplied by Matrox with your Matrox QuadHead2Go product. Matrox QuadHead2Go Series – User Guide 29... -
Page 30: External Power Supply
660hPa (3,000 meters / 9,842 feet) Atmospheric pressure, operational to 1013hPa (0 meters / 0 feet) Atmospheric pressure, 192hPa (12,000 meters / 39,370 feet) non-operational and transportation to 1020hPa (-50 meters / -164 feet) 30 Matrox QuadHead2Go Series – User Guide... -
Page 31: Appendix A - Matrox Secure Cable Solution
Appendix A – Matrox Secure Cable Solution QuadHead2Go card ™ Mini DisplayPort Matrox QuadHead2Go Series – User Guide 31... -
Page 32: Mini Hdmi
® Mini HDMI 32 Matrox QuadHead2Go Series – User Guide... -
Page 33: Quadhead2Go Unit
QuadHead2Go unit Matrox QuadHead2Go Series – User Guide 33... - Page 34 34 Matrox QuadHead2Go Series – User Guide...
-
Page 35: Appendix B - Mounting Your Matrox Unit
Make sure the ambient temperature doesn’t exceed the maximum recommended temperatures. For more information, see “Product information”, page Once your device is mounted, you can connect your system, monitors, and devices to your Matrox device. Matrox QuadHead2Go Series – User Guide 35... -
Page 36: Mounting Your Quadhead2Go Unit
M3 flat-head screws (sold separately) to secure each device to the mounting shelf. The holes used to secure the device to the shelf differ depending on which side (left or right) the device is mounted. 36 Matrox QuadHead2Go Series – User Guide... -
Page 37: Using Your Angled Bracket Kit
Using your angled bracket kit You can mount your Matrox units on standard VESA mounts (75, 100, or 200 mm) or on the back of devices with VESA compliant mounting holes. To mount your Matrox unit on a VESA mount, you need two (2) angled brackets (included in your angled bracket kit). -
Page 38: Customer Support
Technical support Matrox values your business and offers professional support for your Matrox product. If you have a problem, we recommend you follow the procedure below for the quickest results. Contact your integrator – This is usually the quickest and most effective method of technical assistance. -
Page 39: Program Specific Problems
An integrator or a manufacturer may also have directives regarding software updates. Directly from Matrox – A more recent software package may support more features and may offer increased capabilities (such as higher display resolutions). Matrox makes the latest display drivers, firmware, software, and system utilities available on the Matrox Technical Support Web site (www.matrox.com/graphics/en/support/drivers). - Page 40 FCC Compliance Statement Remark for the Matrox hardware products supported by this guide This equipment has been tested and found to comply with the limits for a Class A digital device, pursuant to Part 15 of the FCC Rules. These limits are designed to provide reasonable protection against harmful interference when the equipment is operated in a commercial environment.
- Page 41 Bitte wenden Sie sich an der Matrox-Website (www.matrox.com/environment/en/weee) für Recycling-Informationen. (Italiano) Informazioni per gli utenti europei – Direttiva sui rifiuti di apparecchiature elettriche ed elettroniche (RAEE) Si prega di riferirsi al sito Web Matrox (www.matrox.com/environment/en/weee) per le informazioni di riciclaggio.
- Page 42 Copyright © 2019 Matrox Graphics Inc. • (English) All rights reserved. • (Français) Tous droits réservés. • (Deutsch) Alle Rechte vorbehalten. • (Italiano) Tutti i diritti riservati. • (Español) Reservados todos los derechos. Trademarks • Marques déposées • Warenzeichen • Marchi registrati •...
- Page 43 Copyright © 1996-2018 VideoLAN. This logo or a modified version may be used or modified by anyone to refer to the VideoLAN project or any product developed by the VideoLAN team, but does not indicate endorsement by the project. HTML5 Logo by World Wide Web Consortium (W3C). This HTML5 logo is licensed under this Public License (http://www.creativecommons.org/licenses/by/3.0/legalcode).
- Page 44 However, no responsibility is assumed by Matrox Graphics Inc. for its use, for its reproduction and/or distribution, in whole or in part;...
- Page 45 Matrox Graphics Inc. 1055 Saint Regis Boulevard graphics@matrox.com Dorval, Quebec, Canada H9P 2T4 www.matrox.com/graphics (514) 822-6000...
Need help?
Do you have a question about the QuadHead2Go Series and is the answer not in the manual?
Questions and answers