Table of Contents
Advertisement
Advertisement
Table of Contents
Troubleshooting

Subscribe to Our Youtube Channel
Related Manuals for Reichert AT555


Summary of Contents for Reichert AT555
- Page 1 AT555 Auto Non-Contact Tonometer User’s Guide...
-
Page 2: Table Of Contents
Table of Contents Description Page # Introduction..........................4 Contraindications ........................4 Warnings & Cautions .........................4 Instrument Setup Unpacking Instructions .....................5 Disengaging Travel Lock....................6 Parts Identification ......................7 Icon Definition ........................8 Default Settings ........................9 Tonometer Settings ......................11 Printout Settings .......................12 Communications Settings ....................13 Miscellaneous Settings ....................14 Instructions for Use Alignment &... - Page 3 Figure # Description Page # Shipping Container ................................5 Instrument Components ..............................5 AT555 with Cradle ................................5 Opening Printer Door ............................... 6 Travel Lock ..................................6 Parts Identification ................................7 Proper Patient Alignment .............................. 17 Improper Patient Alignment ............................17 Sample Printout ................................
-
Page 4: Introduction
© 2006 Reichert, Inc. All rights reserved. No part of this publication may be reproduced, stored in a retrieval system, or transmitted in any form or by any means, elec- tronic, mechanical, recording, or otherwise, without the prior written permission of Reichert, Inc. 13912-101 Rev. B... -
Page 5: Instrument Setup
Instrument Setup Great care has been taken to deliver your new AT555 Auto Non-Contact Tonometer to you safely. The container and packaging was specially designed to transport this unit. Please retain the packaging if future transportation is required. Unpacking Instructions... -
Page 6: Disengaging Travel Lock
DO NOT REMOVE THE OUTSIDE COVERS OF THE UNIT OR ATTEMPT TO REPAIR ANY INTERNAL PARTS. REPAIR AND SERVICE OF THE UNIT MUST BE PERFORMED BY EXPERIENCED PERSONNEL OR DEALERS THAT ARE TRAINED BY REICHERT. Push Here Figure 4, Opening Printer Door Figure 5, Travel Lock... -
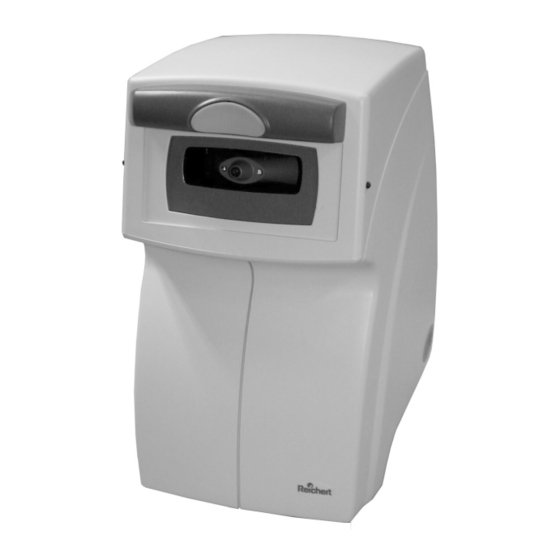
Page 7: Parts Identification
Instrument Setup (Continued) Figure 6, Parts Identification Parts Identification Canthus Alignment Marks (right and left side): Communication port that transfers printer data. Alignment mark that indicates the vertical position of Main Power Connector & Fuse Holder: the center of the patient’s eye. Connection point for input power and the fuses. -
Page 8: Icon Definition
Instrument Setup (Continued) Icon Definition The AT555 incorporates a user-friendly icon/menu-based operating system that will increase the speed of measurements, training and use. Below are the Icons that are used during the operation of this instrument. Icon Icon Description MODE Accesses secondary level menus such as setup and help. MEASURE Initiates the measurement sequence. DEMO Allows patient to feel a soft demonstration air puff. -
Page 9: Default Settings
(Continued) Default Settings The AT555 has default settings that are set at the factory. A summary of these settings are given on the next page. A detailed definition/explanation of each setting is given on pages 11-14. The following steps provide the details on how to customize the default settings. - Page 10 MDY, DMY, YMD Time Format: AM/PM, 24 HR Date: 04/17/2000 Time: 05:00 PM On, Off Printer: Practice: Reichert Communications Setup: (page 13) Baud: 2400, 4800, 9600, 19200 Parity: None, Odd, Even Data Bits: 7, 8 1, 1.5, 2 Stop Bits:...
-
Page 11: Tonometer Settings
Instrument Setup (Continued) Tonometer Settings TONOMETER SETUP Right READINGS Single AVG (3) PRESSURE mmHg Left Down Return The following options are available in the Tonometer Setup menu: Parameters Settings Select READINGS Choose one measurement per eye (Single), or three measurements per eye with the average being shown (Avg (3)). -
Page 12: Printout Settings
24 HR DATE 01/17/2002 Left TIME 5:22 PM PRINTER PRACTICE Reichert Down Return The following options are available in the Printout Setup menu: Parameters Settings Select DATE FMT Choose the date format that will be shown on the printer paper: D=Day, M=Month, Y=Year. -
Page 13: Communications Settings
STOP BITS FLOW None Xon/off PRINTER Down Return The AT555 can transfer data to an external device, such as a computer, through the RS-232C serial port. Select The following options are available in the Communications Setup menu: Parameters Settings BAUD Serial transmission data rate, transfers in bits per second (bps). -
Page 14: Miscellaneous Settings
Instrument Setup (Continued) Miscellaneous Settings MISCELLANEOUS SETUP Right LANGUAGE Eng Fra Deu Esp Por Ita TONE SLEEP Left CONTRAST Down Return The following options are available in the Miscellaneous Setup menu: Parameters Settings Select LANGUAGE Sets the language that is used on the Operator Display. TONE The audible tone indicator (“beep”) can be set to be silent (OFF) or audible (ON). -
Page 15: Instructions For Use
Travel Lock, paragraph in the Instrument Setup section of this manual. When power is applied to the AT555, it will initially perform a calibration check. After completion of the calibration, the message “Press any button to continue” will be displayed. - Page 16 Alignment & Measurement ( Continued The AT555 features a fully automated alignment system that enables the instrument to align itself to the apex of the patient’s left or right eye. This innovative system makes the measurement process quicker and more comfortable for the patient. Perform the following steps to take a measurement of the patient’s eye.
-
Page 17: Proper Patient Alignment
Instructions for Use (Continued) Alignment & Measurement ( Continued Figure 7, Proper patient alignment Figure 8, Improper patient alignment (chin close to unit) (chin moved away from unit) Note: If the patient cannot see the green target, use the canthus marks on the sides of the instrument to set the vertical alignment of the eye and then have the patient move forward until the center of their forehead is against the Forehead Rest pad. - Page 18 Instructions for Use (Continued) Alignment & Measurement ( Continued Once the patient is leaning against the Forehead Rest , press the Measure icon to begin the measurement process. Measure During the positioning process, the Operator Display will change and look similar to the one shown below.
- Page 19 Instructions for Use (Continued) Alignment & Measurement ( Continued After the measurement is completed for the first eye, ask the patient to move their forehead away from the instrument. Measure There are several options available at this point: The Forehead Rest may be slid to the opposite side to continue taking measurements on the other eye All data may be cleared and other measurements taken Clear Data...
-
Page 20: Demo Puff
Demo After each time the DEMO button is pressed and the air puff is delivered, an internal check of the AT555’s systems is conducted to ensure optimum performance of your instrument. Clear Data Note: The DEMO icon will not display if there are measurements displayed on the screen. -
Page 21: Low Confidence Readings
(Continued) Low Confidence Readings During the measurement process, the AT555 may detect a condition that could create a low confidence reading, which is identified with an asterisk after the reading. Asterisk readings can result from an untimely blink or interference from a patient’s eyelashes. - Page 22 Low Confidence Readings ( Continued Measurements with the AT555 are made within a few milliseconds after the instrument “puffs” the eye. Since this measurement cycle is so short, IOP readings can be acquired at different times within a cardiac pulse period. Therefore, repetitive readings for an eye may fluctuate from 2 to 4 mmHg during this cardiac period.
-
Page 23: Too Close Activated
(Continued) Too Close Activated During the measurement process, the AT555 may detect a situation where the patient’s eye is too close to the nosepiece. Should this occur, the instrument will back away from the patient’s eye and then start aligning and measuring again. After three attempts, the instrument will back away completely, and the screen will change to that shown below. -
Page 24: Touch Sensor Activated
This is meant to prevent damage to the instrument and/or to prevent the possibility of causing injury to the patient. Should this situation arise, make sure the patient is not touching the AT555 anywhere near its nosepiece. The instrument will not function until the finger is removed. -
Page 25: Printing Measurement Data
12:00PM [16.0] [17.0] Reichert AT555 Figure 9, Sample Printout If you decide not to make a printout, press the button under the CLEAR DATA icon. This will clear all data from the memory and the screen. The instrument is now ready for the next patient. -
Page 26: Maintenance
Maintenance Fuses Fuses are located next to the power inlet (Refer to page 7, Item# 9). Replace fuses with only a rating of T1.00 AL 250V as indicated on the power inlet panel. An internal fuse for the power circuits is located on the main circuit board inside the unit. Note: Replacement of this fuse must be performed by qualified service personnel only. -
Page 27: Printer Paper
Maintenance (Continued) Printer Paper Instructions for changing printer paper can be found on the inside of the printer door. To order replacement thermal paper, call your local dealer and ask for replacement paper, catalog No. 12441. Paper Release Lever Feed Switch Figure 11, Printer Paper Replacement 13912-101 Rev. -
Page 28: Troubleshooting
Troubleshooting Help Screens The AT555 includes HELP screens, which provide useful information and tips on its operation. These screens are intended to be used as a quick reference to a selection of operations. Mode To access the HELP menu, press the button below the MODE icon. The screen will change and look similar to that below. -
Page 29: Troubleshooting Chart
Clean the Positioning Windows (Refer to the Maintenance section of this manual). Printer not printing. Printer out of paper. Replace paper with Reichert P/N 12441. Printer paper in backwards. Reverse the printer paper. Not using Reichert thermal paper. Replace paper with Reichert P/N 12441. If problems still persist, contact Reichert as shown in the Introduction section of this manual. 13912-101 Rev. B... -
Page 30: Engaging The Travel Lock
Troubleshooting (Continued) Engaging the Travel Lock If it is necessary to ship the instrument to another location, engage the travel lock as follows. Mode Press the button below the MODE icon. The MODE icon can be found on most operating screens. - Page 31 Troubleshooting (Continued) Engaging the Travel Lock ( Continued The screen will also change (as shown below) to indicate the instrument is in the “parked” position. Note: If the instrument does not go to the parked position or the Lock icon is not displayed: a.
-
Page 32: Print-Related Errors
Troubleshooting (Continued) Print-Related Errors If your printer is out of paper, the following message will appear. Instructions for changing printer paper are located on the inside of the printer door (refer to the Maintenance section of this manual). Note: If the printer paper runs out before printing all the measurement data, the data will be stored. -
Page 33: Appendix A - General Specifications
Printer paper 13920-084 Dust Cover 13910-104 AT555 Quick Reference Card To order any of these accessories, contact your local authorized Reichert dealer. Transportation & Storage This instrument can withstand the following conditions while packed for transportation or storage: • An ambient temperature range of -40°F to +158°F (-40°C to + 70°C) • A relative humidity range of 10% to 90% • An atmospheric pressure range of 14.7 inHg to 31.3 inHg (50.0 kPa to 106.0 kPa) -
Page 34: Classification
IPX0 Equipment is ordinary equipment enclosed without protection against ingress of water. The AT555 is not suitable for use in the presence of flammable anesthetic mixtures with air or with oxygen or nitrous oxide. According to the mode of operation, the AT555 is a Continuous Operation instrument. -
Page 35: Warranty
Patent, Reichert will defend such action at its expense and will pay costs and damages awarded in any such action, provided that Reichert shall have sole control of the defense of any such action with information and assistance (at Reichert’s expense) for such defense, and of all negotiation for the settlement and compromise thereof. - Page 36 Reichert, Inc. 3362 Walden Ave Depew, NY 14043 Toll Free: 888-849-8955 Phone: 716-686-4500 email: info@reichert.com www.reichertoi.com Reichert GmbH Hubertusstrasse 2 D-82229 Seefeld Germany Tel: +49-8152-993530 ISO-9001 Certified 13912-101 Rev. B...
Need help?
Do you have a question about the AT555 and is the answer not in the manual?
Questions and answers