Table of Contents
Advertisement
Advertisement
Table of Contents

Related Manuals for Geemarc CL595


Summary of Contents for Geemarc CL595
- Page 1 USER GUIDE...
-
Page 2: Table Of Contents
TABLE OF CONTENTS IMPORTANT SAFETY INSTRUCTIONS ..........1 SET UP THE TELEPHONE ..............2 Package Contents....................2 Location ......................2 Connect the Corded Base Station ..............3 First use of your base ..................3 Base Station Installation options ................ 4 2.5.1 Tabletop to Wall Mount Installation ............ - Page 3 5.9.1 Record a VIP number ................ 19 5.9.2 Use a VIP number ................19 5.9.3 Delete one or all VIP number ............. 19 5.9.4 Record VIP number in photo memory ..........19 5.9.5 Check the VP usage ................19 CALLER DISPLAY (NETWORK DEPENDENT) ......... 20 View the Call List .....................
- Page 4 17 ANSWERING MACHINE ..............32 17.1 Switching Answering Machine On/Off............... 32 17.2 Play Messages on TAM ..................... 32 17.3 Delete all Messages on TAM ..................33 17.4 Record Memos on TAM ..................... 33 17.5 Answering Machine Settings ................33 17.5.1 Set the talking TAM language ............
-
Page 5: Important Safety Instructions
IMPORTANT SAFETY INSTRUCTIONS When using your telephone equipment, basic safety precautions should always be followed to reduce the risk of fire, electric shock and injury, including the following: 1. Read and understand all the instructions. 2. Follow all warnings and instructions marked on the product. 3. -
Page 6: Set Up The Telephone
SET UP THE TELEPHONE Package Contents The package contains the following items: • Base station • Corded handset • AC power adapter • Telephone line cord • User’s manual Location For maximum coverage and reduce the interference, here are some guidelines you should consider when you place the base unit, place it away from electronic appliances such as televisions, microwave ovens, radios, personal computers, wireless devices or other cordless phones. -
Page 7: Connect The Corded Base Station
Connect the Corded Base Station Plug one end of Plug the large end of the telephone base power the telephone line adapter into a power cord into a outlet. telephone jack or a DSL filter. Route the power adapter If you have DSL high- cord through this slot. -
Page 8: Base Station Installation Options
Base Station Installation options Your telephone base is ready for tabletop use. If you want to mount your telephone on a wall, follow the steps to connect the telephone base with a standard dual-stud telephone wall mounting plate. You may need a professional to install the mounting plate. -
Page 9: Wall Mount To Tabletop Installation
2.5.2 Wall Mount to Tabletop Installation 1. Unplug the power adapter from the power outlet. Unplug the telephone line cord from the wall jack (or DSL filter). If the telephone line cord and power adapter cord are bundled, untie them first. Push the telephone base up to remove it from wall. 2. -
Page 10: Get To Know Your Phone
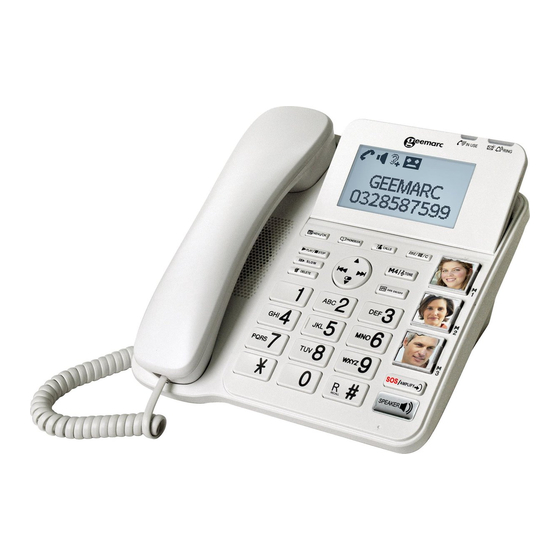
GET TO KNOW YOUR PHONE Overview of the corded base 1 LCD DISPLAY IN USE : ON during a call. RING light ● Flashes when there is an incoming call. ● Steadily on when the answering machine is turned on. Flashes when there are new memos or messages in the answering machine. - Page 11 INT / MUTE / CLEAR ● In main menu mode: Press to go back to idle screen. ● In sub-menu mode: Press to go back to previous level. ● In sub-menu mode: Press and hold to go back to idle screen. ●...
- Page 12 12 NAVIGATION KEYS ▲ ● In menu mode: Press to scroll up the menu items. ● In Phonebook list / Redial list / Call list: Press to scroll up the list. ● In editing mode: Press to move the cursor one character to the right.
-
Page 13: Base Corded Menu Structure
Base corded Menu Structure In idle mode, pressing MENU/OK will access the menu. Refer to the following for the menu structure. MENU/OK Main CALL loog PHOTO PHONEBOOK CALL INTERCOM DATE & TIME TEXT LANG Menu BLOCK BLACK LIST HANDSET 1 Review Call ENGLISH DATE FORM... -
Page 14: Base Lcd Display
Base LCD Display The screen display gives you information on the current status of the telephone. This will display when there is a new calls list entry or if one is being viewed. Indicate a call is in progress. Indicate that speakerphone is being used. Steadily on when the telephone answering machine (TAM) is turned on. -
Page 15: Text And Digit Entry Table
Text and Digit Entry Table The following tables show you where each letter and punctuation character can be found. This will be helpful when storing a name in the phonebook or renaming your handset. In editing mode, a cursor is displayed to indicate the current text entry position. It is positioned at the right of the last character entered. -
Page 16: Use Your Phone
USE YOUR PHONE Make an External Call 4.1.1 Preparatory Dialing Enter the phone number and lift the corded handset or press SPEAKER to dial the number. Press to clear the entry when entering the number. 4.1.2 Direct Dialing Lift the corded handset or press SPEAKER to take the line and enter the phone number. -
Page 17: Answer A Call
Answer a Call When there is an incoming ring, pick up the corded handset or press SPEAKER to answer the call. Volume Boost Function The Volume Boost function allows you to amplify the handset earpiece volume to compensate for the ear’s limited sensitivity. -
Page 18: Redial The Last Number
4.10 Redial the Last Number You can redial up to 10 of the last numbers called on the cordless handset or on the corded telephone base. If you have stored a name in the phonebook to match with the number, the name will be displayed instead. -
Page 19: Make An Internal Call
4.12 Make an Internal Call (if you have added an additional handset) This feature allows you to make internal calls, transfer external calls and make conference calls. If the called base or handset is not answered within 60 seconds, the called base or handset will stop ringing and the calling one will return to standby mode. -
Page 20: Phonebook
5. PHONEBOOK Your phone can store up to 50 private phonebooks in the cordless handset and the telephone base with names and numbers. Each phonebook entry can have a maximum of 20 digits for the phone number and 12 characters for the name. You can also select different ringer tones for your phonebook entries. -
Page 21: Delete A Phonebook Entry
Delete a Phonebook Entry 1. Press MENU/OK and to select PHONEBOOK main menu item. 2. Press MENU/OK 2 times to access the phonebook list 3. Scroll until you see the contact you want to delete. 4. Press MENU/OK and to select DELETE. 5. -
Page 22: Set The Fast Dial Numbers
5.8 Set the Fast Dial Numbers After setting the fast dial numbers, you can dial to the pre-set numbers by pressing lding the respective digit keys from idle mode. 5.8.1 Add or Edit the Fast Dial Number 1. Press MENU/OK and to select PHONEBOOK main menu item. -
Page 23: Vip Number
VIP Numbers You have the possibility to do a VIP phonebook with 50 numbers to have a quick access. 5.9.1 Record a VIP number Press PHONEBOOK to display the first phonebook entry in alphabetical order. 1. Press MENU/OK and to select PHONEBOOK main menu item. 2. -
Page 24: Caller Display (Network Dependent)
6. CALLER DISPLAY (NETWORK DEPENDENT) This feature is available if you have subscribed the Caller Line Identification service with your network service provider. Your phone can store up to 20 received calls on the cordless handset and the telephone base with date/time information in the call list. The number will be shown on the LCD when the phone is ringing. -
Page 25: Store A Call List Number Into The Phonebook
Store a Call List Number into the Phonebook Follow Section 6.1 to access the call list. Press MENU/OK to select ADD TO PB? Press MENU/OK and check the phone number. Press MENU/OK and the name will be displayed. Edit the name if necessary. Use the key INT/MUTE/CLEAR to delete a character. -
Page 26: Direct Memories Keys
7. DIRECT MEMORY KEYS There are three photo speed dial memory keys 1, 2, and 3 and 1 speed dial memory key M4 on the right side of the telephone base for you to store frequent use numbers. After a number is stored in any of these memory keys, you can simply press once on one of these memory keys to dial out to the number stored in it directly. -
Page 27: Delete A Direct Memory Key
Delete a direct memory key 1. Press MENU/OK, and ▼/▲ to select PHOTO MEM. 2. Press MENU/OK, and ▼/▲ to select M1 to M4. 3. Press MENU/OK and ▼/▲ to select DELETE. the display shows “CONFIRM?”. 4. Press MENU/OK and 5. -
Page 28: Black List Function
BLACK LIST FUNCTION This feature allows you to block calls from the numbers you have entered. You have the option to put up to 100 contacts and choose whether you reject all calls, all calls except the VIP contact list, all private or unknown numbers. Record or Edit a black list number 1. -
Page 29: Activation Of The Function For The Private Or Unavailable Number
Activation of the function for the Private or Unavailable numbers You have the possibility to block the private or unavailable numbers only. 1. Follow steps from 1 to 2 in section 8.4 2. Press MENU/OK and to select W/O NUMBER. Press MENU/OK and choose the type of blocking PRIVATE or UNAVAILABLE 4. -
Page 30: Phone Settings
12. PHONE SETTING 12.1 Base Settings 12.1.1 Set the Ringer Melody for Internal Calls You can set special melody to personalize your base internal ringer. A total of 5 melodies are provided for your selection. 1. Press MENU/OK and to select SETTINGS. 2. -
Page 31: Set The Key Tone
12.1.4 Set the Key Tone The key tone is a confirmation beep when you press any key. It is set on by default but can be turned off, if desired. Press MENU/OK and to select BS SETTINGS. Press MENU/OK and to select KEY TONE. -
Page 32: Registration
12.1.8 Registration of one additional handset Register your handset according to the following procedure. On the cordless handset: 1. Press to select HS SETTINGS. 2. Press to select REGISTER. and the display will show “REGISTRING”. 3. Press On the base: 4. -
Page 33: Sos Emergency Function
SOS EMERGENCY FUNCTION 14.1 SOS settings You need to set the SOS numbers before you can make SOS emergency calls. 1. Press MENU/OK, and ▼/▲ to select SET SOS. and ▼/▲ to select SOS NUMBER. 2. Press MENU/OK, and ▼/▲ to select the SOS number to edit (SOS 1, SOS 2, SOS 3 or SOS 4). 3. -
Page 34: Delete A Sos Message
14.6 Delete a SOS messages 1. Press MENU/OK, and ▼/▲ to select SET SOS. and ▼/▲ to select SOS MSG. 2. Press MENU/OK, and ▼/▲ to select DELETE. 3. Press MENU/OK 4. Press MENU/OK to delete your message and come back at the origin announce. 14.7 Set the talking language You can choose the voice prompt language of the answering machine from a total of 4 languages (French, English, Dutch and German). -
Page 35: Set The Alarm Melody
15.2 Set the Alarm melody You have the choice to select 1 of the 10 Melodies. 1. Follow steps from 1 to 2 in section 15.1. Press MENU/OK and ▼/▲ to select MELODY. Press MENU/OK and ▼/▲ to select your desired alarm melody. Press MENU/OK and ▼/▲... -
Page 36: Answering Machine
ANSWERING MACHINE Your telephone base includes a telephone answering machine that records unanswered calls when it is on. The answering machine can store up to 59 messages within the maximum recording time of approximately 15 minutes. As well as recording incoming messages, you can record memos for other users of your phone. -
Page 37: Delete All Messages On Tam
Press to confirm the setting NOTE: After new message is played, the new message will be saved as an old message automatically unless it is deleted. 17.3 Delete all Messages on TAM Using the base menu: 1. Press MENU/OK and to select ANS. -
Page 38: Turn On/Off The Base Screening
17.5.2 Turn On or Off the Base Screening You can select to turn on or off the call screening on base. When the answering machine is set to ON and when there is an incoming message, the base will start call screening automatically after the preset numbers of rings of answer delay. -
Page 39: Set The Answer Delay
17.5.6 Set the Answer Delay You can set the number of rings before the answering machine answers and starts playing your OGM. You can set the answering machine to answer after two to ten rings or TIME SAVER. The TIME SAVER function answers calls after 6 ring signals, until the first new message has been registered - then the answering machine switches to answering after approximately 2 signals. -
Page 40: Activate Or Deactivate The Remote Access
17.5.8.2 Activate or Deactivate the Remote access 1. Press MENU/OK and to select ANS. SYS. 2. Press MENU/OK and to select SET TAM. 3. Press MENU/OK and to select REMOTE ACC. 4. Press MENU/OK and to select ON or OFF to turn on or off the remote access respectively. 5. -
Page 41: Remote Operations
17.5.10 Remote Operations If you are away from your home, you can call your answering machine to switch on or off the answering machine and listen to your messages remotely using another tone-dialing phone. 1. Place a call from a tone-dialing phone. 2. -
Page 42: Troubleshooting
TROUBLESHOOTING If you have difficulty with your phone, please try the suggestions listed below. Problem Solutions My telephone does • For optimum daily performance, return the handset to not work at all. the telephone base after use. • Make sure the power adapter is securely plugged into an outlet not controlled by a wall switch. - Page 43 • There is The handset may be out of range. Move it closer to the interference telephone base. during a • If you subscribe to high-speed Internet service (digital telephone subscriber line - DSL) through your telephone line, you must conversation.
-
Page 44: Technical Specifications
TECHNICAL SPECIFICATIONS Basic Information Power Supply Base Input 100-240V 50/60Hz; output 6V; 450mA adapter * Values may vary according to environment. ** Depending on initial battery charge. -
Page 45: Care And Maintenance Instructions
CARE AND MAINTENANCE INSTRUCTIONS Take care of your telephone • Your cordless telephone contains sophisticated electronic parts, so you must treat it with care. • Avoid rough treatment. • Place the handset down gently. • Save the original packing materials to protect your telephone if you ever need to ship it. Avoid water •... -
Page 46: Guarantee
21 GUARANTEE From the moment your Geemarc product is purchased, Geemarc guarantee it for the period of two years. During this time, all repairs or replacements (at our discretion) are free of charge. Should you experience a problem then contact our help line or visit our website at www.geemarc.com. -
Page 47: Declarations
22 DECLARATIONS: CE Directives Geemarc Telecom SA hereby declares that this product is in compliance with the essential requirements and other relevant provisions of the Radio and Telecommunications Terminal Equipment Directive 2014/53/UE. The CE declaration of conformity may be consulted at www.geemarc.com... - Page 48 UG CL595_En_v0.1 01707-387602...
Need help?
Do you have a question about the CL595 and is the answer not in the manual?
Questions and answers
when calling from an external phone ,there is only one ring and then get the message "1 New Call"
The Geemarc CL595 may only ring once before showing "1 New Call" because it is using the Caller Line Identification (Caller Display) feature. When a call is received, the phone retrieves and processes the caller's information before displaying it on the screen. If the caller's number is withheld or unavailable, the phone may briefly ring before updating the display with "1 New Call." Additionally, if the answering machine or call screening features are enabled, they may affect the ringing behavior.
This answer is automatically generated
What is the "call list"? HOW TO MAKE IT?
The call list feature on the Geemarc CL595 stores a log of received calls, with the latest call appearing at the top. When the list is full, the oldest call is replaced by a new one. Unanswered calls that have not been read are marked with an icon.
To access the call list:
1. Press CALLS to open the call log.
2. Alternatively, press MENU/OK, then use the navigation keys to select CALL LOG and confirm with MENU/OK.
3. Use navigation keys to browse the list and view call details.
The call list is created automatically as calls are received.
This answer is automatically generated
I understand there are 20 keys in which phone numbers could be stored how can I do this storage? Also, how phone numbers could be stored in a "list" (not repeat call list!). thanks for your time! Jack Cohen, PhD Tel Aviv, Israel
To store phone numbers in the Geemarc CL595, follow these steps:
1. Press PHONEBOOK to display the first phonebook entry in alphabetical order.
OR
- Press MENU/OK and use / to select PHONEBOOK from the main menu.
- Press MENU/OK twice to access the phonebook list.
- Press MENU/OK and use / to select ADD.
- Press MENU/OK and enter the phone number (up to 20 digits).
- Press MENU/OK and enter the name (up to 12 characters).
- Press MENU/OK to store the entry.
To create a list of stored phone numbers:
1. Press PHONEBOOK to display the first stored entry alphabetically.
OR
- Press MENU/OK and use / to select PHONEBOOK from the main menu.
- Press MENU/OK twice to access the phonebook list.
- Use / to navigate through stored entries.
This answer is automatically generated