CHIEF SLBU Installation Instructions Manual
Universal interface brackets
Hide thumbs
Also See for SLBU:
- Installation instructions manual (25 pages) ,
- Installation instructions manual (12 pages) ,
- Installation instructions manual (8 pages)
Table of Contents
Advertisement
Quick Links
I N S T A L L A T I O N I N S T R U C T I O N S
Instrucciones de instalación
Installationsanleitung
Instruções de Instalação
SLBU
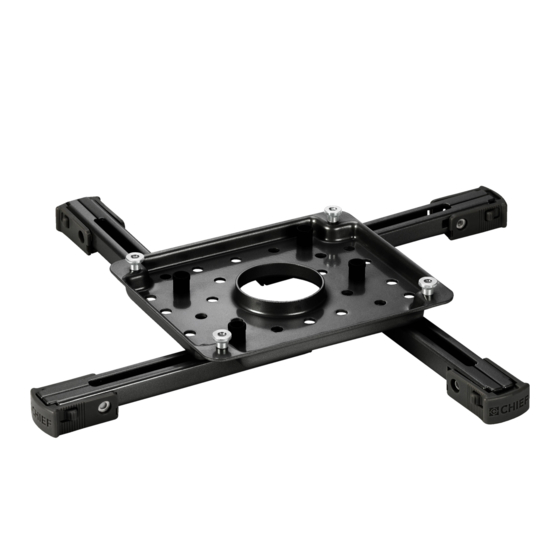
Universal Interface Brackets
Istruzioni di installazione
Installatie-instructies
Instructions d´installation
SLMU
Spanish Product Description
German Product Description
Portuguese Product Description
Italian Product Description
Dutch Product Description
French Product Description
SLBU/SLMU
Advertisement
Table of Contents

Related Manuals for CHIEF SLBU


Summary of Contents for CHIEF SLBU
- Page 1 I N S T A L L A T I O N I N S T R U C T I O N S Instrucciones de instalación Istruzioni di installazione Installationsanleitung Installatie-instructies Instruções de Instalação Instructions d´installation SLMU SLBU Universal Interface Brackets Spanish Product Description German Product Description Portuguese Product Description Italian Product Description Dutch Product Description French Product Description...
- Page 2 Reinforce the structure as required before installing the Chief® is a registered trademark of Milestone AV Technologies. component. All rights reserved. WARNING:...
- Page 3 Installation Instructions SLBU/SLMU LEGEND Tighten Fastener Pencil Mark Apretar elemento de fijación Marcar con lápiz Befestigungsteil festziehen Stiftmarkierung Apertar fixador Marcar com lápis Serrare il fissaggio Segno a matita Bevestiging vastdraaien Potloodmerkteken Serrez les fixations Marquage au crayon Loosen Fastener Drill Hole Aflojar elemento de fijación...
-
Page 4: Tools Required For Installation
M6 x 14mm Q (4) M4 x 10mm M5 x 14mm E (2) F (4) 8-32 x 3/8" 10-24 x 1/4" S (4) [SLBU Only] [SLBU Only] V (1) T (4) U (1) 5/32" 1/4" 1/4-20 (security) H (1) G (4) 5/16-18 x 1/2"... -
Page 5: Assembly And Installation
Only use washers (S) if using M or N screws to attach screw adapters to projector. Remove Screw Adapters from SLBU/SLMU Legs Press locking buttons on SLBU/SLMU leg (B) firmly and simultaneously push clip cover toward enclosed sliding stud (M, N, P, Q or R) mount bracket and screw. - Page 6 Make sure arm latch clips are in the unlocked position. Position sliding stud mount brackets and screws so that SLBU or SLMU main plate (A) can be evenly mounted to legs. (See Figure ) and (See Figure 7) Use 1/4" hex key (U) to secure Allen nuts (T) to screws on sliding stud mounts.
- Page 7 Installation Instructions SLBU/SLMU Attach SLBU/SLMU to RPA or RPM On SLBU, partially install four thumb nuts (D) to SLBU main plate screws. (See Figure 8) NOTE: If using optional security brackets (C) to connect SLBU bracket to RPA or non-locking RPM mount, refer to Security Bracket Installation section prior to installing thumb nuts.
- Page 8 Europe A Fellenoord 130 5611 ZB EINDHOVEN, The Netherlands P +31 (0)40 2668620 F +31 (0)40 2668615 Chief Manufacturing, a products division Asia Pacific A Office No. 1 on 12/F, Shatin Galleria of Milestone AV Technologies 18-24 Shan Mei Street...
Need help?
Do you have a question about the SLBU and is the answer not in the manual?
Questions and answers