Table of Contents
Advertisement
Quick Links
Dear Customer,
Thank you for choosing a Smeg product.
By choosing one of our products, you have selected an appliance which combines
iconic style with innovative technical design and attention to detail.
This appliance coordinates perfectly with other Smeg products, or works equally great
as a standalone statement piece in your kitchen.
We hope you enjoy using your new appliance!
For any further information please visit www.smeg.com or www.smegusa.com (website
valid only for the USA, Canada and South America).
The manufacturer reserves the right to make any changes deemed useful for improvement of its products without prior
notice. The illustrations and descriptions contained in this manual are therefore not binding and are merely indicative.
SMRM01
Ravioli maker accessory
Advertisement
Table of Contents

Related Manuals for Smeg SMRM01


Summary of Contents for Smeg SMRM01
- Page 1 By choosing one of our products, you have selected an appliance which combines iconic style with innovative technical design and attention to detail. This appliance coordinates perfectly with other Smeg products, or works equally great as a standalone statement piece in your kitchen.
-
Page 2: Table Of Contents
Contents 1 Instructions 1.1 Introduction 1.2 User manual 1.3 Intended use 1.4 Manufacturer liability 1.5 Disposal 2 Description 2.1 Product description 2.2 Standard accessories 3 Use 3.1 Before first use 3.2 Installing the ravioli maker accessory in the stand mixer attachment 3.3 Using the ravioli maker accessory 4 Cleaning and care 4.1 Instructions... - Page 3 Important Safeguards RECOGNIZE SAFETY INFORMATION This is a safety alert symbol. This symbol alerts you to potential hazards that can result in severe personal injury or death. UNDERSTAND SIGNAL WORDS A signal word - DANGER, WARNING or CAUTION - is used with the safety alert symbol.
- Page 4 Important Safeguards WARNING To reduce the risk of fire, electrical shock, personal injury, or damage when using the appliance, follow basic safety precautions, including the following: The ravioli maker accessory is a stand mixer • Do not place the stand mixer/accessory accessory.
-
Page 5: Save These Instructions
Important Safeguards For the stand mixer and the ravioli maker accessory • Switch off the stand mixer and unplug it • Do not use the ravioli maker accessory if from the mains before installing and it is damaged. operating the ravioli maker accessory. •... -
Page 6: Instructions
Important Safeguards 1 Instructions 1.2 User manual This user manual is an integral part of the 1.1 Introduction ravioli maker accessory and must therefore be kept in its entirety and in an accessible Key information for the user: place for the whole working life of the Instructions accessory. -
Page 7: Manufacturer Liability
Important Safeguards 1.4 Manufacturer liability 1.5 Disposal The manufacturer shall not be held Old appliances do not belong in responsible for personal injuries or property household waste! To comply with damage caused by: applicable legislation, old appliances, on reaching the end of their useful lives, should •... -
Page 8: Description
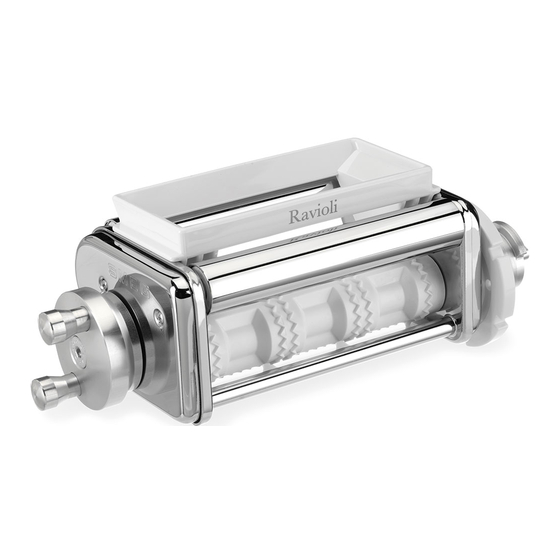
Description 2 Description 2.1 Product description SMRM01 - Ravioli maker accessory 1 Hopper 2 Body 3 Crank 4 Rollers 5 Ring nut and attachment 6 Filling spoon 7 Cleaning brush 8 Key... -
Page 9: Standard Accessories
Description 2.2 Standard accessories Filling spoon For inserting the filling in the hopper. The pointed shape helps distribute the filling in For loosening and tightening the ring nut. the corners. Brush The accessories intended to come into contact with food are made of materials that comply with the provisions of current legislation. -
Page 10: Use
3 Use 3.2 Installing the ravioli maker accessory in the stand mixer attachment Information and recommendations for the user 1. Ensure that the stand mixer is switched off and unplugged. Ensure that the head of • The ravioli maker accessory must be the stand mixer is lowered. - Page 11 2. Grasp the front attachment hub cover (1) 4. Insert the accessory (2) following the guide in the attachment hub (3), then turn at the centre and turn it clockwise. it 60°. 3. Pull the cover (1) to remove it.
-
Page 12: Using The Ravioli Maker Accessory
3.3 Using the ravioli maker accessory Tips and suggestions for the user 1. Follow the tips given in the section “Tips for perfect pasta dough” when preparing the pasta dough. • When first using the accessory, practise using it by inserting pasta without adding the filling in order to gain familiarity and perfect your technique. - Page 13 2. Remove the hopper (1) from the ravioli 4. Insert the folded end of the pasta sheet between the rollers (3) and turn the maker accessory (2) by pushing it crank (4) a quarter of a turn to introduce upwards. the pasta sheet.
- Page 14 8. Slowly turn the crank (7), checking that 6. Insert the hopper (5) on the pasta sheet the ravioli strip comes out from the lower and push it until it clicks. The edges of the part of the accessory easily. hopper must touch the ravioli maker accessory.
- Page 15 Tips for perfect pasta dough 10. Clean the ravioli maker accessory using the supplied brush and lightly flour the • Humidity, type of flour chosen and size rollers before preparing a second strip of of the eggs used can all influence the ravioli.
-
Page 16: Cleaning And Care
Cleaning and Care 4 Cleaning and care 4.4 Food stains or residues Use the supplied brush to remove any dry 4.1 Instructions pasta residue. You must never use sharp scrapers or Improper use knives, as these will damage the surface. Risk of damage to surfaces Do not insert cloths or tea towels between the rollers to clean them. -
Page 17: Recipes
Recipes 5 Recipes Spinach and ricotta cheese ravioli 3. Parboil the spinach. Once parboiled, squeeze dry and chop. 4. Pass the ricotta through a sieve and place in a bowl, adding the chopped spinach, breadcrumbs, Parmesan, salt and nutmeg. 5. Mix well to create the filling. 6.
Need help?
Do you have a question about the SMRM01 and is the answer not in the manual?
Questions and answers