Table of Contents

Related Manuals for National Instruments CompactRIO cRIO-9002


Summary of Contents for National Instruments CompactRIO cRIO-9002
- Page 1 Artisan Technology Group is your source for quality new and certified-used/pre-owned equipment SERVICE CENTER REPAIRS WE BUY USED EQUIPMENT • FAST SHIPPING AND DELIVERY Experienced engineers and technicians on staff Sell your excess, underutilized, and idle used equipment at our full-service, in-house repair center We also offer credit for buy-backs and trade-ins •...
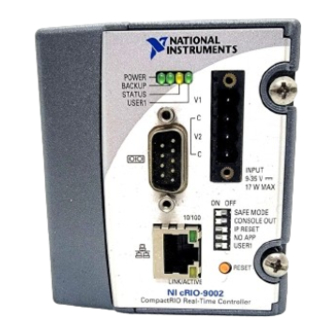
- Page 2 9–35 V 17 W MAX 1 LEDs 4 Reset Button 2 Power Connector 5 RJ-45 Ethernet Port 3 DIP Switches 6 RS-232 Serial Port Figure 1. CompactRIO cRIO-9002/9004 Artisan Technology Group - Quality Instrumentation ... Guaranteed | (888) 88-SOURCE | www.artisantg.com...
-
Page 3: Safety Guidelines For Hazardous Locations
Instruments cRIO-9002 and cRIO-9004 to a network and how to use the features of the cRIO-9002 and cRIO-9004. For information about installing, configuring, and programming the controller, refer to the CompactRIO Bookshelf at Start»All Programs»National Instruments» CompactRIO»Search the CompactRIO Bookshelf. Safety Guidelines Operate the cRIO-9002/9004 only as described in these operating instructions. - Page 4 88.1 mm (3.47 in.) 44.2 mm (1.74 in.) 1 M4 Thread Figure 2. CompactRIO Controller, Front and Bottom Views with Dimensions © National Instruments Corporation cRIO-9002/9004 Operating Instructions Artisan Technology Group - Quality Instrumentation ... Guaranteed | (888) 88-SOURCE | www.artisantg.com...
- Page 5 323561c.fm Page 4 Thursday, August 11, 2005 4:02 PM Complete the following steps to install the controller on the chassis. Make sure that no power is connected to the controller or the chassis. Align the controller with the chassis as shown in Figure 3. 1 Controller 3 Controller Slot 2 Captive Screws...
- Page 6 The controller has one layer of reversed-voltage protection. The power source © National Instruments Corporation cRIO-9002/9004 Operating Instructions Artisan Technology Group - Quality Instrumentation ... Guaranteed | (888) 88-SOURCE | www.artisantg.com...
- Page 7 323561c.fm Page 6 Thursday, August 11, 2005 4:02 PM you connect to the controller must provide an additional layer of reversed-current flow protection. Complete the following steps to connect power sources to the controller. Install a ferrite across the negative and positive wires for both the V1 and V2 terminals.
-
Page 8: Powering On The Controller
Use the Serial VIs to read from and write to the serial port. For more information about the Serial VIs, refer to the LabVIEW Help. © National Instruments Corporation cRIO-9002/9004 Operating Instructions Artisan Technology Group - Quality Instrumentation ... Guaranteed | (888) 88-SOURCE | www.artisantg.com... -
Page 9: Configuring Dip Switches
USER1 Figure 6. Controller DIP Switches All of the DIP switches are in the OFF position when the controller is shipped from National Instruments. cRIO-9002/9004 Operating Instructions ni.com Artisan Technology Group - Quality Instrumentation ... Guaranteed | (888) 88-SOURCE | www.artisantg.com... -
Page 10: Safe Mode Switch
IP address. You also can push this switch to the ON position to unlock a controller that was previously locked in MAX. © National Instruments Corporation cRIO-9002/9004 Operating Instructions Artisan Technology Group - Quality Instrumentation ... Guaranteed | (888) 88-SOURCE | www.artisantg.com... -
Page 11: Understanding Led Indications
323561c.fm Page 10 Thursday, August 11, 2005 4:02 PM No App Switch Push the No App switch to the ON position to prevent a LabVIEW startup application from running on the controller when the controller powers on. If you want to permanently disable the application from running when the controller powers on, you must disable it in LabVIEW. -
Page 12: Status Led
LED, use the RT LEDs VI in LabVIEW. For more information about the RT LEDs VI, refer to the LabVIEW Help. © National Instruments Corporation cRIO-9002/9004 Operating Instructions Artisan Technology Group - Quality Instrumentation ... Guaranteed | (888) 88-SOURCE | www.artisantg.com... -
Page 13: Specifications
323561c.fm Page 12 Thursday, August 11, 2005 4:02 PM Resetting the Network Configuration of the Controller If the controller is not able to communicate with the network, you can manually restore the unit to the factory network settings. When you reset the controller, the IP address, subnet mask, DNS address, gateway, and Time Server IP are set to . -
Page 14: Power Requirements
Torque for screw terminals ....0.5 to 0.6 N · m (4.4 to 5.3 lb · in.) Weight ............ Approx. 488 g (17.2 oz) © National Instruments Corporation cRIO-9002/9004 Operating Instructions Artisan Technology Group - Quality Instrumentation ... Guaranteed | (888) 88-SOURCE | www.artisantg.com... -
Page 15: Safety Voltages
323561c.fm Page 14 Thursday, August 11, 2005 4:02 PM Safety Safety Voltages Connect only voltages that are within these limits. V to C............35 V max, Measurement Category I Measurement Category I is for measurements performed on circuits not directly connected to the electrical distribution system referred to as MAINS voltage. -
Page 16: Shock And Vibration
50 g, 3 ms half sine, 18 shocks at 6 orientations Operating vibration, sinusoidal (IEC 60068-2-6)....5 g, 10 to 500 Hz © National Instruments Corporation cRIO-9002/9004 Operating Instructions Artisan Technology Group - Quality Instrumentation ... Guaranteed | (888) 88-SOURCE | www.artisantg.com... -
Page 17: Electromagnetic Compatibility
323561c.fm Page 16 Thursday, August 11, 2005 4:02 PM Electromagnetic Compatibility Emissions..........EN 55011 Class A at 10 m FCC Part 15A above 1 GHz Immunity ..........Industrial levels per EN 61326:1997 + A2:2001, Table A.1 EMC/EMI ..........CE, C-Tick, and FCC Part 15 (Class A) Compliant Note For EMC compliance, operate this device with shielded cabling. - Page 18 Connector 1 Connector 2 Pin 1 Pin 8 Pin 1 Pin 8 Figure 8. Ethernet Connector Pinout © National Instruments Corporation cRIO-9002/9004 Operating Instructions Artisan Technology Group - Quality Instrumentation ... Guaranteed | (888) 88-SOURCE | www.artisantg.com...
- Page 19 323561c.fm Page 18 Thursday, August 11, 2005 4:02 PM National Instruments Contact Information National Instruments corporate headquarters is located at 11500 North Mopac Expressway, Austin, Texas, 78759-3504. National Instruments also has offices located around the world to help address your support needs.
- Page 20 Instruments trademarks. Other product and company names mentioned herein are trademarks or trade names of their respective companies. For patents covering National Instruments products, refer to the appropriate location: Help»Patents in your software, the patents.txt file on your CD, or ni.com/patents.
- Page 21 Artisan Technology Group is your source for quality new and certified-used/pre-owned equipment SERVICE CENTER REPAIRS WE BUY USED EQUIPMENT • FAST SHIPPING AND DELIVERY Experienced engineers and technicians on staff Sell your excess, underutilized, and idle used equipment at our full-service, in-house repair center We also offer credit for buy-backs and trade-ins •...
Need help?
Do you have a question about the CompactRIO cRIO-9002 and is the answer not in the manual?
Questions and answers